How to Make Chocolate Bombs
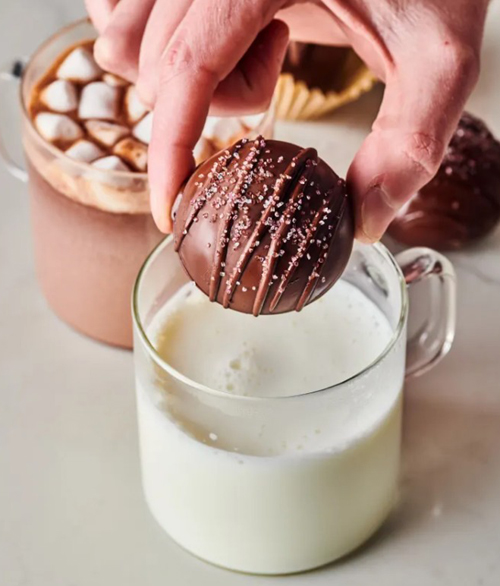
Hot chocolate bombs — also called hot cocoa bombs — are spheres of tempered chocolate filled with hot cocoa mix, mini marshmallows, and sometimes sprinkles. When added to hot milk, the chocolate spheres melt, releasing the cocoa mix and creating a tasty cup of hot chocolate.
Yes, you do have to temper your chocolate. Pure chocolate that is not tempered properly will be too soft. It will not come out of your mold. Yes, if you use a silicone mold you can push the soft chocolate shell out of the mold, but once your chocolate hardens and sits for a while it will bloom.
Higher-quality chocolate makes tempering much easier, such as Guittard chocolate wafers and Ghirardelli chips. Use your favorite store-bought or homemade hot cocoa mix.
Note: For the perfectly round hot chocolate bombs that float, sink, and then explode, you’ll need two (2-inch diameter) half sphere silicone mold trays with six cavities each. Smaller spheres don’t hold enough hot cocoa mix, and bigger spheres won’t fit in a standard mug.
Of all the ways to make hot chocolate bombs without a mold (a plastic-wrapped egg, empty plastic Easter eggs, an orange) and paper cupcake liners are by far the easiest with the best results. Avoid foil-lined liners — the chocolate will get stuck.
Here are some recipes for Boozy Hot Chocolate Bombs
Hot Chocolate Bombs Recipe
You will need 12 molds or cupcake liners to make the bombs, 6 total.
12 ounces high-quality semi-sweet chocolate bars or chips, such as Ghirardelli
1/4 cup hot cocoa mix
18 to 24 mini marshmallows
Sprinkles, for decorating (optional)
6 cups whole or 2% milk, for serving
Step 1: Temper the chocolate:
Set up a double boiler. Fill a 4-quart pot halfway with water and set over medium-high heat. Find a heat proof bowl that fits securely on top of the pot without touching the water.
Chop and temper the chocolate. If using bars, finely chop 12 ounces semisweet chocolate. Set 1/3 aside (about 4 ounces). Transfer the remaining 2/3 (8 ounces) to the bowl and fit over the double boiler. Melt the chocolate in the double boiler, stirring regularly with a heatproof spatula to help with melting and keep it from getting too hot. Keep an eye on the chocolate temperature — it should never get too hot to touch but you can check this using a digital probe thermometer — do not exceed 100° F.
Remove the bowl from the double boiler. Add the reserved chocolate in 3 increments, stirring until incorporated and melted after each addition. Continue mixing until the chocolate is between 88 and 91°F. You can check this with a digital probe thermometer or by touch — the chocolate should be about body temperature, so test on the back of your hand or wrist.
Step 2: Shape the Bombs
Coat the molds or paper cupcake liners with the tempered chocolate. Drop 1 tablespoon tempered chocolate into each well of 2 (6-count, 2-inch wide) half sphere silicone mold trays or 12 cupcake liners. Use a brush to spread the chocolate up the sides and to the very top of the molds.liners. Let sit at room temperature until the chocolate is hardened, 5 to 15 minutes. Brush the wells with more tempered chocolate to achieve a thick, even coating. Let sit at room temperature until completely hardened, 15 to 30 minutes.
Wearing latex gloves to avoid fingerprints, remove the chocolate cups from the molds.
Fill half the spheres with cocoa and marshmallows. Place 3 tablespoons of the cocoa mixture into each of the six chocolate hemispheres. Top each with 1 tablespoon of marshmallow bits.
Assemble Spheres. Wearing latex gloves, paint or pipe a border of melted chocolate onto the edges of the unfilled chocolate cavities and place them on the filled shells to assemble, pressing lightly to seal. If your melted chocolate hardens while waiting for the shells to cool, you can place it back on the double boiler to melt it again. Don’t let it sit over the heat for too long, keep it there until it has just melted again.
Refrigerate them until set.
Decorate (optional):
Before storing, you can decoratively drizzle the bombs with any remaining chocolate and add sprinkles to garnish if desired. Use gloves when decorating or moving the cocoa bombs to prevent fingerprints.
How to Serve Hot Chocolate Bombs
When you’re ready to serve the bombs, get your favorite milk boiling hot (the warmer the milk, the more dramatic the explosion will be). Pour the milk into your mugs, add a bomb, and watch with delight as the chocolate melts, making nearly instant hot chocolate. After the bomb melts, stir vigorously to incorporate into the milk. And because you’ve doubled down on the chocolate — cocoa mix inside a chocolate shell — the resulting cup of cocoa will be deliciously decadent!
Makes 6 hot chocolate bombs
Variations:
To Make peppermint hot cocoa bombs: To do so, simply fill the spheres with hot cocoa mix, 1 tablespoon of white baking chips and 1 tablespoon of finely crushed peppermint candies. Drizzle the outside with melted white chocolate that’s tinted pink and red and top with additional crushed peppermint candies.
To Make salted caramel hot cocoa bombs: Fill the spheres with hot cocoa mix, 1 tablespoon of caramel chips and a pinch of flakey sea salt. Drizzle the outside with melted dark chocolate and melted caramel chips then sprinkle with more flakey sea salt.
Storage: Store hot chocolate bombs in an airtight container at room temperature for up to 1 - 2 months.
Gifting: Use cupcake liners to hold the bombs for gifting and storing. Not only do they look cute, but they’ll also keep your perfectly tempered chocolate from getting damaged by fingerprints and will keep the bombs safe during transport.
Tempering chocolate is crucial for hot chocolate bombs, and while it has a reputation for being finicky, the method we’re using here, called the seeding method, is easy and utterly foolproof.
Tempered chocolate, or chocolate composed of a network of stable crystals, is what gives these bombs their shiny finish and snap.
- Melt two-thirds of the chocolate. Melting two-thirds of the chocolate on the stovetop in a heatproof bowl set over a pot of simmering water, or in the microwave in 30-second bursts. Melt the chocolate completely without exceeding 100°F. (If you don’t have a thermometer, use your fingertip as a guide. It should never be too hot to touch.)
- Add the rest of the chocolate in 3 batches. Remove the melted chocolate from the heat, and add the remaining chocolate in three batches, stirring until incorporated after each addition.
- Stir until chocolate is between 88 and 91°F. Keep stirring until the chocolate is between 88 and 91°F, or about body temperature.
- Test for temper. Test a bit of the chocolate before making the bombs by spreading a small amount on a piece of parchment paper should begin to set immediately. If it doesn’t, add more chopped chocolate, 1 tablespoon at a time, testing again after each addition.
