No-knead Dutch Oven Bread
Adapted from The New York Times article by Mark Bittman, Fall 2006. Bittman got the recipe from Sullivan Street Bakery
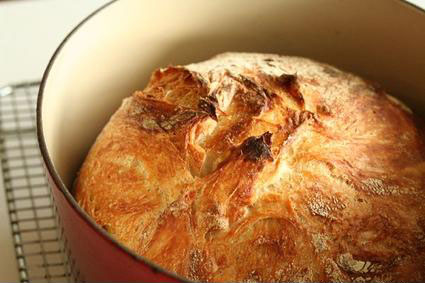
Over the years, ingenious home bakers have tried to replicate the humid conditions of a commercial oven by placing a pan filled with water at the bottom of the oven or by spritzing their loaves with water from time to time. An article in The New York Times that described a new bread-making technique, the results of which sounded too easy and too good to be true. Dubbed "no-knead bread," the method involves using wet dough, letting it rise over a very long time in lieu of kneading it, and cooking it in a hot Dutch oven (heavy covered pot). While the recipe calls for a slow fermentation process, its popularity proved an instant success.
Why Does the Dutch Oven Technique Work So Well?
The protein structure, or gluten, in baked breads is normally developed through lots of kneading. The Dutch oven technique requires no kneading, but the gluten does strengthen. Simply stretching and folding the dough in half a couple times throughout the rising, or fermentation, process strengthens its structure enough to allow a web of proteins to trap the gas produced by the active yeast. Allowing a long fermentation helps to trap even more gas, which creates the bread's volume. It also gives the loaf enough time to develop organic acids fully, which imparts fabulous flavor.
It's essential to have steam during the beginning of baking a loaf of bread. Yeast activity accelerates as soon as the bread enters the hot oven. If you put the dough in a dry oven, the crust sets immediately, preventing the yeast from expanding the bread. By using a covered Dutch oven with this wet dough, the all-important steam is trapped inside, surrounding the loaf. This keeps the crust soft and cool longer, allowing the yeast to go to work and the loaf to grow. Enzymes in the dough are also active at this time, particularly on the warmer surface, busily working to convert starches into dextrins and other simple sugars. These compounds contribute to crust coloration and flavor. Eventually (at about 140 degrees), the yeast die off. Then the starch granules absorb water, becoming swollen and glossy. This process is known as gelatinization, and lasts until the temperature is about 158 degrees.
By preheating the heavy Dutch oven before putting the loaf in, you replicate the direct heat of professional stone hearth ovens. The heat of a Dutch oven remains much more constant than the heat in a conventional oven. It also traps much more steam inside than can be achieved by putting a pan of water into a regular oven. Regular ovens vent, so it’s difficult to keep enough steam inside. Combined with a wet dough, the superhot pan traps plenty of humidity inside. Plus, the higher the internal temperature of the loaf, the more webbing and sheen will be created in the crumb.
When most of the moisture in the Dutch oven is absorbed, the crust reaches higher temperatures, becoming crisper and firmer. The sugars on the surface begin to brown, creating tremendous flavor. The loaf is finished uncovered to allow maximum heat and evaporation at the surface, and thus maximum development of the scrumptious crispy crust.
Recipe
1/4 tsp active dry yeast
1 1/2 cups warm water
3 cups all-purpose flour, plus more for dusting. You may use white, whole wheat or a combination of the two.
1 1/2 tsp salt
Cornmeal or wheat bran for dusting
In a large bowl, dissolve yeast in water. Add the flour and salt, stirring until blended. The dough will be shaggy and sticky. Cover bowl with plastic wrap. Let the dough rest at least 8 hours, preferably 12 to 18, at warm room temperature, about 70 degrees.
The dough is ready when its surface is dotted with bubbles. Lightly flour a work surface and place dough on it. Sprinkle it with a little more flour and fold it over on itself once or twice; it will be soft but not terribly sticky once dusted with flour. Cover loosely with plastic wrap and let it rest for about 15 minutes.
Using just enough flour to keep the dough from sticking to the work surface or to your fingers, gently shape it into a ball. Generously coat a clean dish towel with flour, wheat bran or cornmeal. Put the seam side of the dough down on the towel and dust with more flour, bran or cornmeal. Cover with another towel and let rise for about 1 to 2 hours. When it’s ready, the dough will have doubled in size and will not readily spring back when poked with a finger.
At least 20 minutes before the dough is ready, heat oven to 475 degrees. Put a 6- to 8-quart heavy covered pot (cast iron, enamel, Pyrex or ceramic) in the oven as it heats. When the dough is ready, carefully remove the pot from the oven and lift off the lid. Slide your hand under the towel and turn the dough over into the pot, seam side up. The dough will lose its shape a bit in the process, but that’s OK. Give the pan a firm shake or two to help distribute the dough evenly, but don’t worry if it’s not perfect; it will straighten out as it bakes.
Cover and bake for 30 minutes. Remove the lid and bake another 15 to 20 minutes, until the loaf is beautifully browned. (If at any point the dough starts to smell scorched, lower the heat a bit.) Remove the bread from the Dutch oven and let it cool on a rack for at least 1 hour before slicing.
Because the bread has such high water content- the crust will not stay crisp forever. If you aren’t eating soon, you can re-crisp the crust by re-heating it in a 350F oven for 10 minutes.
Yield: One 1 1/2-pound loaf
