Beginner’s Sourdough Bread
from https://www.theperfectloaf.com/
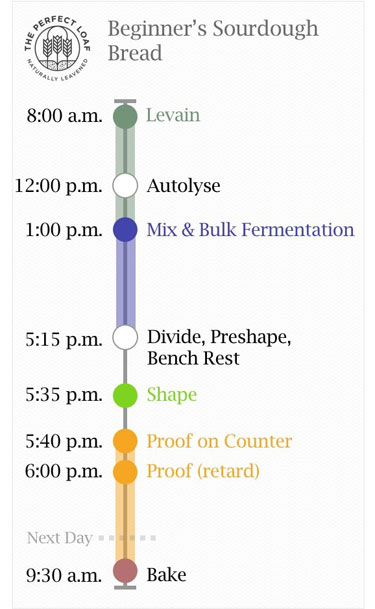
This beginner's sourdough bread is a two-day-long process where the bread is cold proofed (retarded) in the fridge overnight. The baking schedule to the right shows you a high-level view of what step takes place when throughout that 48-hour period.
Beginner's Sourdough Bread Method
1. Levain – 8:00 a.m. Remember: the levain is an off-shoot of your continually maintained sourdough starter and is likewise composed of bacteria and yeasts. This preferment is made well before mixing the dough, given time to ferment, and then eventually added to the dough to kickstart fermentation.
Mix the ingredients in a clean jar and leave it at warm room temperature, 74-76°F (23-24°C), for 5 to 6 hours. Keep an eye on how your levain is progressing during this time. When it's ready, it will be expanded, bubbly on top, inside, and at the sides, and have a slightly sour aroma.
2. Autolyse – 12:00 p.m. The desired dough temperature (DDT) for this dough is 78°F (25°C). As described in the temperature section above, we will try to get the dough to be at this temperature right at the end of mixing (which is also right at the beginning of bulk fermentation).
Warm or cool the autolyse water so the temperature of the mixed dough meets the FDT for this recipe. Place the flour and the water called for in a large bowl use wet hands to mix until no dry bits remain; the dough will be shaggy and loose. Use a bowl scraper to scrape down the sides of the bowl to keep all the dough in one area at the bottom. Cover the bowl and place it near your levain for 1 hour.
Note that the autolyse stage does not incorporate salt or the levain in any way since the autolyse is a long one hour. Adding the levain to the autolyse would mean fermentation would begin, which could end up overproofing the dough. Salt is rarely added to an autolyse because the salt would diminish enzymatic activity during this time, which is precisely why we are doing an autolyse. The autolyse and levain are two separate entities at this point that will be mixed together later in the process.
3. Mix – 1:00 p.m. At this point, your autolyse is complete and your levain is ready. If the dough feels very wet and shaggy, do not use all of the reserved 50g of water; use only a splash to help incorporate the salt and levain. If the dough feels good to you, use all the reserved water.
But first, use your instant-read thermometer to take the temperature of the dough and compare it to the FDT for this recipe. If it is higher, use cold water for the remaining water; if it is lower, use warm water.
To the autolyse, add the salt, reserved water, and levain. I like to spread everything on top of the dough and use wet hands to pinch all the ingredients together. Transfer the dough to a container or thick-walled bowl for bulk fermentation.
Take the temperature of the dough to get your final dough temperature. If your FDT is below 78°F (25°C), next time use warmer water, and conversely, if it’s above 78°F (25°C) use cooler water. Cover the dough.
4. Bulk Fermentation – 1:10 p.m. to 5:10 p.m. At 74-76°F (23-24°C) ambient temperature, bulk fermentation should go for about 4 hours. Perform 3 sets of stretches and folds during bulk fermentation, spaced out by 30 minutes.
Each set of stretches and folds consists of 4 folds: one each at the North, South, East, and West sides. Wet your hands with a little water to prevent sticking, and then lift one side (North) of the dough with two hands. Stretch the dough up high enough just so that you can fold it completely over to the other side of the dough. Rotate the bowl 180° and do the other side (South). Finish the other two sides (East and West) to complete the set. Let the dough rest for 30 minutes, covered, between sets.
After the third set of stretch and folds, let the dough rest for the remainder of bulk fermentation. During this time, fermentation continues, which aerates the dough (makes it rise), continues to strengthen it, and develops flavor further.
At the end of bulk fermentation, your dough should have risen anywhere between 20% and 50%. It should show some bubbles on the top and sides, and the edge of the dough where it meets the bowl should be slightly domed, which indicates strength. If you don’t see these signs, leave it for another 15 minutes in bulk fermentation and check again.
5. Divide & Preshape – 5:15 p.m. Lightly flour a work surface. Using a bowl scraper, gently scrape the dough onto the work surface and use your bench knife to divide the dough directly in half. Using your bench knife in your dominant hand, and the other hand wet (or floured, if you prefer) to reduce sticking, turn each half of the dough on the counter while lightly pulling the dough towards you. This gentle turning and pulling motion will develop tension on the dough's top, forming a circle.
Preshaping bread dough is an often overlooked step, but it sets the stage for successful shaping later. See my guide to preshaping bread dough for more information.
Let the dough rest for 25 minutes, uncovered.
6. Shape – 5:35 p.m.
7. Rest & Proof – 5:40 p.m. to 9:30 a.m. (next day) To prevent your dough from drying out overnight, place your bowls containing your shaped dough into reusable plastic bags and seal. I will usually puff up the plastic bag around the bowl by opening it wide and then quickly closing the opening.
Let the dough rest on the counter for 20 minutes. Then, retard in the refrigerator at 38°F (3°C) for 16 hours (overnight).
During this time, overall fermentation will slow (especially yeast activity), but bacterial activity will continue at a reduced rate, which will result in a more complex flavor and ultimately deeper crust coloring.
8. Bake – Next Morning: Preheat oven at 8:30 a.m., Bake at 9:30 a.m.
Place an oven rack in the bottom third of the oven with no rack above it. Put your combo cooker or Dutch oven on the oven rack, and preheat the oven to 450°F (232°C) for at least 30 minutes. If you’re using a combo cooker, place the shallow side face up on one side and the heavier, deep side face down on the other.
When your oven is preheated, take one of the proofing baskets out of the fridge, uncover it, and place a piece of parchment paper over the basket. Place a pizza peel, cutting board, or inverted baking sheet on top of the parchment and, using both hands, flip everything over. Gently remove the basket, and your dough should be resting on the parchment.
Using a razor blade, sharp knife, or baker’s lame, score the dough at a 90° angle between the blade and the dough. I chose to make a “box” pattern. If using scissors, snip the dough a few times at a very shallow angle between the scissors and the dough, forming a set of ridges down the dough's center.
While wearing your heavy-duty oven mitt, and with caution, pull out your shallow side of the combo cooker and place it on a heat-safe rack or stovetop. Slide the dough into the combo cooker or Dutch oven. Place it back into the oven and cover the shallow side with the deep side, or put the lid on the Dutch oven. This sealed environment helps trap the moisture (escaping steam) from your dough to steam the loaf exterior as it bakes, which encourages maximal rise and a crunchy, shiny crust.
Bake for 20 minutes. Vent the oven of steam: use your oven mitt to very carefully remove the top of the combo cooker or Dutch oven. Leave the large side of the combo cooker in the oven to the side. Close the oven door and bake for 30 minutes more. When done, the loaf should have an internal temperature of around 208°F (97°C), and the crust should be a deep mahogany color and crackle/crunch when squeezed.
Use your oven mitt to carefully transfer the bread to a wire rack. Let cool for 1 to 2 hours before slicing. For the second loaf, preheat the combo cooker or Dutch oven for 15 minutes and repeat.
Beginner's Sourdough Bread Recipe
The perfect bread to get started baking sourdough bread at home. This crusty, crunchy, and absolutely delicious loaf of bread is perfect for any lunch or dinner table.
Levain
38 grams stoneground whole wheat flour
38 grams bread flour
76 grams water
38 grams ripe sourdough starter
Main dough
773 grams bread flour
114 grams whole wheat flour
51 grams whole grain rye flour
18 grams fine sea salt
653 grams water (50g reserved)
Levain (8:00 a.m.)
In a small container, mix the levain ingredients and keep at 74-76°F (23-24°C) for 5 to 6 hours.
Autolyse (12:00 p.m)
In a medium mixing bowl, mix the flour and 603 grams water (50 grams is reserved until the next step). Cover and let rest for 1 hour.
Mix (1:00 p.m.)
To the mixing bowl holding your dough, add the salt, ripe levain (from step 1), and reserved 50 grams water. Mix by hand until incorporated. Transfer your dough to a bulk fermentation container and cover.
Bulk Fermentation (1:10 p.m. to 5:10 p.m.)
Give the dough 3 sets of stretch and folds at 30-minute intervals, where the first set starts 30 minutes after the start of bulk fermentation.
Divide and Preshape (5:10 p.m.)
Lightly flour your work surface and scrape out your dough. Using your bench knife, divide the dough in half. Lightly shape each half into a round shape. Let the dough rest for 25 minutes, uncovered.
Shape (5:35 p.m.)
Shape the dough into a round (boule) or oval (batard)—place in proofing baskets.
Rest and Proof (5:40 p.m. to 9:30 a.m. the next day)
Cover proofing baskets with reusable plastic and seal shut. Let the dough sit out on the counter for 20 minutes. Then, place both baskets into the refrigerator and proof overnight.
Bake (Preheat oven at 8:30 a.m., bake at 9:30 a.m.)
Preheat your oven with a combo cooker or Dutch oven inside to 450°F (230°C). When the oven is preheated, remove your dough from the fridge, score it, and transfer to the preheated combo cooker [or cast iron Dutch oven]. Place the cooker in the oven, cover with the lid, and bake for 20 minutes. After this time, remove the lid (you can keep it in the oven or remove it) and continue to bake for 30 minutes longer. When done, the internal temperature should be around 208°F (97°C). Let the loaves cool for 1 to 2 hours on a wire rack before slicing.
Notes
While the recipe calls for 16 hours of total proof time, you could extend this time and bake the loaves in the morning, afternoon, or even the evening on day two. Leave the proofing dough in the fridge until ready to bake.
Yield: 2 loaves
