My Best Sourdough Recipe (from The Perfect Loaf)
from https://www.theperfectloaf.com/, by Maurizio Leo
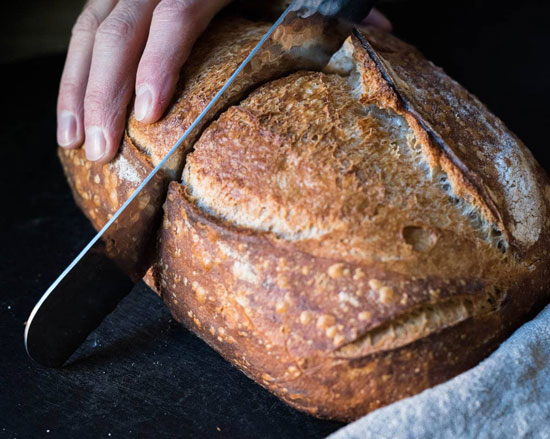
This bread was born when I first got my hands dirty with flour and water. Its parent—if you could call it that—was originally Chad Robertson’s Tartine loaf with his liquid levain, brought to life, not with intensive kneading, but rather a series of folds during bulk fermentation.
My best sourdough recipe has grown since then. It has developed a personality of its own as I’ve expanded my baking repertoire and investigated the many facets of baking naturally leavened sourdough. It’s taken on and lost traits from many great bakers out there, borrowing from their inspiration and giving me a direction to raise this bread into something of my own. This bread is one that doesn’t entirely taste like anything else I’ve had, and yet, still employs many of the same processes and ingredients.
This bread is the bread that I want to make the most often, the one my family asks for the most often, and the one I share most often.
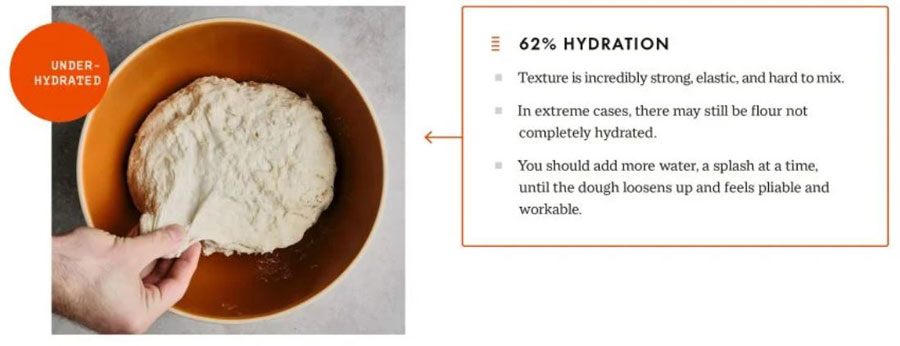
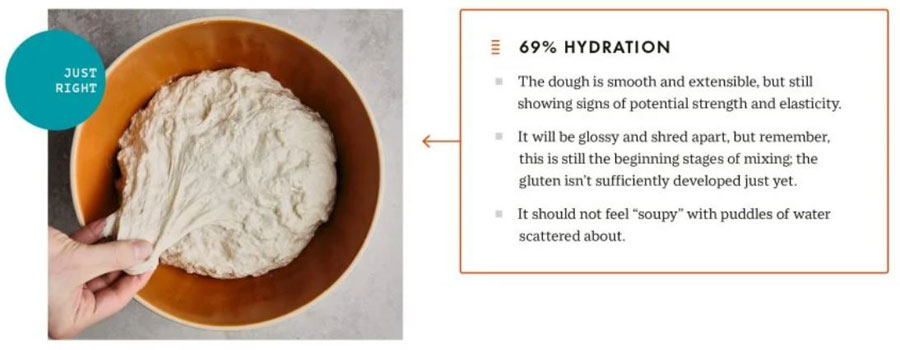
My best sourdough recipe is very highly hydrated (85.0%) and can be challenging. Feel free to adjust the hydration to suit your environment and flour; as we know, each bag of flour can be different. If you’re not used to working with high-hydration dough, please start with hydration somewhere in the middle and slowly work up.
Here are a few key things to successfully making this bread:
- An active starter
- An autolyse
- A high hydration
- Sufficient dough strength
- A warm and complete bulk fermentation
- A long, cold proof
The target final dough temperature (FDT) is 78°F (25°C). This dough loves a warm ambient environment. Try to keep the dough at the listed temperatures if possible.
[Temperature is one of the most important variables in making sourdough bread. It will affect how quickly your starter will rise and fall (or if it will rise and fall). The wild yeast in a sourdough starter love the temperature of 76-78 degrees Fahrenheit. This temperature is where those wild yeast – and the bacteria that make up a sourdough starter – are going to be the most active. If your starter/levain/dough is under 70 degrees, it’s going to take a lot longer for the fermentation process to take place. If your starter/levain/dough is in the high 80s, this fermentation process can move too quickly, resulting in an overly sour taste. I always shoot for 76-80 degrees F for the “room temperature” of my sourdough.
If your room temperature is lower that this, you can put your sourdough in the oven with the light on. Do not put the dough directly under the light. I did this and the temperature was in the 80s. I should check the temperature next time. I may want to put it in the oven, but leave the door open.]
Total Ingredients [cut recipe in half for 1 loaf]
| Weight | Ingredient | Baker's Percentage |
|---|---|---|
| 852g | Medium-protein bread flour (~11.5% protein, Giusto's Artisan Bread Flour) | 90.00% |
| 94g | Whole wheat flour (Giusto's Organic Stoneground Whole Wheat) | 10.00% |
| 710g | Water 1 | 75.00% |
| 95g | Water 2 | 10.00% |
| 17g | Salt | 1.80% |
| 30g | Ripe sourdough starter (100% hydration) | 3.20% |
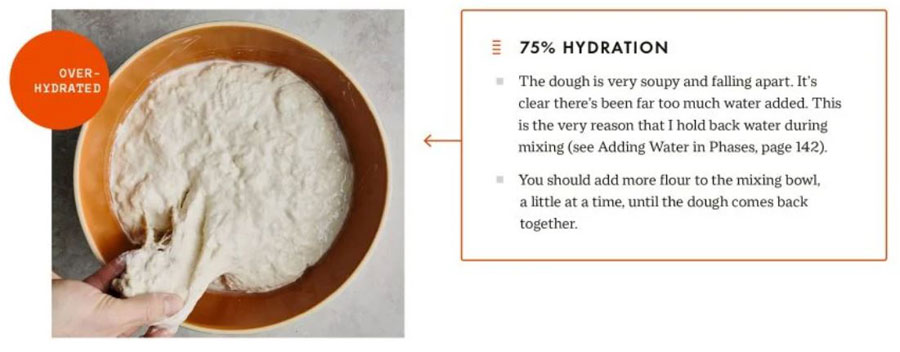
As I mentioned above, my best sourdough recipe is an extremely high hydration. If this is your first time working with this recipe, reduce the total water or hold water back during mixing to ensure your dough can handle the addition. The amount of water your dough will handle will vary based on your particular flour and environment—play it safe the first few bakes and work the water up gradually once you get a feel for the dough.
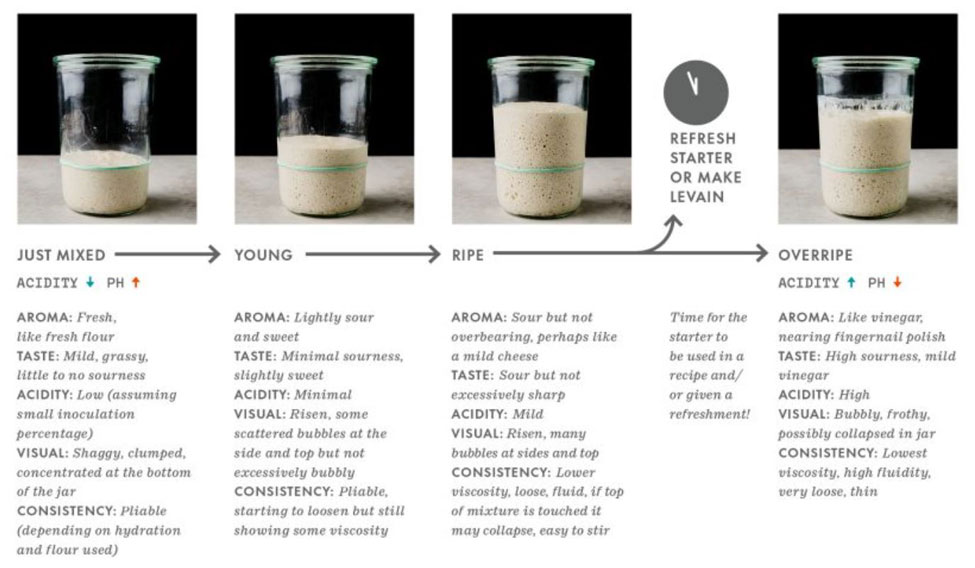
Start with a Ripe Starter (picture from The Perfect Loaf cookbook):
1. Levain – 9:00 a.m. [cut in half for 1 loaf]
Build the liquid levain in the morning and store somewhere warm around 77-80°F (25-26°C) ambient for 5 hours.
It's always an option to use your starter instead of making a levain. But, for most recipes, I prefer making a levain so I can control the flour going into the levain, the ripening timeline, and when I use it to mix into a dough—all of this without having to adjust my continually maintained sourdough starter.
[The ratio of sourdough starter to flour and water will determine the time it takes to peak.]
| Weight | Ingredient | Baker's Percentage |
|---|---|---|
| 30g [15g] | Ripe sourdough starter (100% hydration) | 50% |
| 30g [15g] | Medium-protein bread flour (~11.5% protein, Giusto's Artisan Bread Flour) | 50% |
| 30g [15g] | Whole wheat flour (Giusto's Organic Stoneground Whole Wheat) | 50% |
| 60g [30g] | Water | 100% |
Need a total of 151g [75.5g] for Step 3.
2. Autolyse – 12:00 p.m. [cut in half for 1 loaf]
Mix the flour and water in a bowl until all the dry bits are incorporated, then cover. Ensure all dry flour is hydrated—store near levain (we want the dough's temperature to remain warm). [This is the total amount of flour for the recipe. This mixture will be quite stiff as all the water has not been added yet. - Actually this depends on the flour. Flours with higher protein % can absorb more water than those with lower protein %.]
[The purpose of the Autolyse is to completely hydrate the flour and to start the developement of gluten.]
| Weight | Ingredient |
|---|---|
| 822g [411g] | Medium-protein bread flour |
| 64g [32g] | Whole wheat flour |
| 650g [325g] | Water 1 [for 75% hydration] |
3. Mix – 2:00 p.m. [cut in half for 1 loaf]
Add the following ingredients to your dough in the mixing bowl that underwent an autolyse. Add the water slowly [just add enough to moisten the salt], in stages, while you're mixing, and stop adding water if the dough feels excessively wet or soupy at any point.
| Weight | Ingredient |
|---|---|
| 95g [47.5g] | Water 2 (do not add all at once, dough may not need all) [will bring hydration up from 75% (Water 1) to 85%] |
| 17g [8.5g] | Fine sea salt |
| 151g [75.5g] | Ripe liquid levain [use sourdough starter instead, skip Levain, see above] |
Perform folds for about 2-3 minutes in the bowl. Grab under one side, pull up and over to the other side, then rotate the bowl a bit and repeat. I do this probably 30 times or so (it goes fast and easy). In the end, the dough should still be shaggy, but it will be more smooth and will start to hold itself together more in the bowl.
I find that the correct level of dough strength at this point is important. You want the dough to be smooth, elastic, and strong, but it doesn't have to be fully developed, and it will still be shaggy. We will continue to strengthen the dough through stretch and folds in bulk fermentation.
Transfer dough to a tub or thick-walled bowl for bulk fermentation.
4. Bulk Fermentation – 2:15 p.m. to 6:15 p.m.
As the term suggests, bulk fermentation is the time when dough is fermenting in bulk, or one large mass. It’s an important step in the bread-making process wherein the dough is strengthened, generates acidity (flavor), and rises. Skipping or shortening this step can result in underdeveloped flavors and an undesirably tight crumb structure.
At 78°F (25°C) ambient temperature, bulk fermentation should go for about 4 hours. Cover the bowl and place in a proofer or your oven with light on. Perform six sets of stretch and folds during the bulk. The first three are at 15-minute intervals, and the last three are at 30-minute intervals. After these folds (2 hours and 15 minutes have gone by), let the dough rest for the remainder of bulk fermentation.
I stretch and fold more vigorously at the beginning of bulk than usual since it is extraordinarily slack and extensible (due to this recipe's high hydration and autolyse). Pick up one side of the dough with both hands and pull it up, just before tearing, and fold it over to the other side. Rotate your container and repeat 4 or 5 times. That is one set. I find it's always beneficial to leave the dough gathered up neatly in the bulk fermentation container. This means the dough has a smooth surface on top with the sides tucked in and down. Cleanly bundled dough allows you to assess it better as it rises during bulk fermentation.
After about 2 hours. There is no significant rise as of yet, but the edges are beginning to dome downward, and the dough's texture is smoothing out slightly. We still have several more folds to do and more strength to build.
It is essential that the dough is kept near 78°F (25°C) as much as possible (minor fluctuations up and down are ok). If temperatures dip down too far, you might have to extend the bulk fermentation duration to compensate, and vice versa. Use your judgment, the signs described below, and be flexible.
Eventually, your dough reaches the sweet spot where it's strong enough, the ideal point at which it can rest for the remainder of bulk fermentation without intervention. What is the ideal dough strength anyway? There's no ideal; that's my imaginary point where I feel the dough is strong enough. The dough looks smoother, has defined edges, and (drastically) domes downward at the edges. You can feel that it's stronger just by looking at. A weak dough still looks shaggy and sloppy; it doesn't have sufficient structure.
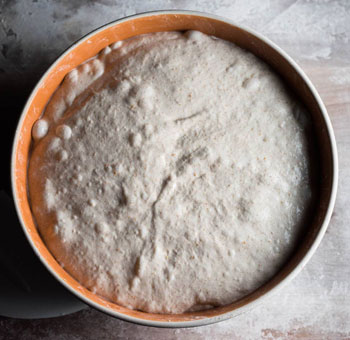
At the end of bulk, your dough should look very gassy, with some bubbles here and there, and the edges where the dough meets the bowl should be slightly domed. You can see all these signs in the image to the left.
When you gently shake the bowl, the entire mass jiggles from side to side—very alive. The dough is smoother and holds its edges, folds, and creases more readily (most of the bumps and ridges you see are due to trapped gasses from fermentation).
5. Divide & Preshape – 6:15 p.m.
Lightly flour the counter. Divide the dough into two halves and gently preshape each piece of dough into a round. Then, let the dough rest for 30 minutes, uncovered. Act quickly when handling this dough and rely heavily on your bench knife (scraper). I try to use my hands as little as possible when dealing with the dough at this point.
6. Shape – 6:45 p.m.
Have the banneton or the bowl that going to do the final proof in ready.
Lightly flour the top of your dough rounds and flour the work surface. With this recipe use a little more flour on the surface than normal, the dough will be extremely sticky and wet. Gently flip each round using a bench knife and shape into a batard or boule, whatever your preference. Handle the dough very gently and be careful not to deflate the dough.
- Fold the bottom up to about halfway.
- Fold the left side over to about 3/4 to the right.
- Fold the right side over to cover left.
- Stretch top up & away from the center and fold down to about half (you’ll now have a “letter”).
- Take the bottom and roll the package over.
- Use hands by rounding and pushing the dough around the bottom near the work surface to tuck the dough under iteself. Dough will tighten up and hold its shape and have a tight skin on top.
- Use bench scraper to move dough to proofing basket or bowl
Or, for a firmer dough you can flip the dough over, pull up two opposing sides and pull them to the middle. You are not degassing, just pulling the sides up. Keep going around the dough doing the same thing, like you are wrapping something up into a cloth bundle, until you have a nice round tight bundle. Flip over and shape as above to get a tight skin on top.
7. Proof – 7:25 p.m. to 9:00 a.m., the next day
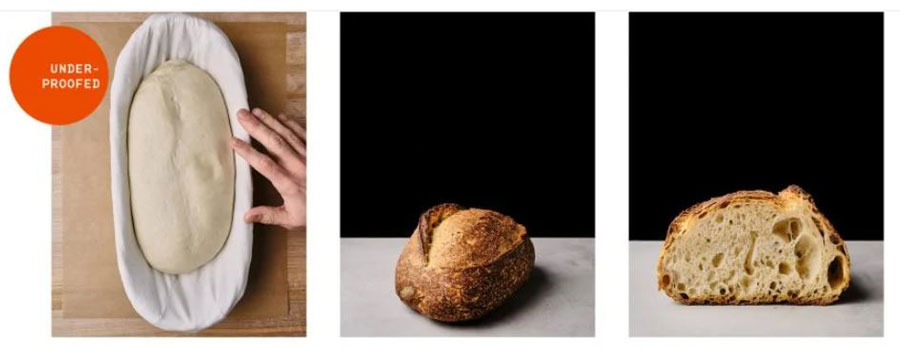
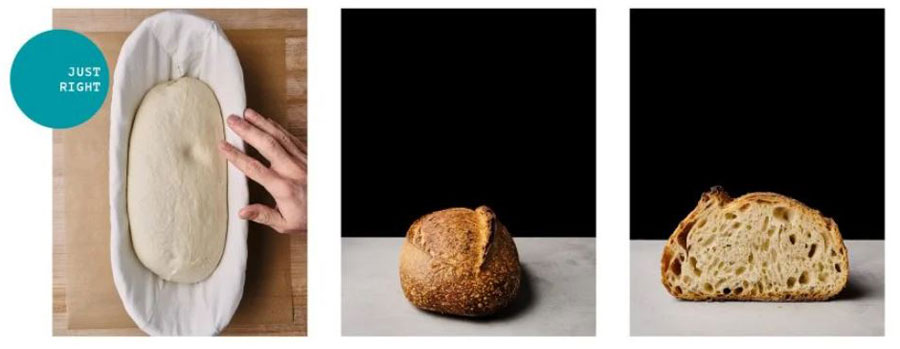
Gently place the dough into your bannetons. Cover your bannetons with plastic and place it in the refrigerator at 38°F (3°C) overnight.
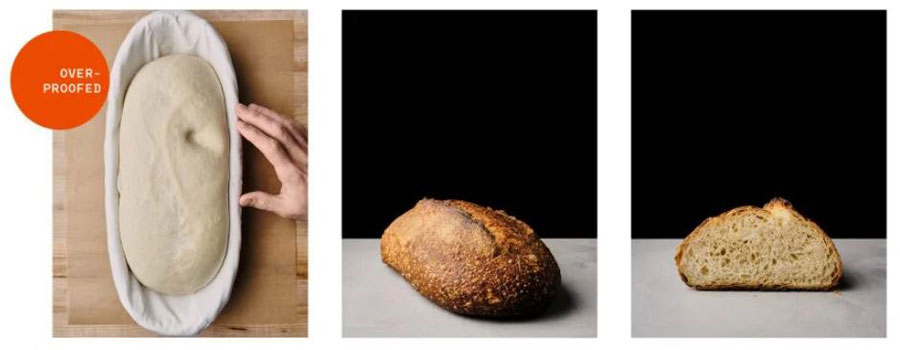
8. Bake – Next Morning: Preheat oven at 8:00 a.m., Bake at 9:00 a.m.
Preheat your oven to 450°F (230°C). Remove the dough from the fridge (there's no need to let the dough come to room temperature) and uncover. I scored the dough with a single, long slash to get that dramatic opening when baked. I keep the blade at a reasonably shallow angle so the taut skin created during shaping will “peel” back as the loaf rises.
You can add steam to your oven in your usual way, but you can also bake in a pot or Dutch oven that has been heated in the oven.
Bake for 20 minutes with steam, then remove your steaming pans if baking on a surface or Dutch oven/combo cooker lid. Then, bake for an additional 30 minutes until done to your liking. I like to bake rather dark, so I sometimes extend this second half of baking until I get the crust I'm looking for.
Once your loaf is done, remove and let cool on a wire rack for 1-2 hours. See my post on the best way to store the bread after it's baked for a few tips on keeping it on the counter and freezing if you think you won't get through both loaves in a week.
Makes 2 - 900g loaves [1.98 pounds each]
