Pennsylvania Dutch Hard Pretzels
from https://www.splendidtable.org/
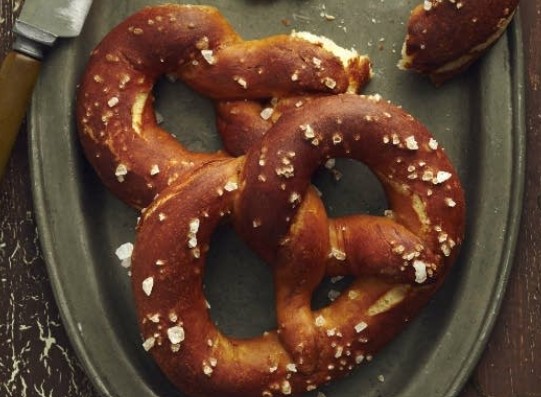
A happy culinary accident, hard pretzels are one of America's first salty, crunchy snack foods. Traditional recipes for hard pretzels are fat-free, but I find that a few pats of butter added to the dough lend the pretzels an extra-special crispiness and a savory flavor. If you prefer the drier crunch of the traditional style, omit the butter. For pretzel rods, see the variation at the end of the recipe. A good pretzel should have a dark brownish outer crust and a white inner crumb with small and finely distributed gas cells.
[Professional bakers put the pretzels in a drying oven after coming out of the baking oven, Foods are generally dried at a temperature of 150°F. Leave the oven door ajar so moisture can escape.
Industrial Pretzel Oven: "For baking pretzels, oven temperatures generally range between 400 and 600°F, and baking times from 1.5 to 5 minutes. As pretzels exit the oven, their moisture levels are between 8 and 15%. By combining an oven and dryer module, you can reduce the pretzel moisture to between 2 and 5%, depending on pretzel thickness.
The dryer operates at a low temperature (220 to 300°F). After baking, the product passes through the dryer for 5 to 50 minutes. This slow process enables moisture to escape through the pretzel’s hard shell before transferring the product to packaging. The very low moisture content gives the product a shelf life of up to 6 months."]
One 1/4-oz/7-g package active dry yeast (2 1/4 tsp)
1 cup/240 ml warm water (between 100 and 115°F/38 and 45°C)
1 tbsp barley malt syrup or 1 tbsp firmly packed dark brown sugar
3 1/2 cups/440 g unbleached all-purpose flour
2 tbsp unsalted butter, cubed, at room temperature, plus more for greasing the bowl
2 tsp fine sea salt, such as fleur de sel or sel gris
2 tbsp food-grade lye, or 1/4 cup/60 g baked baking soda (see separate notes, below)
Coarse salt for topping
[Make the baked baking soda. See instructions below]
Sprinkle the yeast over the warm water in the bowl of a stand mixer or in a large bowl. Add the barley malt syrup, stirring until it is dissolved. Allow the yeast to bloom until it is foamy, 5 to 7 minutes. Add the flour, butter, and fine sea salt and stir to form a shaggy mass. Attach the bowl and the dough hook to the stand mixer and begin kneading on medium-low speed. After about 1 minute the dough will form a smooth ball. The dough should be quite firm and may be slightly tacky, but not sticky. (If it is sticky, add a little more flour, about 1 tbsp at a time, and knead it in until the dough is smooth. If the dough is too dry to come together, add more water, 1 tsp at a time.) Continue kneading the dough on medium-low speed until it is elastic, 5 to 7 minutes. Alternatively, turn the shaggy dough out onto an unfloured work surface and knead it by hand.
Choose a bowl that will be large enough to contain the dough after it has doubled in size, and lightly grease it with butter. Transfer the dough to the greased bowl and cover the bowl tightly with plastic wrap. Put the dough in the refrigerator to rise for at least 8 hours, and up to 24 hours, for optimal flavor.
Line two 12-by-17-in/30.5-by-43-cm rimmed baking sheets with parchment paper; set aside.
Turn the dough out onto an unfloured work surface and press it down to deflate. Cut it into four equal portions, and divide each portion into six small chunks of dough. Work with one piece of dough at a time and keep the rest covered with a damp, clean kitchen towel. Pat a piece of dough down with your fingertips to form a rough rectangle. Roll it up tightly, beginning with a long side, into a cylinder. Shape the dough into a rope 18 in/46 cm long by rolling it against the work surface, using your palms and working from the center of the rope out to the ends. Apply a little more pressure as you get closer to the ends to taper them slightly. If you need more friction, spray the counter with a little water from a squirt bottle or drizzle a few drops of water and spread it with your hand. It is important that the dough be rolled out to the correct length, or it will be too thick to harden during baking.
Position the dough rope into a U shape, with the ends pointing away from you. Holding an end in each hand, cross the ends and then cross them again. Fold the ends down and press them into the U at about 4 and 8 o'clock, allowing about 1/8 in/3 mm of the ends to overhang. Place the pretzel on one of the prepared baking sheets and cover it with a damp towel. Repeat this process with the remaining dough, arranging the pretzels at least 1 in/2.5 cm apart and covering them with a damp towel.
When the first baking sheet is filled with twelve pretzels, transfer it to the refrigerator while you shape the rest of the pretzels to prevent the first batch from overproofing. When all the pretzels are shaped, leave both trays, covered, at warm room temperature to rise until the pretzels have doubled in size, 30 to 40 minutes. (The pretzels can be refrigerated at this point, covered tightly with plastic wrap, for up to 8 hours before dipping and baking them.)
At least 20 minutes before baking, position one rack in the upper third and another rack in the lower third of the oven and preheat it to 325°F/165°C/gas
Using the lye or baked baking soda solution, dip the pretzels following the instructions for (see separate notes*), working in batches of four to six pretzels at a time, depending on the size of your pot. After dipping, sprinkle the pretzels with coarse salt. Bake them immediately. [Due to my experience with bagels, I would let them drain on a cookie rack for a few seconds, sprinkle with salt, and continue to drain for a few minutes.]
Bake the pretzels for 25 minutes, and then rotate the pans from front to back and top to bottom. Continue baking until the pretzels are mahogany in color and completely hard throughout. This could take anywhere from 25 to 40 minutes more, but rely on the visual and textural cues rather than the time. To test a pretzel for doneness, remove one from the oven and break it in half. If the center is still a little chewy, continue baking. If the color is deep brown but the pretzels are not done inside, remove the trays from the oven and allow them to cool to room temperature while you reduce the oven temperature to 300°F/150°C/gas 2. [Place on wire mesh for drying.] f v tReturn the pretzels to the oven to finish hardening to a crisp. Test a pretzel after about 10 minutes, and in 5-minute increments after that. When they are hard, transfer the pretzels to a cooling rack. Once they are completely cooled, store them in an airtight container for up to 2 weeks.
To store the pretzels, allow them to cool completely and then wrap each one individually in plastic wrap. Store them at room temperature for up to 2 days, or put the plastic-wrapped pretzels in a resealable plastic freezer bag and freeze them for up to 1 month. Reheat the pretzels in a 350°F/180°C/gas 4 oven for about 5 minutes, or for 10 to 12 minutes if frozen.
Yield: Makes 24 classic pretzels
*Dipping Pretzels in an Alkaline Solution:
Dipping pretzels in a solution of a small amount of food-grade lye dissolved in water gives them that unique pretzel flavor. Unfortunately, food-grade lye is unavailable in most retail stores, making it difficult to source and use for home cooks. That's why most recipes for homemade pretzels substitute baking soda (which is much less alkaline), but the pretzel flavor and the quality of the crust are substandard with this method. In 2010 the esteemed food scientist Harold McGee wrote a story for the New York Times in which he explained that the chemical properties of baking soda can be altered, causing it to behave in a similar way to lye, if it is baked in an oven at a low temperature for an hour or so. I have found this to be true. Still, there is no replicating that genuine pretzel-y quality that a lye dip imparts, so in this book both options are offered [instructions for lye solution omitted here]. I prefer the lye method and always have lye on hand, but I also thoroughly enjoy pretzels made with a baked baking soda substitute. See following for instructions.
Baked baking soda method
An alternative to working with lye is to dip pretzels in a simmering [not boiling] baked baking soda solution, which will give you a result that is close to the dark, burnished crust that lye imparts. If you prefer to avoid working with lye, or just don't have time to source it, use this method.
To make the baked baking soda solution: First, you must bake the baking soda. This step should be done while the pretzels are undergoing their first rise, if not earlier. Preheat the oven to 250°F/120°C/gas 1/2. For one batch of pretzels, spread out 1/4 cup/70 g of baking soda on an aluminum pie pan or a small rimmed baking sheet covered with aluminum foil. Bake the baking soda for 1 hour. The baking soda will lose weight as it bakes but maintains about the same volume, so you should end up with about 1/4 cup/60 g of baked baking soda. [Do not touch the soda once baked.] Allow it to cool completely, and then keep it in an airtight container at room temperature until you are ready to make pretzels. (If you see more than one batch of pretzels in your future, consider baking a whole box of baking soda in one shot, since it keeps indefinitely. Sift baked baking soda before using, as it cakes after prolonged storage.) Select a large stainless-steel pot and fill it with 8 cups/2 L of water. Be sure to choose a pot that is at least a finger's length wider than the diameter of the pretzels and tall enough so that the water comes up no more than 2 in/5 cm from the rim. (Avoid other metal surfaces, such as aluminum and copper, and nonstick surfaces, which may react with the baked baking soda.) Pour in the 1/4 cup/60 g of baked baking soda, and bring the liquid to a simmer over medium-high heat. Once the baking soda dissolves, reduce the heat to medium to maintain a gentle simmer. Before baking, brush the tops of the pretzels lightly with an egg wash of 1 egg yolk, beaten with 1 tbsp of water. This will give them a glossy finish.
Dipping
Use the lye solution or baked baking soda solution.
Use a large skimmer to gently dip the pretzels in the lye or baked baking soda solution, one or two at a time. Leave them in the solution for about 20 seconds, carefully turning once after 10 seconds. Remove the pretzels from the liquid, drain, and return them to the baking sheets, spacing them at least 1 in/2.5 cm apart. If the ends come detached, simply reposition them. Repeat with the remaining pretzels.
