Rye Sour Starter (for Jewish Rye Bread)
from Arthur Schwartz’ Jewish Home Cooking
This sour starter is used for making Jewish rye bread. The recipe takes 2 to 3 days.
The book recommends using white rye flour, which can be purchased from King Arthur Flour.
Another technique for making a Rye Sour Starter from potatoes can be found in the New York Deli Rye recipe.
When preparing Stages One and Two, the object is to make a thick consistency as close as possible to that of a soft dough. If the mixture is too soupy, add more flour 1/4 cup at a time and mix until smooth. It is recommended that Stage One and Two be made on the same day, the second stage refrigerated overnight, and the third stage prepared the morning of baking. If you intend on baking the bread first thing in the morning, then prepare the third stage the evening before, so it can rise slowly all night and be ready in the morning.
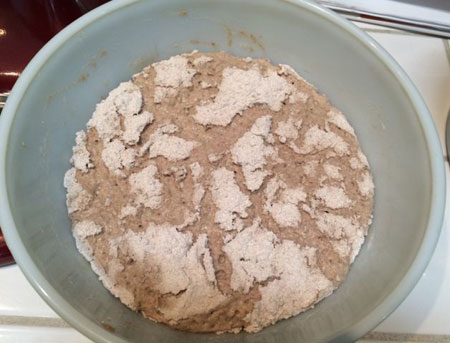
Ripe Rye Sour Starter - use immediately
It should nearly double in volume and be bubbly.
Rye Sour Starter:
1/2 cup rye flour
1/8 teaspoon active dry yeast
1 cup warm water (110 degrees F)
1 tablespoon crushed caraway seeds
1 teaspoon minced onion
Stage One:
1/2 cup water
1 1/4 cups rye flour
1 recipe Sour Starter
1/4 cups rye flour
Stage Two:
1/2 cup warm water (110 degrees F)
1 cup rye flour
Stage Three:
1/2 cup water (use warm water if sour has been refrigerated)
1 cup rye flour, or more
Begin the Rye Sour Starter: Combine all the ingredients in a large bowl and mix until smooth. The mixture should have a thin, soupy consistency. Cover and allow to stand in a warm spot until bubbly and fermented. It can be left up to 24 hours.
Rye Sour, Developing and Fortifying: In making sour use approximately 3/4 to 1 cup flour to each 1/2 cup water. (Notice that Stage One calls for a higher ratio. This is done to adjust for the initial consistency of the starter.) The object is to make a thick consistency as close as possible to that of a soft dough. It is not necessary to thicken to the point that the mixing becomes burdensome. If the mixture is too soupy, add more flour 1/4 cup at a time. Mix until smooth.
Prepare Stage One: In a large bowl or container, combine the water, 1 1/4 cups of the flour, and the Starter; stir until smooth. The dough should pull slightly and may start to come away from sides of the bowl. Wipe down the sides of the bowl with wet hands or a bowl scraper. Sprinkle 1/4 cup flour over the entire surface of the sour. Let stand, covered with a cloth or clear plastic wrap, until doubled in size and the floured top appears cracked with fissures spread widely apart. This may take 4 to 8 hours. Avoid letting the sour collapse.
Prepare Stage Two: To the Stage One sour add the water and 3/4 cup of the flour; mix until smooth. Wipe down the sides of the bowl. Sprinkle the remaining 1/4 cup flour over the entire surface of the sour. Allow to rise in a warm area 4 to 8 hours.
As the sour begins to rise, you can refrigerate it at any stage for later use or overnight for mixing the following day. Refrigeration retards the rate of growth of the sour, which continues to rise slowly. Whenever time permits, I prefer to make two stages the day before, refrigerating the second stage overnight and preparing the third stage the morning of baking. If the dough is to be mixed first thing in the morning, the third stage is prepared the evening before, so it can rise slowly all night and be ready in the morning.
Prepare Stage Three: To the Stage Two sour add the water and the 1 cup flour. Mix until smooth. Additional flour can be added to attain a dough-like consistency. The sour, when fully risen in Stage Three, is ready for use in the dough. When the third stage is mixed, set aside 1/4 to 1/2 cup and refrigerate in a covered container with a light film of cold water floated over the top. I have kept sour under refrigeration for months at a time.
It is best to stir down the starter every 3 to 4 days if unused. Periodically (every 10 to 12 days) dispose of half and refresh it by mixing in equal amounts of flour and water. If there is some discoloration on the top, it can safely be skimmed off and the sour used as normal. When going away for long periods of time, I freeze a small amount of sour. When preparing a new starter from scratch, I add the frozen sour to preserve my original culture. To ensure the proper strength of the sour, in each stage you can only double the amount of starter you begin with. For example, if beginning with 1/4 cup starter, you can add up to 1/2 cup water plus flour to thicken. If Stage One contains 1 cup sour, Stage Two can be prepared with up to 2 cups water plus flour. If a large amount of sour is required, extra stages can be added.
Sometimes the process goes awry. Perhaps there is insufficient sour left to start the next batch, or the sour might have been forgotten and was left standing to get old or dry. There is a remedy. The bakers call it an einfrisch, meaning to refresh. A small amount of sour is thinned down with water to a soupy consistency. Swishing 1/4 cup water around in what remains clinging to the sides of the empty bowl can yield enough to restart the sour. Let this einfrisch stand, covered, at room temperature or in a warm spot until bubbly. If desperate, add a pinch of yeast. When ready, add enough flour to make a first stage, allow to rise, and proceed with two more stages.
