Salt Rising Bread
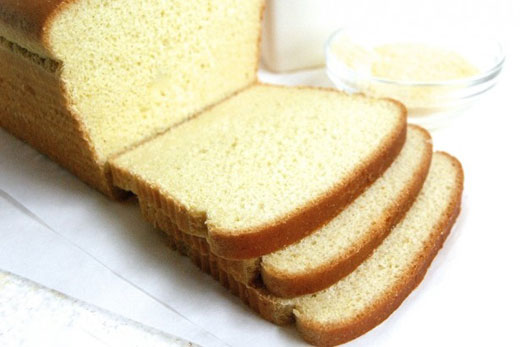
The origins of salt-rising bread are unclear but seem to lie in the nineteenth-century American frontier (c. 1830s to 1840s), where it was likely difficult to obtain fresh yeast or keep a bread starter cool and regularly fed. The salt-rising process produces a leavened loaf from grains and water in about eighteen hours. The name is misleading, because salt doesn't play a major role. The real key to the process is heat: scalding-hot liquid to start with, then a feverish but perfringens friendly 100 to 115 degrees Fahrenheit for the starter, sponge, and dough.
All of the old recipes say, "Set the rising in a warm place overnight." A warning -- this sounds very easy! It is not so simple! However, this step is, in fact, the key to having success making salt rising bread! You must keep and maintain the temperature of your rising at an even, warm temperature (between 90 - 110 degrees F) for 8-16 hours or the rising will not "work." When our grandmothers and great grandmas were making Salt Rising Bread, it was simple to set the starter in a warm place overnight. Many had wood cookstoves which held heat the whole night through. Often, women would set their jar or crock of rising over the hot water reservoir located in their wood burning cookstove, where the embers of the previous day's fire would hold just the right amount of heat in the water for the rising to foam during the night. Other times, they would set their rising above the stove in the warming cupboards, which were also heated from the fire of the cookstove.
The fermentation loss in Salt Rising Bread is less than one half of one percent. There are several reasons for the extremely small fermentation loss in Salt Rising Bread. First, salt rising fermentation does not produce any alcohol or other highly volatile substances which evaporate. Secondly, salt rising fermentation produces mostly hydrogen gas, which is 22 times lighter than carbon dioxide. Very little gas is wasted in Salt Rising Bread. Thus, the salt rising sponge should be taken when it first begins to drop. The bacterial ferment will work itself out if the sponge is over-aged, and the bread will not rise properly in the pans. Salt Rising Bread dough should be made into loaves and put into pans immediately after mixing. Do not slash the top of the loaf.
One poster at a web site said, "I have tried on several occasions to make a starter but the bread was never as I remembered it. I think I've found my solution. Remember to use germinated corn meal in the starter. Most of the corn meals in your grocery are degerminated and will not do. You may have to go to an organic type grocery to find the germinated corn meal. This one change made a difference for me.."
Also see The Disquieting Delights of Salt-Rising Bread and Early Salt Rising Bread Recipes
The first recipe below from King Arthur Flour uses cornmeal for the salt rising bread starter; the one from James Beard uses potatoes.
Classic American Salt-Rising Bread: A Tasty Journey into The Past
from http://www.kingarthurflour.com/, recipe courtesy of the late Bernard Clayton
If you're neither a passionate bread baker, nor a resident of certain parts of the country – the southern and western portions of the Appalachians, western New York down into western Pennsylvania, and parts of Michigan - you have probably never heard of Salt Rising Bread. This traditional American bread remains popular in these regions, where it's often sold in bakeries.
Salt Rising Bread is a fairly dense, fairly moist, very close-grained white bread, with a distinctive "cheese-y" flavor. It makes wonderful toast. But its most salient characteristic? It's not made with yeast. And, contrary to its name, it doesn't rely on salt for rising; in fact, this bread has less salt than many standard breads.
Salt-rising bread had its American origins back in the early 1800s, when commercially produced yeast wasn't available. Housewives found that a mash of cornmeal and milk (and/or potatoes) could produce a bubbly substance that could then be used to raise bread.
The "starter" was tricky, though, needing consistent warmth to work; it's thought that perhaps "salt-rising" refers to the rock salt that pioneer women might have heated and piled around their starter, to keep it warm.
These days, those of us experimenting with salt-rising bread find ourselves with the same challenge as our forebears: how to keep the starter warm for the 12 to 18-hour, two-stage process it needs to leaven bread.
Heating pad, top of the fridge, near the wood stove, over a heating grate… all of these are imperfect solutions. (I know, I've tried them.) But now, I've found the perfect tool for not just salt-rising bread, but all kinds of yeast breads, plus sourdough starter and yogurt, too.
This "climate controlled" electric proofer offers temperature settings from 70°F-120°, plus a water tray for optimum humidity. If you're a baker who struggles to find a cozy place in the house for rising bread or feeding sourdough (or salt-rising starter and bread), you might consider this tool.
But don't worry; while this proofer makes the whole process a lot simpler, I've found another "hot spot" in my house; and it's hopefully one that'll work for you, too.
If you've never made salt-rising bread, please be prepared to trust me through some of the following procedures. Yes, it's very important to keep the starter warm. Yes, it's supposed to smell that way. The bread's aroma is redolent of cheese, though there's no cheese in involved; the flavor comes from the slight fermentation of the ingredients during the bread's preparation.
Speaking of fermentation, be prepared; the starter and dough will smell like… dirty socks? Old sneakers mixed with Parmesan cheese? Somewhat unpleasant, anyway, but please bear with me – it's just the enzymes and bacteria doing their jobs and giving the bread its special qualities. If you've ever made cheese or yogurt, you know exactly what I'm talking about.
OK, let's get started here, shall we? This bread is built in stages.
This recipe comes to us courtesy of the late Bernard Clayton, a fine gentleman and author whose books we've long admired. We've made a few minor changes, but a very similar version of this recipe appears in Bernard Clayton's New Complete Book of Breads. Clayton, in turn, cited its publication by the Ladies Aid Society of the First Presbyterian Church of Polson, Montana, in 1912. Now, we're pleased to pass it along to you. This traditional American bread recipe, made without yeast, is worth saving — and savoring.
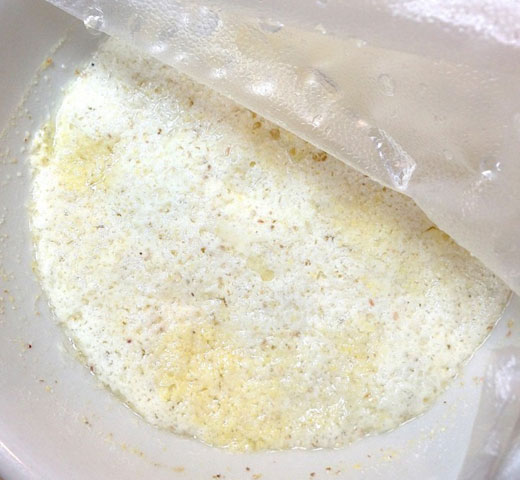
Starter Stage 1
First stage: starter #1
1/4 cup milk (skim, 1%, 2% or whole)
2 tablespoons yellow cornmeal
1 teaspoon sugar
Heat 1/4 cup milk until it's nearly but not quite boiling; small bubbles will form around the edge of the pan (or microwave container), and you might see a bit of steam. This is called "scalding" the milk.
Cool the milk until it's lukewarm, then whisk together the milk, 2 tablespoons cornmeal (yellow is traditional), and 1 teaspoon sugar in a small heatproof container. The container should be large enough to let the starter expand a bit.
A note on cornmeal: while you can certainly use "supermarket" cornmeal, organic is probably preferable, since it comes with additional "friendly bacteria."
Cover the container with plastic wrap, and place it somewhere warm, between 90°F and 100°F. The bread proofer mentioned above is ideal for this, since you can set the exact temperature you want.
I find my turned-off electric oven, with the light turned on for about 2 hours ahead of time (and then left on throughout the starter's time in the oven) holds a temperature of 95°F to 97°F, perfect for this starter.
I tried a heating pad covered by an overturned bowl, but it didn't work. Before you even start this process, find someplace reliably warm for the starter; if you can't find someplace that'll stay warm for up to 12 hours at a time, it's best not to try this recipe.
Let the starter rest in its warm place overnight, or for 8 to 12 hours.
The starter won't expand much, but will develop a bubbly foam on its surface. It'll also smell a bit fermented. If it doesn't bubble at all, and doesn't smell fermented, your starter has failed; try again, using different cornmeal, or finding a warmer spot.
Next, we'll build on this first starter; let's call this starter #2.
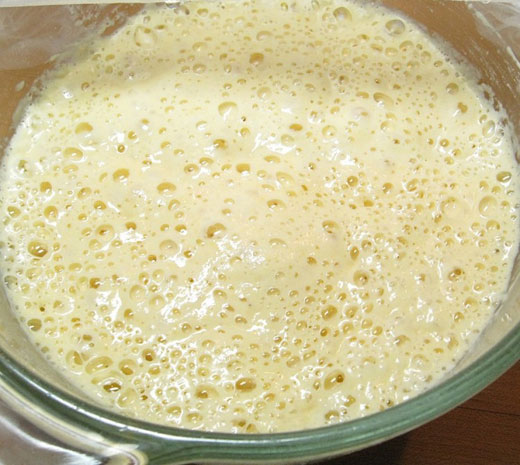
Starter Stage 2
Second stage: starter #2
Combine the following:
1 cup hot water (120°F to 130°F)
1/2 teaspoon salt
1/2 teaspoon baking soda
1/2 teaspoon sugar
Add 1 1/2 cups (6 1/4 ounces) King Arthur Unbleached All-Purpose Flour, stirring until everything is thoroughly moistened.
Stir starter #1 into starter #2.
Cover the bowl with plastic wrap, and place it in the same warm spot starter #1 was in. Let it rest until very bubbly and doubled in size, 2 to 4 hours.
Success!
If the starter's not showing any bubbles after a couple of hours, move it somewhere warmer. If it still doesn't bubble after a couple of hours, give it up; you'll need to start over.
If the process isn't working for you, don't be too discouraged; even our pioneer forebears found this bread notoriously fickle, working perfectly one day, not so well another. Personally, I think it's all about finding a spot that's reliably warm, between 90°F and 100°F.
Mix the Dough
Transfer your bubbly starter to a larger bowl, or the bowl of a stand mixer (or your bread machine bucket).
Add the following:
4 tablespoons soft butter
1/2 teaspoon salt
2 1/4 to 2 1/2 cups (9 1/2 to 10 1/2 ounces) King Arthur Unbleached All-Purpose Flour
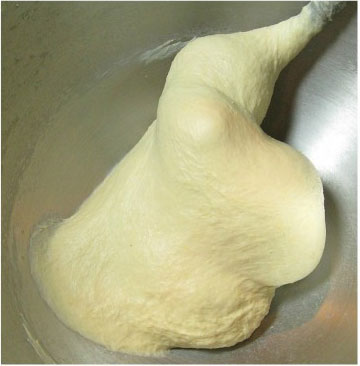
Mixing the dough
Start with the smaller amount of flour. In the depths of summer, when your kitchen is hot and humid, you may need to use more. But usually you'll only need about 2 1/4 cups to make a dough that's cohesive and elastic yet still a bit sticky, as pictured.
Knead everything until smooth; this took 7 minutes at medium speed in my stand mixer. The dough will be soft, and fairly elastic/stretchy.
Shape the dough into a log, and place it in a lightly greased 8 1/2 x 4 1/2" loaf pan.
Cover the pan, and place it back in its warm spot. Let the loaf rise until it's crowned about 1/2 to 3/4" over the rim of the pan, which could take up to 4 hours or so.
This won't form the typical large, domed top; it will rise straight up, with just a slight dome.
Towards the end of the rising time, preheat the oven to 350°F.
Bake the bread for 35 to 40 minutes, until it's nicely browned. Again, it won't rise much; that's OK.
Remove the bread from the oven; if you have a digital thermometer, it should read about 190°F to 200°F at its center. Wait a couple of minutes, then turn it out of the pan onto a rack to cool.
Run a stick of butter over the bread's surface, if you like; this will add flavor, and a lovely golden sheen.
Here comes the hard part: DO NOT slice the bread until it's completely cool! You'll make the loaf gummy if you do. And after all you've been through to get to this point, you surely don't want impatience to get the better of you now.
Once it's cool – enjoy! Toast it. Use it for sandwiches. Make grilled cheese. This bread keeps quite well at room temperature for 5 to 7 days; if there's any left over after that, it's best to wrap it tightly and stow it in the freezer.
Makes 1 loaf
Jame Beard's Salt Rising Bread
from Beard on Bread, by James Beard (1973)
For the Salt-Rising Starter:
1 1/2 cups hot water
1 medium potato, peeled and sliced thin
2 tablespoons white or yellow cornmeal
1 teaspoon granulated sugar
1/2 teaspoon salt
Mix the starter ingredients and pour into a 2-quart jar or deep bowl that has been rinsed well with hot water. Cover with a lid or plate. Put the jar into a larger bowl or pan and surround with boiling water. Cover the large bowl with plastic or a towel, and cover this with three or four towels or a blanket. It should stand at a temperature of 100° degrees when the mixture is finally foaming. The electric oven turned to warm will provide the right temperature, and so will a gas range with a pilot light on. In either case, let the starter stand about 12 hours, or until the top is covered with 1/2 to 1 inch of foam. Sometimes it will take longer to foam, even 24 hours, but continue to keep it warm.
For the Bread:
Liquid from starter (see above)
1/2 cup warm water (100° to 115°, approximately)
1/4 teaspoon baking soda
1/2 cup undiluted evaporated milk or 1/2 cup lukewarm whole milk
1 tablespoon butter
1 teaspoon salt
4 1/2 to 5 1/2 cups all-purpose flour or hard-wheat flour
Let the liquid from the potato drip through a strainer into a mixing bowl, and then pour the warm water through the potatoes, pressing out as much liquid as possible. Discard the potatoes. Add to the drained liquid the soda, milk, melted butter, and salt, mixing well. Stir in the remaining flour, a cup at a time, until a soft dough is formed, using up to 4 1/2 cups. Put a cup of flour on the bread board and turn the dough onto it. Sprinkle a little of the flour on top of the dough and knead lightly for 10 to 12 minutes, or until the dough is smooth but still soft. Divide the dough and shape into two loaves (this bread does not have a rising between the the kneading and the shaping). Place in well-buttered bread pans, brush the top of each loaf with melted butter, cover, and place in a warm, draft-free place to rise until doubled in bulk. (This will take longer than regular bread - as long as 4 to 5 hours, maybe more.) Bake in a preheated oven at 350° for 35 to 45 minutes, or until loaves shrink from the sides of the pans. Remove from pans to cool.
