Tempering Chocolate
One web site gave this advice: All chocolate that is available to the public is tempered and ready to eat. The trick is to melt the chocolate without un-tempering it.
The easiest way to accomplish this is to melt your chocolate in a Bain Marie over a low heat. Don’t try to rush this part of the process because if your chocolate gets too hot, it will lose temper and then you will have to go through a rather elaborate process to re-temper it. If you happen to have an instant read thermometer, and you should always have one handy, do not let the chocolate go higher than these temperatures.
- Dark Chocolate – No higher than 90 degrees Fahrenheit
- Milk Chocolate – No higher than 89 degrees Fahrenheit
- White Chocolate – No higher than 88 degrees Fahrenheit
The reason we want the chocolate to keep temper is that tempered chocolate sets quickly without streaks of cocoa butter and is hard and shiny. Un-tempered chocolate will set slowly, have pale streaks of cocoa butter, and will be soft and dull.
If you need to temper your chocolate, see the techniques below.
Stella Parks in her book, BraveTart: Iconic American Desserts, gives this advice:
Tempering Chocoate: Just think of it as a stick of butter. Soft butter can be put in the refrigerator and it thickens again, but if it is melted, it is not so flexible. Butter turns into milky layers of fat and water as it cools, and no amount of stirring will change it back.
Chocolate faces the same problem, but at a lower point of no return: just 92 degrees F. Overheated chocolate turns mealy and soft as it cools, swirled with streaks of gray. Like the milk solids that float to the top of melted butter, cocoa butter rises to the surface of melted chocolate.
Tempering is a process that protects melted chocolate from overheating, ensuring that it stays crisp and glossy after it cools.
Look for good chocolate made with cocoa butter, not vegetable oil, and free from stabilizers.
The actual process of tempering is remarlably simple.
- First, over a water bath, warm a big batch of chopped chocolate to 92 degrees F. (do not exceed 115 degrees for dark chocolate and 110 degrees for milk and white chocolate), stiring constantly, to break its temper, remove from the heat.
- Then vigorously stir in a smaller portion of finely chopped chocolate. These "seeds" help the melted chocolate return to a good temper. Stir until the chocolate returns to a temperature of 90 degrees.
- If the temperature gets too cool, place over the water bath for a few seconds.
The result is a fluid chocolate that is able to return to its former state, coating cookies and candies in a crisp and glossy shell.
Tempering Chocolate Technique 1
Tempering Chocolate is a process necessary to ensure that your chocolate candy is firm on the outside. The melting process takes a little longer, but the effort will keep your candy from becoming sticky. Tempered chocolate will give your coated candies a dark, shiny, firm surface when they harden. This process works equally well with white chocolate.
The secret to tempering is to never let the chocolate reach a temperature greater than 115 degrees Fahrenheit.
Step 1
Grate or finely chop your chocolate. Place 2/3 of the chocolate in the top of a double boiler. Stir constantly as the chocolate melts over hot but not boiling water
Be sure water does not touch the bottom of the upper pan. Bring the melted chocolate to exactly 115 degrees Fahrenheit on your candy thermometer.
Step 2
Remove double boiler from the hot water and place on a dry towel or a cooling rack. Stir in the rest of the chocolate. Stir constantly until it is completely melted.
Step 3 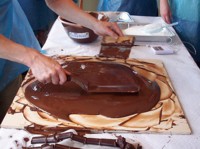
Pour the melted chocolate on a cooling surface, like a pastry marble or even a cookie sheet. Scrape and stir with a metal spatula or pastry scraper until the chocolate cools down to about 80-82 degrees Fahrenheit.
Reheat back up to 87-91 degrees for semisweet chocolate and 83-88 degrees for white chocolate.
Step 4
Use the tempered chocolate for your chosen recipe. You need to keep your chocolate at its proper temperature throughout the candy making process. Monitor the chocolate to keep the temperature right until your delicious work is done.
Here's a couple of tips to hold your chocolate's temper:
- Place the tempered chocolate over a pan of warm water about 2 degrees hotter than your chocolate.
- Place your pan of chocolate on a heating pad on low temperature.
- Stir the chocolate occasionally while you are working with it, to keep the chocolate on the sides from cooling and going out of temper.
Tempering chocolate does take extra time, but you will be very pleased with the quality of your finished candies. They will be absolutely beautiful!
Tempering Chocolate Technique 2
from http://spinningsugar.wordpress.com/
Tempering chocolate is a complex science in nature, but a simple technique to perform. And if you want a shiny chocolate coating that has a crisp break and retains its firmness when handled by warm hands, tempering is an absolute necessity.
Some people temper chocolate in the microwave, which I find terribly dangerous to ruining good chocolate, moreover incapable of producing a crisp break and really high gloss. (Consider my bias in my admission that I refuse to allow a microwave anywhere in my house. I have, however, tried the microwave method many times in my neighbor’s kitchen with poor success each time. Her success was the same, but “wasn’t it convenient?”)
My tried-and-true method, one I have used hundreds of times, is the old fashioned one: melting chocolate over a double boiler, lowering the temperature, then reheating, all using specific temperatures and judicious temperature monitoring along the way. It is the only method that guarantees me a perfect tempered break and a deep glossy shine to the finish. And to ensure my success, I take my dear, sweet time every step of the way. I also reward myself for my patience by slowly sipping a couple of glasses of delicious cabernet during the process…
Before beginning the tempering technique, I need to offer some background information, a warning or two, and some tips.
Tempered chocolate has a lot in common with cooked sugar syrups. In both materials, the goal is to bring the material to a specific temperature and optimize crystallization. In the case of chocolate, the cocoa butter is brought to the most stable crystalline form through heating, cooling, and reheating, then retained at the final temperature.
There are many different types of chocolate, based primarily on their cocoa butter contents. Before you go out and invest in any chocolate, educate yourself by reading my page Extraordinaire du Chocolat and save yourself from a quite expensive blunder.
TIP: When I dip or coat candies with chocolate, I strongly prefer E.Guittard couverture in a 60/40/38 style – a deep, dark, full-bodied slightly bitter chocolate that assails your senses with its aroma. Couverture has more cocoa butter solids than other chocolates and is therefore much, much smoother. You may not be as anal as I am, though: Scharffen Berger 70% Cacao Bittersweet is always at my local grocer (at a very steep price) and I’ve used it quite successfully in a pinch.
TIP: For greatest success whenever and however you are working with chocolate, always do so in a cool (68-degree (F)) room with low (less than 60%) humidity.
WARNING: The biggest danger in tempering chocolate using the double-boiler method I will describe is water. One single drop of water splashing into your tempering bowl from aggressively boiling water beneath will seize your chocolate into a ruined, rock-hard mass that you will be forced to throw away. If you use a heavy double-boiler with an inset pan that has a high rim, you don’t really have a worry. But if you are making a double-boiler using a glass or metal bowl that sits inside the top of a large saucepan, you’d better be careful, because the “seal” around the edge of the bowl where it meets the saucepan will be uneven. Two pieces of advice here: (1) Don’t allow the hot water beneath to erupt into a boil; and (2) cut an old washcloth or tea towel into 2-inch strips and lay these strips over the rim of your pot before placing your bowl on top. (Make certain the strips are far away from the heat source of a ceramic or electric range, and NEVER use them if you have a gas open-flame cooktop!)
The Tempering Technique
Chop your chocolate blocks into small chunks using a large heavy knife. (I use a Chinese meat cleaver.)
Fill the bottom of your double boiler so the hot water does not touch the bottom of the upper pan. Do not let the water boil in the bottom of the boiler, but SIMMER! Stir the chocolate while melting to ensure even heating. Try to avoid creating air bubbles. Heat the chocolate to 120 F. to 122 F.
Remove the bowl of chocolate and replace the hot water in the bottom of the boiler with 70 F. water, no cooler. Return the chocolate bowl atop the bottom water and stir until the chocolate cools to between 79 F. and 80 F. It may occasionally be necessary to add additional cool water to the bottom of the double boiler in this cool-down phase. (Usually two 70-degree refills for me.)
Again remove the chocolate bowl and now replace the 70 F. water with warm water between about 92 F. and 93 F.) and raise the temperature of the chocolate to between 88 F. and 89 F. for dark chocolate or 84 F. to 86 F. for milk chocolate or white cocoa butter coating (“white chocolate”). Maintain the final temperature while dipping.
WARNING: If the tempered chocolate exceeds 90 F., it will be necessary to repeat the entire tempering process before using it. Usually just keeping the unused chocolate in the bowl over the warm water will suffice, but you may need to turn on the heat below the water for a couple of minutes to re-warm sufficiently. If it thickens, this is an indication that crystallization has begun (you will see it on the bowl sides first). Merely slowly reheat, stirring constantly, until the entire chocolate returns to 88 to 89 F.
You may now dip a myriad of items into the chocolate in the bowl, or ladle the tempered chocolate quickly over items placed on a metal rack inside a cookie sheet (to catch the drippings).
Always allow the coated chocolates to completely cool before handling, usually about four hours at room temperature will produce the final crisp shell.
