
Using Food Coloring to Dye Eggs
Besides using store bought dying kits, you can dye eggs with food coloring. Make sure the water you use is warmer than the eggs. For each cup of water, squeeze in a few drops of food coloring and add 2 to 3 teaspoons of white vinegar. Then, use a slotted spoon to put an egg into the water. Leave the egg in the water until you like the color. Then, lift it out with the slotted spoon and let it dry.
You can also dip a brush into food coloring and paint with it right on the eggshell. Use the coloring straight from the bottle or blend colors together to make other colors. To make a stipple pattern on an egg, first dip a clean sponge into food coloring. Then, press it onto the shell.
To add designs to your colored eggs try one of these ideas:
For a tie dye effect, wrap rubber bands around the eggs before dying.
Write your name or draw a picture on your eggs using light colored crayons
and then dye as usual.
Place shaped stickers on your eggs before dying!
Cut small strips of masking tape and stick on eggs before dying.
Naturally Dyed Easter Eggs
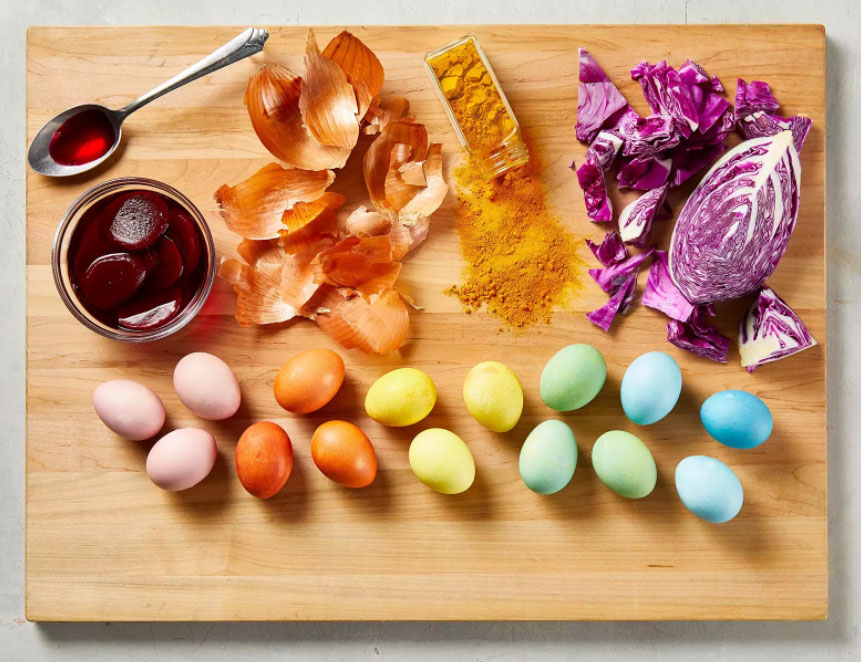
Per cup of water use the following:
1 cup shredded beets = pink on white eggs, maroon on brown eggs
1 cup yellow onion skins = orange on white eggs, rusty red on brown eggs
2 tablespoons ground turmeric = yellow eggs
1 cup chopped purple cabbage = blue on white eggs, green on brown eggs
- add 1-2 tsp baking soda for a teal color*
1 cup red onion skins = lavender or red eggs
Green eggs - To make naturally dyed green Easter eggs, combine turmeric (for yellow) and red cabbage (for blue) dyes, then soak the eggs in the turmeric dye first, and then in the red cabbage dye after they dry.
*Red cabbage contains a chemical called anthocyanin that changes color depending on the acidity of its environment. Baking soda acts as a base and turns red cabbage juice greenish-blue. The kids used Q-tips to paint designs onto the eggs (1/2 tsp baking soda with enough water to dissolve it). They were so surprised to watch the surface of the eggs change from blue to pink when they painted with lemon juice!
For turmeric dye, just add the ground turmeric to the hot water, off heat, and stir until dissolved. For the vegeatble dyes, bring the water with the added ingredient to a boil and then simmer for 20-30 minutes. For vegeatble dyes, avoid boiling, as the brightest colours tend to come from dye that hasn’t been excessively heated. After the dye has cooled, add one tablespoon white vinegar to every cup of strained dye liquid to help set the dye. Now you can dye the eggs.
Vary the length of time the eggs spend in the dye bath. The deeper the tone, the longer the time. In fact, the deepest tones sat overnight! Simply submerge the eggs and periodically check on them until you like the color. Place in the egg carton to dry or on paper towels.
For every dozen eggs, plan on using at least four cups of dye liquid.
To Add Leaf and Floral Designs
If you want to create leaf and floral resist designs, you’ll need to collect small leaves and flowers! Generally speaking, thinner items will more easily sit flush against the surface of your eggs, giving you a crisper image - I used an old oak leaf on one egg, and because it was dry and stiff it didn’t have ‘perfect’ contact with the egg, and as a result that imprint was softer and less precise. Cut up some old pantyhose into approximately 5” lengths, then press your flowers and leaves onto your egg - wetting the egg and/or plant material will help it stick to the egg. Gently stretch the piece of pantyhose over your egg, and twist it to tie it into a knot at the back. I got my favourite results from papery old hydrangea blossoms, but fresh flowers would work great as well!
