How to Make Traditional Cassoulet (And Why You Should Put Chicken in It!)
The Food Lab Oct 8, 2014, J. Kenji López-Alt, Managing Culinary Director, http://www.seriouseats.com/
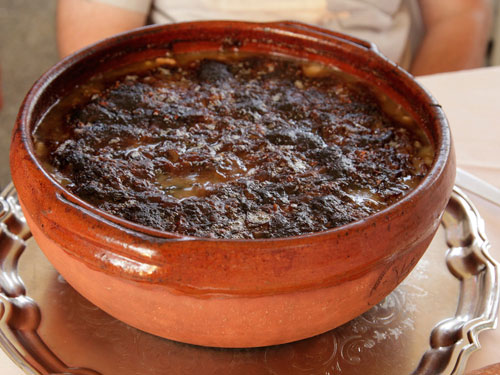
Real-deal cassoulet in Languedoc
What started in the region of Languedoc as a humble peasant dish of dried beans cooked with various sausages and preserved meats has turned into an all-out culture war with not one, not two, but three towns all claiming to be the originators of the One True Cassoulet (pronounced cass-ooh-lay). You thought local sports fans are insane? You should head over to one of those medieval walled cities—Toulouse, Castelnaudary, and Carcassonne all have claims to the dish—and chat with some local cassoulet chefs to see what a true fanatic is like.
"Le true cassoulet must have mutton in it," they'll say in Toulouse.
"Mais non!," the chef in Castelnaudary will cry. "Only a vache Espagnole would put anything other than confit de canard and pork in their cassoulet!"
"Sacrebleu! You are both le wrong! In Carcassonne we use the goose and the partridge!"
Here's the truth of the matter: Cassoulet is not cheffy, prescriptivist stuff. It's a medieval peasant dish designed to make do with whatever was around. In Languedoc, that happened to be dried beans, preserved duck, and preserved pork. Do you think any medieval French peasant would turn their nose up at the pot of beans because someone had dared to make it partridge-free? Je ne pense pas.
The first time I had cassoulet in its home turf (the Carcassonne version, in fact) it was a revelation: The cassoulet I'd known for nearly all of my professional career is nothing like the cassoulet found in Languedoc. It's as if I'd spent my life in the kitchen at Giordano's in Chicago and just found out that there's a style of pizza beyond deep dish and that not only that, but I'm the weird one here. That loose, almost soup-like stew of beans and meat was so far removed from all versions of cassoulet I'd had in the United States, or even in other parts of France. Gone was the stodgy, stew-like broth. Gone were the bread crumb toppings. Gone were the extra vegetables.
Instead, we were presented with a large, bubbling vat of beans and meat, covered in a crust so dark that it was almost black (see picture). Our hostess cracked open the crust to reveal beans swimming in a rich, gelatinous broth with bits of tender duck leg, cured pork belly, pork shanks, and a few different sausages.
Just as in a good risotto, the cassoulet flowed slowly across the plate, spreading out into a loose sauce. None of that solid-enough-to-mound stuff I'd seen everywhere else. Flavorwise, it was different too. Rich, meaty, and overwhelmingly simple, there were a few background notes from aromatic vegetables—onions, carrots, celery, a few cloves, perhaps some bay leaf and parsley—but the main flavor was just that of the cured meat, a good stock, and beans. Like I said: simple, peasant fare.
The beans were cooked to the point of maximum creaminess—melting on your tongue as soon as they hit your mouth. Similarly, all of the meats were meltingly tender, to the point where the only real texture was from the crust.
Recipe below
What's the Matter? Chicken?
I need to get one thing off my chest right off the bat here: I am not using duck or goose confit in my cassoulet. I am using plain old chicken legs. You can pick up those pitchforks and come at me—I'm ready for you. Well duck is an ingredient in traditional cassoulet not by choice, but by necessity. Back in the days before refrigeration, duck meat was preserved by heavily salting it, slow-cooking it, then packing it under a layer of its own fat. Now sure, it turns out that this produces a fantastically tasty end product, but it's by no means a requisite for cassoulet. I'd argue that the most important part of the confit process—the slow cooking to tenderize tough connective tissue—is entirely wasted in a dish like cassoulet where the meat ends up getting slow-cooked anyway.
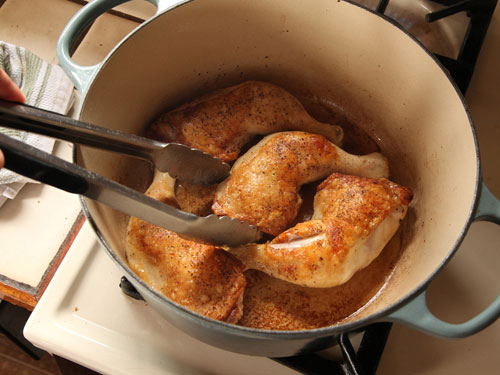
So why chicken? Well, duck happens to be very common and inexpensive in medieval Southern France. In modern urban America, not so much. You could go out and buy duck legs to use for this recipe, but chicken is cheap, widely available, and easy to work with. And you want to know something else? With so much flavor packed into the cooking liquid—sausages, salted pork, [garlic] cloves—you actually don't miss the duckiness of the traditional dish.
Here's another thing: Most of the distinguishing flavor in a particular type of meat comes from the fat. Cook a beef steak in lamb fat and it'll taste like a lamb chop. Seriously. So instead of just using duck, what if I were to incorporate a bit of store-bought duck fat? I used that duck fat to brown my meat and bingo: true ducky, cassoulet flavor without any need for actual duck. Even without the duck fat, a chicken-based cassoulet is killer, so don't sweat it if you can't find or don't want to shell out for duck fat.
Pork Picks
After the poultry, the pork is the next most important flavoring element in the cassoulet (I decided to not even bother trying to seek out mutton shoulder). Sausages are a must. In Languedoc, you'd typically find a garlicky pork sausage flavored with a bit of red wine. Back here, I like to use whatever mild garlic sausage I can find, though if you want to play Cassoulet Choose Your Own Adventure, you can go with any flavor sausage in the shop.
For the cured, fatty element, I tried various cuts including salted pork belly, regular bacon, pancetta, salted fatback, and salted smoked ham hocks. Both the bacon and hocks imparted too much smoky flavor to the mix. Fatback was just too fatty, and pancetta was immediately identifiable. Salted pork belly (usually sold as "salt pork" in the meat or sausage case) was the way to go. I decided to start my cassoulet by rendering the fat from the pork belly and using it to brown the rest of my ingredients.
Browning it as a whole piece before slicing it into smaller chunks for slow cooking seemed like a good way to go about it, but in the interest of saving time and streamlining, I settled on cutting it into chunks before browning. This gave more surface area for rendering fat to escape, as well as more surface for browning, which led to deeper flavor in the finished dish. Rendering them relatively slowly helps to get them to release maximum fat without burning or singeing around the edges. Once done, take it out and set it aside.
How Now, Brown... Chicken?
One thing that's not necessary, and which I learned the hard way: salting your chicken. There's already a ton of salt that makes it into the dish from the salt pork and other ingredients, not to mention the liquid that slowly reduces in the oven.
Don't poke and prod that chicken too much, and definitely don't flip it until it is deeply, deeply browned. All that flavor is going to go right into your beans. Take out the chicken after browning both sides and set it aside with the pork belly. Once the chicken is done, it's time to brown the sausage. Can you see where we're going with this? Building up layers of browned flavors. Again, brown it, then take it out and set it aside.
The Aromatics
Now comes a deeper question: how to incorporate the aromatics. Some recipes I've seen call for onions, carrots, celery, and garlic to all be finely chopped and left in the finished dish. I personally find the little bits of vegetables very distracting.
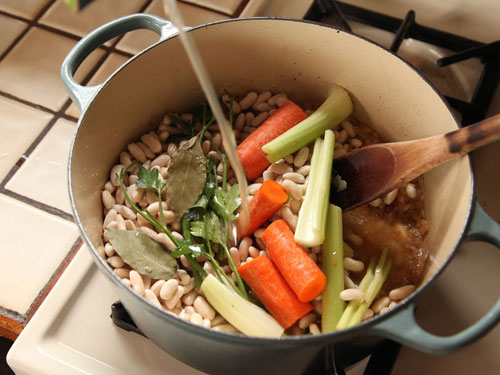
Instead, I chop only the onion and add it to the pot after the meat is done browning, using the steam and moisture it gives off to deglaze the pan, scraping up all the flavorful browned bits that the meat left behind. As for the other aromatics—a carrot, a couple stalks of celery, a head of garlic, some sprigs of parsley, a couple bay leaves, and few cloves—I find leaving them in large chunks and using them to flavor the stock that I cook the beans in is the best way to extract subtle flavor without the distracting bits of vegetable in the finished dish.
As for those beans
I tested my recipes using a few different types of dried white beans from actual lingot I brought back from Languedoc to cannellini to small navy beans. Cannellini were the best domestic option. I tried cooking them a number of ways, from canned (no good—they don't develop flavor the way I'd like them to and the liquid doesn't thicken up enough as they cook) to non-soaked to soaked-and-cooked to completely pre-cooked before adding to the rest of the ingredients.
The best method was somewhere in between. I start by soaking my beans in a salty brine. Despite what you may have heard about salt preventing beans from softening properly, it actually accomplishes the exact opposite goal: salt ensures that bean skins turn tender.
Bean skins are held together by pectin, a sort of organic glue. Buttressing this pectin are magnesium and calcium ions. It takes a lot of work to take these down. But in the course of an overnight soak, some of those magnesium and calcium ions will get replaced by sodium ions. These guys are sort of like the double agents of the ion world. The beans will seem firm at first, but as soon as you start cooking them, those sodium ions reveal that they are not nearly as good at keeping pectin strong as the magnesium or calcium. Your bean skins will soften in record time and cook more evenly in the process.
After draining the soaked beans I add them to the pot with the onions along with a quart of store-bought chicken stock and the aromatics. I simmer them until just shy of cooked before fishing out the spent aromatics, adding the meats back in, mixing everything around, and throwing it all into a low oven to finish cooking.
Skin Problems
This is where the real magic of cassoulet happens. See, a good stock should be rich with proteins, and just like the proteins in meat, they brown when heated. As you cook a cassoulet in the oven, the top layer of liquid slowly evaporates, leaving an ever more concentrated layer of proteins on its surface. Eventually, these proteins form a raft-like skin.
By occasionally removing the cassoulet from the oven and breaking that skin, allowing fresh liquid to flow above it (traditionalists will tell you that seven times is the optimal number of breaks for the best skin), you build up a significant layer of skin. It's this skin that browns, forming the crust of a traditional cassoulet.
At least, that's what's supposed to happen. The sad reality is that most of the cassoulets I've cooked in the past have not ended up like this. What's the problem? First off, it's the shape of the pan. A traditional cassole has a tapered shape that gives it an extremely high surface area to volume ratio. More room for evaporation means better skin formation and better browning. Unfortunately, it's tough to find a good cassoulet pot around here. A regular cassoulet will form a crust in about 4 hours of cooking in a 300°F oven. What about if you just cook your Dutch oven cassoulet for longer or hotter? I tried a variety of time and temperature ranges.
The second problem is the store-bought stock I'd been using. Homemade chicken stock tends to be very high in gelatin, a result of the high amount of connective tissue in the bones and cartilage used to make it. Store-bought stock, by contrast, is thin and watery. It's this gelatin that forms the crusty raft on top of the cassoulet, giving it both crust and body. It's these two problems—wrong pot, not enough gelatin in the stock—that lead many recipes to resort to using breadcrumbs to create an artificial crust.
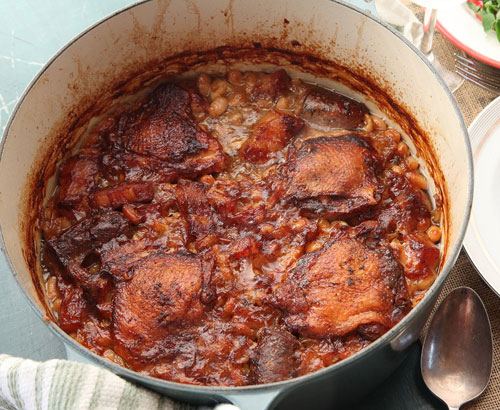
J. Kenji López-Alt's Cassoulet
So what's the solution? Well the obvious one is to just make your own goddam stock. It's actually way easier than it sounds, though it again requires a bit of a time commitment. I'll admit it: sometimes even I'm too lazy to make my own stock when I've already got a day-long project ahead of me.
So what's the next best thing? By blooming store-bought unflavored gelatin in regular store-bought stock, you can create a rich stock full of body that forms a raft just like the real deal. I don't go easy on the gelatin either (remember, you have to make up for using the wrong-shaped pot as well). A full three packets for a quart of liquid gives it the body and crust I'm looking for.
In order to get a cassoulet that stays nice and loose underneath while still building a crust up top, it's important not to drown that crust out. If your liquid level starts to get too low, add more liquid (just plain water works) to the pot by carefully pouring it along the side of the pot so that it goes under the crust, not over it.
Break into that crust, and here's what you've got underneath: Creamy, flavor-packed beans with meltingly tender nubs of pork belly and sausage and chicken legs that fall off the bone in moist shreds, all in a rich, sticky liquid that drinks like liquid pork. This is the kind of fare that demands you sit down and make an event out of, good Languedoc wine and all. It's the kind of meal so rich and hearty that all you could possibly eat on the side is a simple green salad (preferably with an excellent French vinaigrette).
Traditional French Cassoulet
Why this recipe works:
- Soaking the beans in salted water overnight helps keep them tender as they cook.
- Chicken used in place of the traditional duck picks up tons of flavor from the other cured meat products and comes out meltingly tender and meaty.
- Adding gelatin to the cooking liquid helps it form a better crust on the casserole as it bakes.
Note: If you are using homemade chicken stock that already has lots of gelatin (i.e., it should thicken and gel when chilled), you can omit the unflavored gelatin here; if your stock is store-bought, or if it's homemade but watery even when chilled, the unflavored gelatin is an essential ingredient.
1 pound dried cannellini beans
Kosher salt
1 quart homemade or store-bought low-sodium chicken stock
3 packets (3/4 ounces) unflavored gelatin (see note above)
2 tablespoons duck fat (optional)
8 ounces salt pork, cut into 3/4-inch cubes
6 to 8 pieces of chicken thighs and drumsticks, or 4 whole chicken leg quarters
Freshly ground black pepper
1 pound garlic sausage (2 to 4 links depending on size)
1 large onion, finely diced (about 1 cup)
1 carrot, unpeeled, cut into 3-inch sections
2 stalks celery, cut into 3-inch sections
1 whole head garlic
4 sprigs parsley
2 bay leaves
6 cloves
In a large bowl, cover beans with 3 quarts water and add 3 tablespoons salt. Stir to combine and let sit at room temperature overnight. Drain and rinse beans and set aside.
Adjust oven rack to lower middle position and preheat oven to 300°F. Place stock in a large liquid measuring cup and sprinkle gelatin over the top. Set aside. Heat duck fat (if using) in a large Dutch oven over high heat until shimmering. Add salt pork and cook, stirring occasionally, until browned all over, about 8 minutes. Transfer to a large bowl and set aside. (If not using duck fat, cook pork with no additional fat.)
Season chicken thighs or duck confit with pepper (do not add salt) and place skin side down in Dutch oven. Cook without moving until well-browned, 6 to 8 minutes. Flip chicken pieces and continue cooking until lightly browned on second side, about 3 minutes longer. Transfer to a plate and let cool to room temperature.
Add sausages to Dutch oven and cook, turning occasionally, until well-browned, about 2 minutes per side. Transfer to bowl with salt pork. Drain all but 2 tablespoons fat from pot.
Add onions to Dutch oven and cook, stirring and scraping up browned bits from bottom of pot, until onions are translucent but not browned, about 4 minutes. Add drained beans, carrot, celery, garlic, parsley, bay leaves, cloves, and stock/gelatin mixture. Bring to a simmer over high heat. Reduce to low, cover Dutch oven, and cook until beans are slightly softened but retain a bite, about 20 minutes.
Cover cooled chicken or duck and transfer to refrigerator. Using tongs, remove carrots, celery, parsley, bay leaves, and garlic cloves from pot and discard. Add pork and sausages to pot and stir to incorporate. Beans should be almost completely submerged. Transfer to oven and cook, uncovered, adding remaining 1 cup (237ml) stock halfway through by pouring it carefully down side of pot as necessary to keep beans mostly covered, until a thin crust forms on top, about 1 hour 30 minutes.
Break crust with a spoon and shake pot gently to redistribute. Nestle chicken or duck into the Dutch oven, skin side up. Return to oven and continue cooking, stopping to break and shake crust every 30 minutes, until crust is deep brown and thick, an additional 1 hour 30 minutes. Serve immediately.
Serves 6 - 8
Notes
If you are using homemade chicken stock that already has lots of gelatin (i.e., it should thicken and gel when chilled), you can omit the unflavored gelatin here; if your stock is store-bought, or if it's homemade but watery even when chilled, the unflavored gelatin is an essential ingredient.
Make sure not to use a salted, or even low-sodium, chicken broth, especially if opting for duck confit, lest the dish end up too salty.
