New York Style Cheesecake
Cook's Illustrated Test Kitchens (modified just a bit)
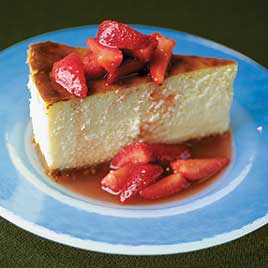
FMM: This recipe will give you a true New York style cheesecake. I have tried many recipes over the years and no other recipe has even come close. The key is to cook at a very high temperature to begin with so that the eggs rise and not use a water bath as many other cheesecake recipes do. This cheesecake contains no flour.
"The ideal New York cheesecake is timeless in its adherence to simplicity. It should be a tall, bronze-skinned, and dense affair. At the core, it should be cool, thick, smooth, satiny, and creamy. Radiating outward, it goes gradually from velvet to suede, then, finally, about the edges, it becomes cake-like and fine-pored. The flavor should be pure and minimalist, sweet and tangy, and rich to boot.
New York style cheesecakes are cream cheese mixtures baked without a water bath and are unique because the baking starts at a high temperature (that's quickly dropped down) producing a rich interior and brown exterior.
The major ingredients in almost all plain cheesecakes are cream cheese, sugar, lemon juice, vanilla extract, egg yolks, whole eggs, and either heavy cream or sour cream. The ratios of these ingredients determine the final taste (tangy or sweet) and texture (dense or fluffy). Note: The more cream cheese you use, the denser the cheesecake will be (but not dry!) the more eggs you use, the fluffier it will be.
Start with a classic graham cracker crust. Use 2 1/2 pounds of cream cheese for adequate height, flavor with 1 1/2 cups sugar and 2 teaspoons each of lemon juice and vanilla for the perfect balance of sweetness and tang, and use 6 whole eggs plus 2 yolks for a texture that is dense but not heavy, and firm but not rigid. Bake in the New York method: at 500 degrees for about 10 minutes and then at 200 degrees for 90 minutes."
Note: To make a 6 inch cheesecake, cut the recipe back by 1/3 or a little more.
For a short dough crust, see Cheesecake Crusts.
*** Graham Cracker Crust ***
1 cup graham cracker crumbs (4 ounces, about 7 whole crackers)
1 tablespoon granulated sugar
5 tablespoons unsalted butter melted, plus additional 1 tablespoon melted butter for greasing pan
*** Cheesecake Filling ***
2 1/2 pounds cream cheese (5 8-oz. packages), cut into rough 1-inch chunks and left to stand at room temperature for 30 to 45 minutes
1/8 teaspoon table salt
1 1/2 cups granulated sugar (10 1/2 ounces)
1/3 cup sour cream (2 1/2 ounces)
2 teaspoons lemon juice from 1 lemon
2 teaspoons vanilla extract
2 large egg yolks
6 large eggs
1. For the crust: Adjust oven rack to lower-middle position and heat oven to 325 degrees.
Place the graham crackers in a plastic bag and use a rolling pin to crush them; grinding in a food processor creates too fine a crumb which results in a hard, dense crust. Combine graham cracker crumbs and sugar in medium bowl; add 5 tablespoons melted butter and toss with fork until evenly moistened.
Brush bottom and sides of 9-inch springform pan with most of remaining melted butter, making sure to leave enough to brush pan in step 3 (I just rub the bottom of the pan and a bit up the sides where the crust will go with softened butter). Empty crumbs into springform pan and press lightly, yet evenly, into pan bottom.
Bake until fragrant and beginning to brown around edges, about 8 - 10 minutes. Cool on wire rack while making filling.
2. For the cheesecake filling: Increase oven temperature to 500 degrees (our convection oven seems hot, the cheesecake gets very dark and bakes much more quickly than the times in the recipe - try 450 degrees, 475 did not make a difference). In standing mixer fitted with paddle attachment, beat cream cheese at medium-low speed to break up and soften slightly, about 1 minute. Scrape beater and bottom and sides of bowl well with rubber spatula; add salt and about half of sugar and beat at medium-low speed until combined, about 1 minute. Scrape bowl; beat in remaining sugar until combined, about 1 minute.
Scrape bowl; add sour cream, lemon juice, and vanilla, and beat at low speed until combined, about 1 minute. Scrape bowl; add yolks and beat at medium-low speed until thoroughly combined, about 1 minute. Scrape bowl; add whole eggs two at a time, beating until thoroughly combined, about 1 minute, and scraping bowl between additions.
3. Brush sides of springform pan with remaining melted butter (I just rub the sides with soft butter). Set springform pan on rimmed baking sheet (to catch any spills if springform pan leaks). Pour filling into cooled crust. Lift the pan an inch or two above your counter or cutting board and drop it to bring any bubbles trapped inside to the surface.
Bake 10 minutes [next time try turning the oven down as soon as the cheesecake goes in] - the cheesecake should puff up and start to turn brown at this stage; without opening oven door, reduce oven temperature to 200 degrees and continue to bake until instant-read thermometer inserted into center of cheesecake registers about 150 degrees, about 1 1/2 hours. [Start checking after 45 minutes with the thermometer!]
Note: Gently shake the cheesecake pan to get it to jiggle. You want the outer 2-3 inches of the cheesecake to look more set and less jiggly, and in the center it should be jiggly. It should wobble a bit, but not too much. If it looks liquid-y still and has kind of a sloshy wiggle, it’s not done it. Once the edges start to set take the temp.
Mine only took 1 hour 10 minutes more and the temperature was 160 degrees - check after 1 hour. The next time it was 1 hour and 15 or 20 minutes. If the cake begins to shrink back down - it puffs up during baking - it is definitely done. Do not exceed 160 degrees - overbaking causes it to crack. When I made one in the summer, the temperature was 180 degrees after only 1 hour.
The cake will not fully set until fully chilled, but the process should be gradual. Transfer cake to wire rack and cool 5 minutes; run paring knife between cake and side of springform pan being careful not to cut into the side of the cake. This will reduce the risk of cracking as the cake contracts and tries to pull away from the walls of the pan. Cool until barely warm, 2 1/2 to 3 hours. Wrap tightly in plastic wrap and refrigerate until cold, at least 3 hours. (Cake can be refrigerated up to 4 days.)
4. To unmold cheesecake, remove sides of pan. Slide thin metal spatula between crust and pan bottom to loosen, then slide cake onto serving plate. Let cheesecake stand at room temperature about 30 minutes, then cut into wedges and serve.
This cheesecake is excellent served plain but adding a fresh fruit topping is also nice. Here are some ideas: Macerated Strawberries, Maine Blueberry Sauce, and Cherry Topping.
Notes: The flavor and texture of the cheesecake is best if the cake is allowed to stand at room temperature for 30 minutes before serving. When cutting the cake, have a pitcher of hot tap water nearby; dipping the blade of the knife into the water and wiping it clean with a kitchen towel after each cut helps make neat slices.
Tips for Making Cheesecakes
- Go for full-fat ingredients: Use regular cream cheese and sour cream in cheesecake recipes, unless one specifically calls for reduced-fat or fat-free products. This will ensure that the cake turns out as intended and tastes great, too.
- Use room temperature ingredients: When making cheesecake, using room temperature cream cheese and eggs is absolutely critical. Room temp ingredients blend up smoothly so you don’t have a lumpy cake.
- Add the eggs in last: You can whip together the cream cheese and sugar together as long as you like (or at least until smooth and fluffy) without causing any issues with your batter. However, be mindful with the eggs in any cheesecake recipe. Add them in last and beat just until combined. The longer you mix the eggs, the more air you incorporate into the batter. The air can expand and then contract during baking and cooling which causes cracks.
- Get the oven ready: You don’t want your cheesecake too close to your oven’s heating element. While baking on the center rack is perfect for cookies, you’ll want to move the rack one rung lower for cheesecake. It’ll still be near the center of the oven, but just far enough away from the heat to prevent major cracks.
- Don’t peek! Open the oven door as little as possible while baking the cheesecake, especially during the first 30 minutes. Drafts can cause it to crack.
- Do the wobble test: Set a kitchen timer to the minimum recommended baking time, and check for doneness only when the timer goes off. You’ll know it’s finished baking when the edges are slightly puffed and when the center wobbles slightly when you tap the side of the pan with a spoon. The retained heat will continue to cook the center while the cheesecake is cooling.
Pro tip: Don’t use a knife or a toothpick to test for doneness. Do that, and the top might—you guessed it—crack.
[This did not tell me much. Maybe I didn’t tap hard enough.] - Run a knife around the edge: To prevent cracks during cooling, it’s important to loosen the cheesecake from the sides of the pan after baking. First, cool the cheesecake on a wire rack for 10 minutes. Then carefully run a table knife or small metal spatula between the cheesecake and the inside of the pan. Don’t remove the sides of the pan yet. Cool for an hour longer in a draft-free location.
- Cut the cake cleanly: Slice cheesecake while it’s cold. Trust us, it’s a lot less messy. To do this, dip a long, thin knife in very hot water, wipe the blade with a paper towel, then slice. Clean and rewarm the knife after each cut.
