Danish Pastry
Recipe from Gourmet | July 1990
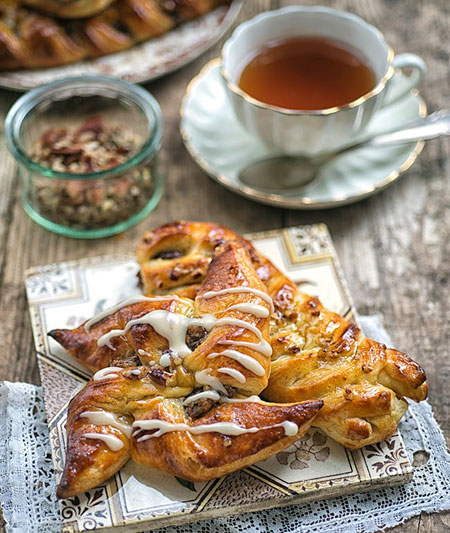
Origin of Danish Pastry: These light, flaky delicacies originated about 150 years ago, when Copenhagen bakers went on strike for cash, instead of room and board. Employers retaliated by dismissing Danish bakers and importing Austrians to take their places. The Austrian method of folding butter into dough became popular, and when the Danish bakers eventually returned to their jobs they embellished the Austrians' method by adding jam, and other fillings to the variously-shaped pastries.
A Danish pastry or Danish, is a sweet bread product made with raised dough. Originating in Austria at an unknown date, the Danish pastry grew to fame in Denmark and has become a popular breakfast or snack treat throughout the world. Danishes come in many varieties and are often filled with fruit, jam, or cream.
Danishes are made from a pastry dough rich in butter, mixed with eggs, flour, yeast, sugar and salt. Spices may be added to the basic dough for additional flavoring, including cinnamon, allspice and cardamom. The dough is rolled out into thin layers and often coated with more butter, before being shaped into individual pastries. Often, Danish dough will be chilled before baking, or rolled out and buttered repeatedly to increase the flakiness and texture of the dough.
When baked, the dry yeast used in the dough causes the Danish pastry to rise, creating a flaky and rich bread that will crumble easily. Much like their cousins, the croissant, Danish pastries are a favorite breakfast food in many places. The Danish is quite versatile, however, and may also be enjoyed as a late morning or afternoon snack, perfect with a cup of coffee or tea.
Unbaked Danish dough freezes well, so you make several batches and freeze it after completing the layering of the dough - before rolling out to make the pastries, or just make up half the recipe into pastries and freeze the other half for later. It will be good for three months in your freezer.
Recipe for Danish Pastry Dough
Makes 16 danishes or 2 large braids
For the Danish Pastry
2 tablespoons active dry yeast
2/3 cup sugar
1 teaspoon salt
3 large egg yolks at room temperature
2 teaspoons vanilla
2/3 cup milk
3 1/4 cups all-purpose flour
3 sticks cold unsalted butter, cut into bits
½ cup flour
Make the Danish Pastry Dough
Add ¼ cup lukewarm water to the yeast in a large bowl. Set aside for five minutes or until the mixture is foamy. Stir in the sugar, salt, egg yolks, vanilla, and milk. Begin adding flour stirring until the dough leaves the sides of the bowl and forms a soft and sticky dough. Butter the top and cover tightly. Chill the dough for one hour.
Make the Butter Layer
For successful laminated dough the butter should be kept icy cold at all times. Rub the countertop with ice and then place a sheet of wax paper over the chilled countertop. Place the butter on the wax paper and beat with a rolling pin until it is smooth and easy to work with but still cold. Add the remaining ½ cup flour and work it into the butter until the mixture is smooth. Form the mixture into a six inch square and wrap it in plastic wrap. Chill it for 30 minutes.
Laminating the Dough
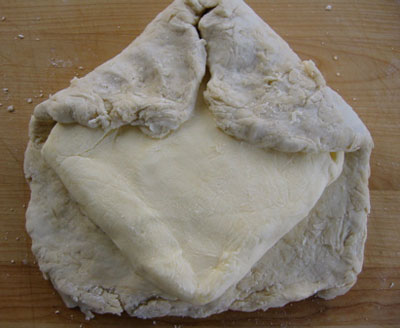
On a surface that has been well dusted with flour, roll the dough into a 12 inch square. Lay the butter diagonally in the center of the square and fold the corners of the dough over the butter. Be sure to enclose the butter completely. Seal the edges of the dough by pinching.
Flatten the dough gently by pressing the rolling pin into it. Roll from the center outward. Do not roll over the ends but stop rolling when you are within 1/2 inch of the ends of the dough. Turn the dough 180 degrees and roll the dough in the same way. Continue to roll the dough until you have an 8 inch by 18 inch rectangle. You may need to flour the counter a few times to keep the dough from sticking. If it is a warm day or the butter starts to melt just immediately stop and chill the dough for about 15 minutes before proceeding. The ideal dough and better temperature is 60° F.
When the rectangle is the correct size, brush off any flour that might be on the dough. Fold the top quarter of the rectangle down to the center of the rectangle. Now fold the bottom to the center, leaving some space between the two ends. Fold the top half of the dough over the bottom half and close like a book. Turn the dough 90 degrees so that a short side faces you (This is always done before each rolling-out so that the length becomes the width.) and roll it into an 18 x 8 rectangle again. Fold it again just as before. Mark the lower right corner of the dough by pressing a finger into the dough. This indicates that the dough has gone through the first turnings. Wrap with plastic wrap and chill for one hour. Two turns are completed. [48 layers of butter?]
Repeat this process two more times always beginning with a short side facing you. After this turn, press two fingers in; after the next, three. Chill the dough between the turns. After the last turn chill the dough, tightly wrapped, overnight. The dough could also be frozen after the last turn to be used later.
This recipe will make 2 large Danish Braids or 16 individual pastries. See instructions below.
Choose and Make the Filling
You can use any filling you like when making Danish, although some are more appropriate to a certain shape than others. See the instructions below for filling suggestions for a particular shape. Some popular fillings are: Poppyseed, Nut, Almond Paste, Fruit Preserves, Dried Fruit, Chocolate, Cream Cheese, Pie Filling, such as apple.
These two filling are appropriate for making the larger braids.
Strawberry or Blueberry Cream Cheese Filling for a Braid
8 ounces cream cheese, softened
1/4 cup granulated sugar
1 large egg yolk
1 teaspoon vanilla
1/4 teaspoon salt
2 teaspoons freshly grated orange zest
1 teaspoon freshly grated lemon zest
2 tablespoons all-purpose flour
2 cups fresh, sliced blueberries, strawberries or other fruit
Beat the cream cheese, sugar, egg yolk, vanilla, salt, lemon and orange zest and flour until the mixture is smooth. Chill over night. Spread the cream cheese filling down the dough. Lay fruit on top.
Raspberry, Brie, And Pecan Danish Braid
1 small wheel Brie, sliced
1/2 c halved pecans
Raspberries made by mixing
2 c frozen raspberries and
1/2 c sugar in sauce pan. Boil until sugar is dissolved and raspberries are thawed.
Slice brie and layer over dough. Add raspberries and pecans.
For the Glaze
1 1/4 cups confectioners' sugar
2 to 3 tablespoons fresh lemon juice or water
To Assemble the Pastry
To Make 2 Danish Braids - Cut the dough in half and roll each half of the dough into a 16 x 8 inch rectangle - it should be about 1/4" thick. Follow the instructions below for cutting, filling and braiding.
To Make Individual Pastries - Cut the dough in half and roll each half of the dough into a 16 x 8 inch rectangle - it should be about 1/4" thick. Leave this size if making the Classic Sweet Rolls (first individual roll below) or the Snail Rolls.
Otherwise cut each rectangle into 8 4 x 4" squares - cut down the center in half lengthwise, then cut each strip into 4. You should have 16 squares total.
To Make 2 long Danish Braids:
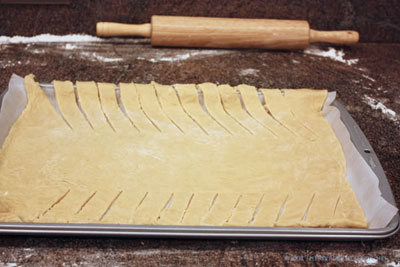 |
Cut the dough in half. Roll each half of the dough into a 16 x 8 inch rectangle. Trim the edges evenly. Cut the long edges of the rectangle as if you were cutting fringe. |
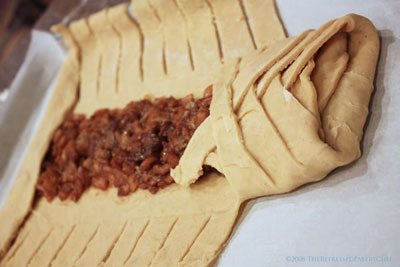 |
Spoon half the filling down the center of each rectangle. Fold down the top and bottom ends to keep the filling inside. Then fold first one piece of fringe over the filling then fold the corresponding piece from the other side, as if you were braiding. Brush the pastries with 1 egg yolk beaten with 1 tablespoon water and sprinkle with sugar crystals. Turbinado crystals work best for this because the crystals are large. Let rise for one hour. Bake in an oven preheated to 350 for 30 - 40 minutes or until golden. |
Making Individual Pastries
from http://joepastry.com/index.php?cat=89
To make any of the Danish shapes below, begin by rolling each half of the dough made above into a 16 x 8 inch rectangle - they should be about 1/4" thick. Leave this size for the Classic Danish Sweet Roll and the Snail Rolls. For the other shapes that begin with a sqaure of dough, cut each 16 x 8 inch rectangle into 8 4 x 4" squares. To do this, cut down the center in half lengthwise so you have 2 16 x 4 inch strips, then cut each strip into 4. After cutting both 16 x 8 inch rectangle, you should have 16 squares total. The Classic Danish Sweet Roll and the Snail Rolls are handled differently. See instructions below.
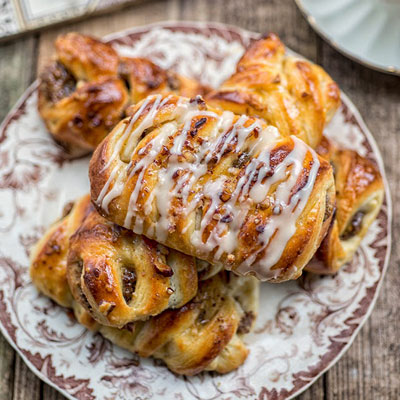 |
The Plait (pecan maple danish) Pecan Maple Danish Pecan and Maple filling Put all the ingredients in the small bowl of the Magimix fitted with a metal blade. Pulse until the ingredients form a fairly coarse paste. Set aside until needed. To create plaits cut square or rectangle pieces of the dough. Place filling along the centre and cut strips on the diagonal either side of it (as shown above for the large braid). Fold the strips alternately towards the middle to create the plait. Tuck the ends under or cut them off. Repeat making pastries with rest of the dough (or freeze it). Transfer onto the baking tray, cover loosely with plastic wrap and let them rise at room temperature for 30 minutes. Brush some egg wash over the pastries. Sprinkle with chopped pecans and bake for 15-25 minutes, depending on size, until puffed and golden. Cool on a wire rack and brush with sieved apricot jam if you want a high shine. Use a spoon to drizzle the maple glaze (below) over the pastries. |
Maple glaze Mix all the ingredients for the glaze together, thinning with hot water if necessary, until thick but pourable. |
|
The Classic Danish Sweet Roll (Jam Filling)
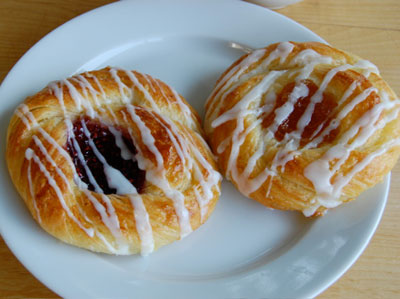 |
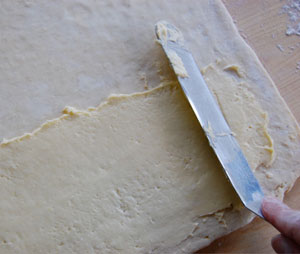
As ubiquitous as this style of Danish is, it's one of the more complex to make. I [JoePastry] learned to make them putting in an extra fold and layer of buttercream. That makes the end product both richer (of course) and flakier. If you'd rather not do that part (though it's a nice way to use up any leftover buttercream you might have in the freezer) you don't have to. The end result will still be amazing. (For shaping, also see the pictures below.) As discussed above, begin by cutting the finished Dansih pastry dough in half and roll each half of the dough into a 16 x 8 inch rectangle - it should be about 1/4" thick. Trim up the sides a little to square it off, then spread a thin layer of vanilla buttercream frosting on the half of the pastry sheet closest to you. Fold the top half down to enclosed the buttercream. [I have also seen recipes that brush the dough with egg and add a sprinkling of cinnamon and sugar instead of the buttercream frosting.] |
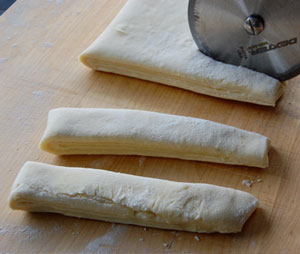
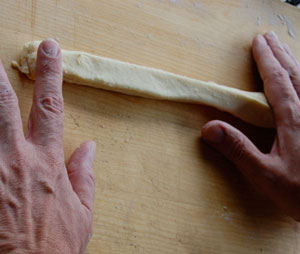
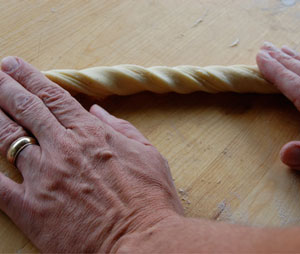
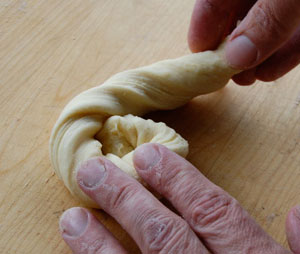
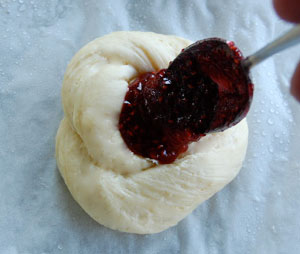
Then cut the dough into roughly 1/2-inch thick strips - they should actually be longer than those in the picture. Then, grasping the strip on each end, stretch the dough strip out, flipping it back and forth like you're trying to dry the ink on a check. When it's long enough (again the strip should be about half again as long as the one in the picture), press one end down onto the board with your index finger. Then use the palm of the other hand to roll the strip toward you. What you get is an attractive twist. Now, still holding one end of the dough strip down, drape the strip down and around the center point in a curlicue. Bring it around and around. Tuck the last half inch underneath so the pastry doesn't unravel in the oven. A longer strip gives you more of a swirl than that in the picture. Put them on a parchment-lined sheet pan, six per sheet. At this point you can start proofing the pastries in anticipation of baking right away, or put them in the fridge overnight. If you don't have a proof box, don't worry about it. Just give them a spritz of water to keep the outer skin moist. Then cover them with lightly oiled plastic wrap (or you can drape the plastic over shot glasses placed between the rolls to keep it from touching). You'll want to give them a light spritz with water every 45 minutes or so to keep them supple. Once the Danishes have proofed and are soft and airy to the touch, about two hours at room temperature (closer to three hours if the pastries have been refrigerated) make a deep depression in the middle of the Danish with the back of a spoon and lay in about a tablespoon of any jam you like. Brush with egg wash and bake in a preheated 375-degree oven for about fifteen minutes or until golden. After the Danishes have cooled a bit on a wire rack, use a fork to drizzle them with a simple powdered sugar and water icing. |
|
   |
|
   |
|
Lemon Danish 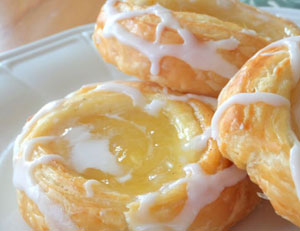 Follow the instructions above to make the spirals that are filled with jam. Instead of jam, place 1 heaping tablespoon lemon curd into the center of each pastry. Bake for 18 minutes or until the pastries are golden brown. Let cool on the baking sheet for 5 minutes. Drizzle glaze over the edges of the danish. Serve immediately. Lemon Curd 1/2 cup lemon juice In a saucepan bring lemon juice and half of sugar to a boil. In a separate bowl whisk eggs for 2 minutes and quickly whisk in remaining sugar. Pour half of boiling lemon syrup into eggs and beat well. Pour egg mixture into remaining lemon syrup and whisk back to a boil. Boil for 1 minute while constantly whisking and mixture has the consistency of thick bubbling honey. Remove from heat and cover with plastic food wrap. Mix gelatin with water and set aside for 5 minutes. Add gelatin and stir into above. Once incorporated add SOFT butter in small nuggets and stir with a spatula. If butter was too cold and refuses to dissolve into curd, place for a few seconds in microwave. Let cool in refrigerator. Glaze [with lemon] 1 cup powdered sugar Place the confectioners' sugar into a small bowl. Whisk in the lemon juice and milk, until the mixture is desired consistency (may need to add a little more milk if icing is too thick). |
|
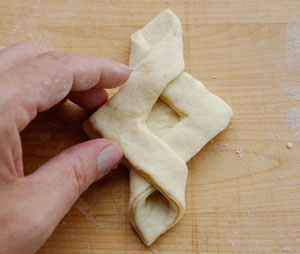
The Envelope (jam or apricot halves)
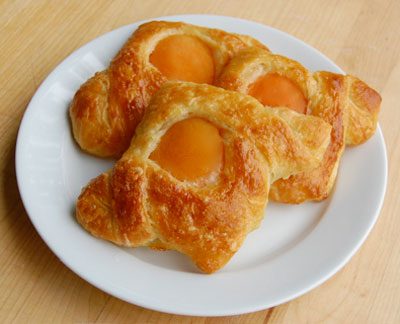 |
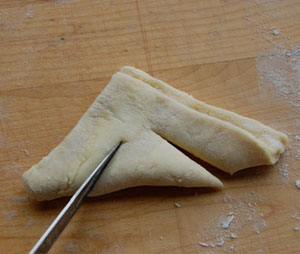
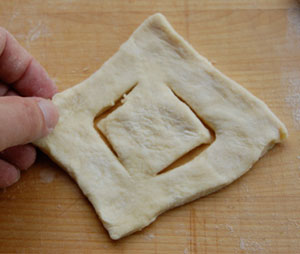
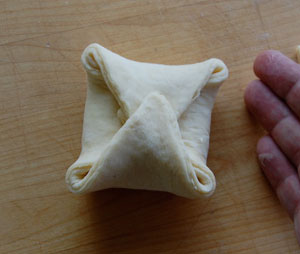
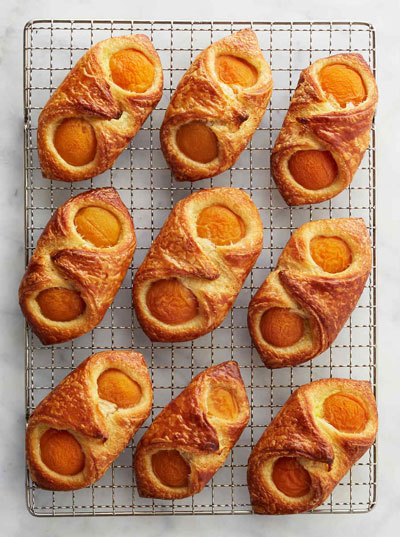
Most of the time when you see these they're filled with jam, though you can also tuck a canned apricot half inside as in the picture to the left. To add Pastry Cream along with the apricot, see Apricot Bow Tie Danish below. (For shaping, see the pictures below.) Fold the bottom half up to make a triangle, but don't press down or seal it. Cut two slits in the dough, parallel to the outside edge, about two thirds of the way to the center of the dough piece... ...and unfold the dough square. Turn it so there's a slit on either side. Then, fold in the sides, tucking the left-side point through the gap in the right-side point (put an apricot half in the very middle beforehand, if you wish). Proof as with classic sweet rolls on lightly greased cookie sheets, then fill the middle (if unfilled) with jam. Paint with egg wash and bake in a preheated 350-degree oven for 30 - 35 minutes or until golden.. |
|
|
||
The Bear Claw (almond flavor)
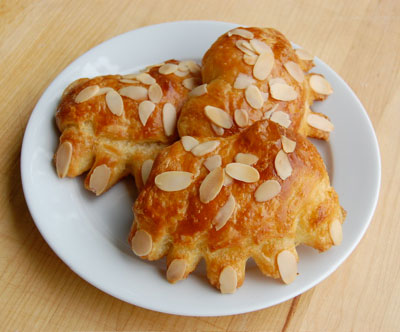 |
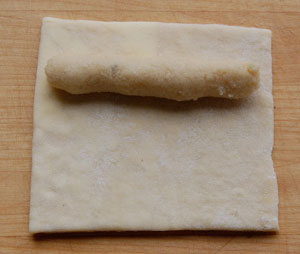
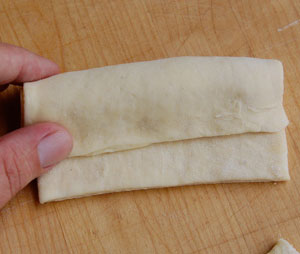
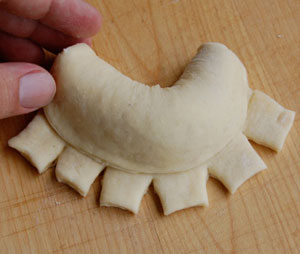
Here's how they're classically made. First you'll need to prepare a filling that's made from: 1 cup blanched almonds, chopped fine in a food processor Combine all and mix until uniform. Or Almond Paste Filling—Mix: 1c. almond paste, 1/3 c. butter & 1/3 c. sugar Roll a small log of filling between your palms and place near the edge of one of your dough squares. Then, dip your finger in water and moisten the top edge of the square. Fold the dough over the filling, leaving a lip on the bottom (see picture). With a sharp knife, make several small cuts in the lip...and bend the whole thing to spread them out into "toe"-like shapes. This bear has six toes. Proof on lightly greased cookie sheets, then paint with egg wash as with classic sweet rolls and sprinkle the tops with slivered almonds (put on little fingernail "claws" if you feel like being cute). Bake in a preheated 350-degree oven for 30 - 35 minutes or until golden. |
   |
|
The Pin Wheel (jam)
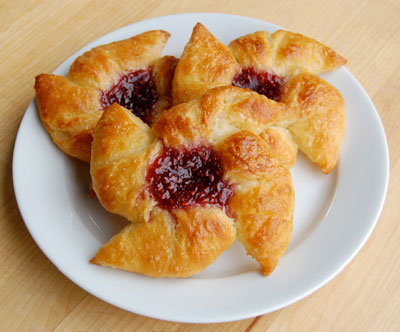 |
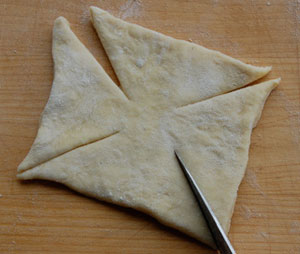
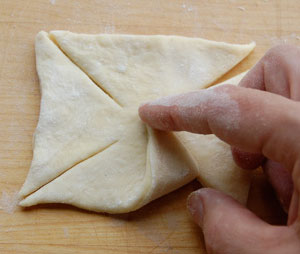
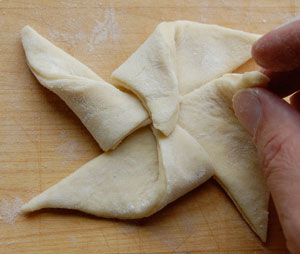
Begin by cutting slits in the dough square from (almost) the center outward. Bring up the right-side corner of each resulting "triangle" to the center of the dough piece and press it down lightly. Proof on lightly greased cookie sheets like classic sweet rolls. Similarly make a depression in the center of the proofed Danish with the back of a spoon, then fill it with a teaspoon or so of whatever jam you like. Brush with egg wash and bake like classic sweet rolls. Bake in a preheated 350-degree oven for 30 - 35 minutes or until golden. |
   |
|
The Cheese Danish (packet shape)
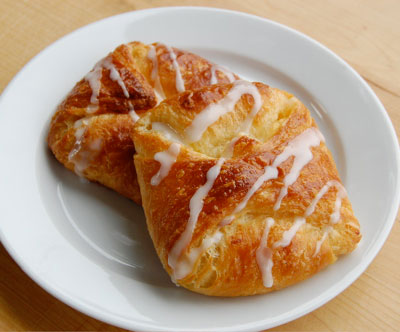 |
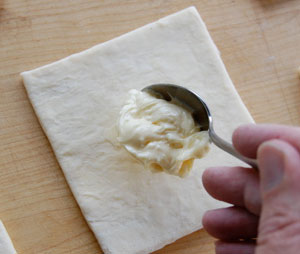
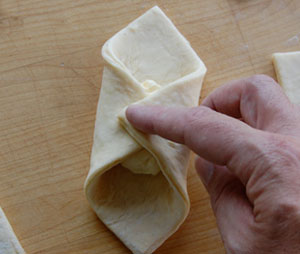
This shape is perhaps the easiest of all the Danish types, being just a simple packet made from a dough square. The filling is simplicity itself, something that can be improvised on. The rough proportions are as follows: 8 ounces cream cheese You could add a little lemon or orange zest if you have it. Combine all ingredients a bowl and beat until fluffy and uniform. Spoon about a tablespoon of filling into the middle of the square. Then fold in the the two corners opposite corners. (NOTE: Stop here if you wish to make the Danish pastry shape known as an "envelope", though this shape most commonly has jam or fruit in it). Bring in the third corner and using your finger, dab a little bit of the cheese filling on it as a sealing compound. Fold in the last corner and you're done! Proof, paint with egg wash and bake just like classic sweet rolls. Cool a bit and drizzle a little icing on top if desired to finish them. |
|
   |
||
 |
Apricot Bow Tie Danish w/ Pastry Cream Pastry Cream for Apricot Bow Ties Danish 2 cups whole milk In a medium saucepan, combine the milk, 1/4 cup sugar, vanilla bean and seeds, and salt. Cook over medium heat until mixture comes to a simmer. In a medium bowl, whisk together the egg yolks, cornstarch, and remaining 1/4 cup sugar. Whisking constantly, slowly pour about 1/2 cup of the hot milk mixture into the egg yolk mixture. Continue adding milk mixture 1/2 cup at a time, until it has been incorporated. Pour mixture back into saucepan, and cook over medium-high heat, whisking constantly, until it thickens and registers 160 degrees on an instant-read thermometer, about 2 minutes. Remove and discard vanilla bean. Transfer to the bowl of an electric mixer fitted with the paddle attachment. Add the butter, and beat on medium speed until the butter melts and the mixture cools, about 5 minutes. Cover with plastic wrap, pressing it directly onto the surface of the pastry cream to prevent a skin from forming. Refrigerate until chilled, at least 2 hours or up to 2 days. Just before using, beat on low speed until smooth (you can also whisk by hand). YIELD: about 2 1/2 cups |
|
To Make the Pastry Line two large baking sheets with parchment paper; set aside. On a lightly floured work surface, roll out the dough to just over a 13-inch square, a little over a 1/4-inch thick. Using a ruler and a pizza wheel or pastry cutter, trim the edges of the dough to form a 12-inch rectangle, then cut the dough into nine 4-inch squares. Place pastry cream in a pastry bag fitted with a 1/2-inch plain tip (such as an Ateco #806). Pipe a dollop of cream into the center of each square. (Alternatively, scoop the filling with a tablespoon.) Arrange two apricot halves (1 15-ounce can) over the cream, overlapping them slightly, one in the upper left corner and the other in the lower right. To form the bow ties, fold the upper right corner over the apricot filling, about two-thirds of the way toward the opposite corner; press down firmly to seal. Bring the lower left corner up and over first fold, pressing down to adhere. (Be careful not to fold too tightly, or you may force out some of the filling.) Repeat with the remaining squares. Place the bow ties on the prepared baking sheets. Cover with plastic wrap, and let rest in a warm place until dough is doubled in bulk, about 45 minutes. Preheat the oven to 375 degrees. Brush dough with beaten egg; sprinkle with sugar. Bake, rotating sheets halfway through, until pastries are evenly browned, 20 to 25 minutes. Transfer to a wire rack to cool. Serve at room temperature. Bow ties are best eaten the same day they are made. |
||
The Snail Roll (chocolate chip - like in the picture, cinnamon sugar, cinnamon sugar and raisin, walnut and cinnamon sugar, pecan, almond filling)
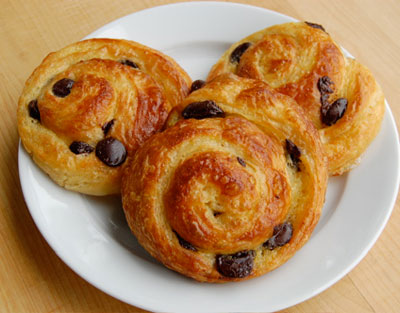 |
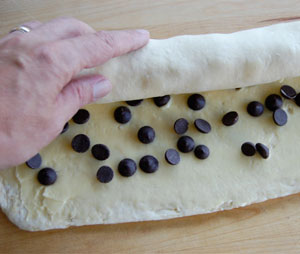
Like classic sweet rolls, these too are fixtures of the Danish counter. The reason (probably), because the shape is so darn versatile. There are chocolate chip snails (like in the picture), cinnamon sugar snails, cinnamon sugar and raisin snails, walnut and cinnamon sugar snails, pecan snails, almond filling snails and any-kind-of- jam-you-can-possibly-think-of snails. And none are more difficult to make than any others. If you're making chocolate chip or pecan snails, put down a thin layer of buttercream (otherwise lay down whatever you wish). Then scatter your chips — or whatever — over the sheet. Gently turn in the top edge and using both hands roll the whole thing up. Another recipe: Pecan Filling: Cream 1/4 c. butter and 1/2 c. brown sugar, spread on dough and sprinkle with pecans. Cinnamon could be added to the butter - brown sugar mixture. Shore up the ends with your hand and roll the tube back and forth a little to solidify it a bit. The roll should be about an inch-and-a-half to two inches in diameter. If it isn't, just roll it out with your palms like a baguette until it is. (Don't forget to shore the ends up again afterward). Now, using your trusty bench scraper (or a knife), cut them into roughly inch to inch-and-a-quarter-long pieces. Don't worry if they're a little squished, you can squeeze them back into shape. Now all you need to do is peel back about the last inch or so from the roll and tuck it underneath to keep it from unraveling in the oven. Proof, brush with egg wash and bake just like you would classic sweet rolls. Drizzle with simple icing — or even chocolate — if you wish. |
 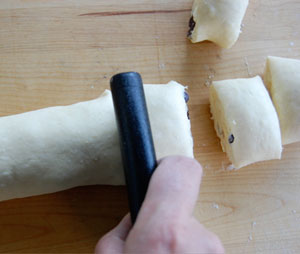 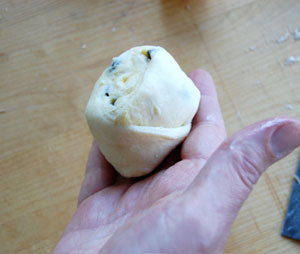 |
|
Butterfly Make a diagonal cut to ½ inch (1 cm) of the center from two opposite corners, forming two triangles that are joined at the center. Place a small teaspoonful of raisins in the middle of each triangle and fold the cut corners over to the other. Press lightly to seal, then separate [move?] the triangles to form a butterfly shape. Decorate, when cooked, with glace icing and flaked almonds. |
|
Appricot Puff Place an apricot half in the center of a small dough square. Cut a circle, the size of the apricot, from the center of a second square and place over the first. Brush the finished pastry with glace icing. |
|
