 Perfect Pie Crusts
By: Allrecipes Staff
Whether you prefer flaky crusts or crispy ones, pie-making is all about technique.
There are four basic ingredients in a pie crust: flour, fat, water and salt. You can come up with numerous variations just by changing your basic ingredients, as long as you stick to the ratio of three parts flour, two parts fat, and one part liquid.
Flour: For a tender crust, choose a low-protein (low gluten) flour. Pastry flour, with a protein content of about 8-10%, ranks between all-purpose flour and cake flour. All-purpose flour works just fine for pie crusts, while cake flour may lack enough protein to form a workable, elastic dough. Depending upon your tastes and the recipe, you may substitute nut flours (almond flour or hazelnut flour) or whole wheat pastry flour for part of the mixture. If you're a novice crust-maker, start with a plain all-purpose or pastry flour dough.
Fat: Shortening in the dough produces tenderness and richness. It is a tenderizer because it interferes with gluten development in the making of pastry. The fat "shortens" or cuts the flour proteins and prevents them from becoming elastic. Mixing and handling too much causes the gluten to develop.
Flaky crusts can be made from a variety of fats. Crusts made with all butter are very flavorful, though they are generally not quite as flaky as crusts made with shortening or lard. Vegetable shortening produces a flaky pie crust that is slightly easier to work with than one made with butter, but the flavor won't be as rich. Lard produces the flakiest crust, but processed lard can have a chemical aftertaste. If you wish to replicate your grandmother's famous pie crust, ask your butcher to order fresh lard. Some of the best pie crusts are made with a combination of fats: half butter, for flavor, and half shortening, for flakiness.
You can also make a pie crust with vegetable oil. Fans of crispier crusts use melted butter or oil for the fat, resulting in a mealier dough that bakes up in a fine-textured, crisp crust that melts in your mouth.
If you're using solid fats (butter, shortening, or lard), they should be kept very cold. When you "cut in" the fat, you want discrete pieces (pea-sized) that don't blend in to the dough as you work it. These flakes of butter will expand and the liquid evaporate during baking, separating the layers of dough into a flaky crust.
Liquid: The liquid in dough, which is most commonly water, forms steam in the oven. Steam forces the layers of fat-coated flour to expand and separate. As the dough bakes, the moisture evaporates; the dough dries and leaves a multitude of layered flakes that form a casing called "crust."
When adding liquid to the flour and fat mixture, it should be ice-cold in order to keep the pieces of fat cool and separate. Ice water is fine, but fruit juices, egg yolks, sour cream, and milk or cream add different flavors and textures to your pie crust. Always add liquid a tablespoon at a time, tossing with the flour mixture. Humidity can affect dough performance, so you may need less liquid than the recipe calls for. If your dough becomes too wet, you'll need to add more flour to roll out the crust, throwing off your ratio and resulting in a tough crust.
Other additions: Wheat germ, a pinch of spice, a dash of flavorful liqueur or cold brewed coffee are all good additions to pie crusts. Don't forget to add a pinch of salt: the crust will taste flat without it. No matter how good the filling, the crust is the showcase: a good homemade crust takes a pie to new heights. For a sweeter crust, add a tablespoon or two of confectioners' sugar. Granulated sugar can make the dough sticky and harder to work with.
Pastry Techniques
Technique is the most important aspect to making a good pie crust. As long as you follow a few simple tips, your pie crusts should turn out perfectly almost every time.
- All ingredients should be ice-cold before mixing, including the bowl. This is especially important for the fat you are using. Shortening can be kept in the freezer without becoming solid.
- Be sure to mix half the fat in until the flour looks like meal; then mix the other half in until the size of peas.
- Do not overwork the dough. Mix quickly and handle the dough as little as possible. Overworking the dough will cause it to be tough.
- Chill the dough in the refrigerator for at least 30 minutes before rolling it out. This lets the flour absorb the liquid and helps to prevent stickiness when rolling out the dough. It also allows the gluten (the protein structure) to relax, making it more elastic and less likely to shrink back as you roll it.
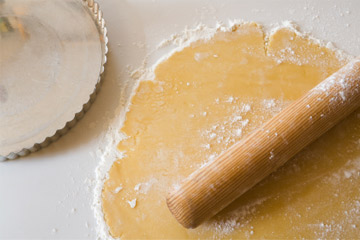
- Roll the dough out on a lightly floured surface, a pastry cloth, or between two sheets of waxed paper. Roll the dough from the center outward using even, firm strokes. Turning the dough as you work, about an eighth of turn per roll, will help to keep it round.
- Use a dry pastry brush or a clean dishtowel to brush off excess flour from the dough.
- Once the dough is rolled to the proper thickness, fold it in half or roll it around your rolling pin to lift it into the pie pan. Always drape the walls of the pan generously with the dough and don't pull up on the crust to flute the edges, this will stretch the dough and cause it to shrink when being baked. Gently press the dough down into the bottom edges of the pan. You can use kitchen shears or a paring knife to trim the crust to about a ¾ inch overhang.
- After the rolled-out dough has been transferred to the pie pan, let it relax in the refrigerator for another 20-30 minutes before filling. This will prevent the dough from shrinking during baking.
- Before pouring the filling into the unbaked pie crust, you can brush the bottom and sides of the unbaked pie crust with lightly beaten egg white or melted jelly. This will help create a seal to keep the crust crisp. To ensure that the crust stays even crisper, partially bake the pie crust before adding the filling. (This is, of course, only an option for custard or crumb-topped pies, not latticed or double-crust pies.)
Baking tricks
- When pre-baking a pie crust, line it with foil or parchment paper and fill it with pie weights, dried beans or rice. (This is also called blind baking.) Bake until the rim just begins to color. Remove the weights and carefully prick the bottom and sides with a fork to prevent air bubbles. Return it to the oven and continue baking until golden brown.
- To keep the crust's edges from over-browning, cover them with strips of foil or a "pie shield."
- Use a pie pan that absorbs, rather than reflects, heat. The best ones are glass, dull aluminum, or dark finished metal. These pans will help to ensure that your pie crusts bake to a nice golden brown color.
- If you own a baking stone or pizza stone, use it. Bake the pie on a cookie sheet to prevent spillovers on the stone. Baking on a stone ensures that the bottom crust on even the juiciest fruit pie will be done when the top is brown.
- When baking a double-crust pie, be sure that the top crust has holes cut or poked in it so that steam can escape while baking. It's especially nice if the holes are cut or poked in a decorative pattern.
- To add a richer color to a double-crust or lattice-topped pie, brush the top crust with milk or lightly beaten egg before baking.
- For shine and sparkle, thin a quarter cup of light corn syrup with very hot water. When the pie is done, brush the thinned syrup over the top of the crust. You can add granulated sugar or decorative sugar at this time. Return the pie to the oven for two to three minutes to let the glaze dry and set.
The Myth of Water from Baking Unplugged by Nicole Rees
Just about every cookbook I own insists that adding too much water to pie dough makes it tough. Truth is, I always use the allotted amount of ice-cold water, and then some, and my pie dough is wonderfully flaky. So what's the deal?
The toughness, as the argument goes, stems from the network of proteins that form when flour and water are mixed. Less water must minimize the formation of protein, then, right? Well, not exactly. Mixing, shaping, and rolling the dough develop the gluten, too—you can feel the dough tighten up as you work it.
Usually the culprit for a tough pie crust is too much mixing, which destroys the pea-sized globs of butter or shortening that make the pastry flaky. Care must be taken not to grind the fat into the flour completely. The action of rolling out the pie pastry develops the gluten, too, and this can contribute to toughness—but only if you bake the dough right away. A quick rest in the refrigerator, usually 30 minutes to an hour, relaxes the gluten completely. This step is not to be skipped, or the dough will actually snap back in the oven, losing its shape.
When making pie pastry, I barely work the dough for fear I'll melt all the fat. This means I add more water than most folks as I'm folding and pressing the dough with a rubber spatula to see if it's moist enough to come together. So why is my pie dough so flaky? Think of a quick puff pastry, which has more water than pie dough, has large globs of fat, and gets rolled and folded a lot (for a strong gluten network)—it is tremendously flaky and not tough at all. The key is all in the resting.
This is what America's Test Kitchen says about tough crust and water:
Our 100% foolproof pie dough relies on an 80-proof secret ingredient! Pie dough should be simple: mix flour, salt, and sugar together, cut in some fat, add water, roll it out, and bake it. But somehow the same recipe can result in a perfect crust one day and a tough-as-nails crust the next. We wanted to figure out why this happens, and how to guarantee a tender, flaky crust every time.
The trick to creating consistently great dough depended on the amount of water incorporated, and in particular how it was absorbed. There had to be a substitution that would keep the dough moist but not create too much gluten, which is produced by combining water and flour and makes for a leathery crust. After many dry, crumbly, dough "don'ts," we discovered the perfect liquid to use. Vodka! It added moisture, but is only 60% water—the other 40% of vodka is ethanol. The alcohol doesn't create dough-toughening gluten, so when we baked up this pie dough, we had a perfectly flaky AND tender pie crust with absolutely no vodka taste (all the alcohol evaporates in the oven during baking).
See also:
Making a Pie Crust, Step by Step
Making a Lattice-Top Pie Crust
Pie Troubleshooting Guide
