Exercises for Spinal Stenosis
These exercises are recommended by the American medical field.
from https://www.spine-health.com/ and https://www.spineuniverse.com/
Lumbar spinal stenosis—a narrowing of the nerve passageways in your low back—causes pain from your lumbar spine down to your buttocks and legs. When your lower body feels weak and in pain, staying active is the last thing on your mind. But gentle stretching and exercise are among your greatest allies, as they strengthen your spine and make it less susceptible to spinal stenosis symptoms.
It’s also important to consider that a sedentary lifestyle—using rest to heal your pain—may actually worsen your lumbar spinal stenosis symptoms. Exercising with lumbar spinal stenosis shouldn’t be stressful or painful.
The best spinal stenosis exercises either reduce tension through light stretching or activity, or help strengthen the core — the core refers to all of the muscles which wrap around the torso and support both the pelvis and the spine. Think of your core as a strong column that links the upper body and lower body together. Core exercises train the muscles in your pelvis, lower back, hips and abdomen to work in harmony. This leads to better balance and stability, whether on the playing field or in daily activities. Any exercise that involves the use of your abdominal and back muscles in coordinated fashion counts as a core exercise.
How to engage your core
Many exercises tell you to engage your core. The simplest way to engage your core is to brace yourself as if you’re expecting a strong punch to the torso, and then breathe into your stomach. Your core engages naturally right before you laugh or cough, so if you initiate one of these actions, you’ll get an idea of how it should feel when your core is engaged.
Sucking in your stomach and holding your breath are the most common mistakes people make when told to engage their core. Truthfully, this is pretty much the exact opposite of how to engage your core correctly.
Rather than sucking your stomach in, you need to focus on pulling your navel up and in towards your spine. When you do this, your abs should feel tightened but you should still be able to move and breath as normal.
A good position for engaging your core is on all fours. In this position, pull your abs up and in towards your spine and keep your torso still whilst you exhale.
Exercises to relieve and treat lumbar spinal stenosis pain are usually flexion-based (forward-bending). This position opens up the constricted bony canals, decompressing the nerve root(s) and enabling patients to perform the exercise more efficiently with lesser pain.
Flexion-based lumbar stabilization techniques to treat spinal stenosis involve:
- Functional stretching of the hamstrings, quadriceps, and the deep lower back muscles
- Abdominal strengthening exercises to decrease pressure on the spine
- Hip mobilization to improve the mobility of the hip joint
These exercises typically aim at building stability of the lumbar spine, reducing pain, and improving leg function. A combination of several exercises is necessary to achieve the desired stability and support of the lumbar spine. Simple stretches like the pelvic tilt, knee to chest, and lower trunk rotation—can easily be incorporated into your daily routine to boost your overall spine health.
Practice Deep Breathing while Exercising
Pay special attention to how you breathe, and practice deep breathing, which should be done through the nose. Most people use only the small part of their lung capacity. As the breathing is shallow, it deprives the body of oxygen and prana. With each inhale, allow your belly to expand. Draw your navel toward your spine with each exhale. Typical yogic breathing is one where "when you inhale, your stomach swells out, followed by your chest and while you exhale your stomach goes in, followed by your chest". This is a deep breathing exercise wherein you soak in maximum oxygen filling in your stomach first followed by the chest and vice versa during exhalation. Couple deep breathing with asana (or guided imagery, mantra meditation, or therapeutic massage), and you’ve given your body and mind one of the most effective relaxation techniques there is.
A few things that are worth keeping in mind while doing any asanas would be:
- Inhale when opening the front of the body. Any asanas that open the front body should be practiced on an inhalation. These include backbends, raising the head, and raising the arms. Cobra pose is a great example of this pairing. As you peel off the floor in Cobra pose, the head is lifted, the chest is expanded, and the belly moves downward. This movement, then, is supported by inhalation.
- Exhale while compressing the front of the body. Forward bending movements tend to compress the front of the body. In Seated Forward Bend pose, for example, the back is stretched and the front of the body contracts. This movement and all forward bends, then, should be practiced on an exhalation. Twists and side bends, which restrict expansion of the chest and abdomen, should also be practiced on an exhalation.
- Breathe deeply and effortlessly. This is the goldest of yoga’s golden rules of breathing. The breath should serve as a guide in all movement. The moment the breath becomes strained or disturbed, the body’s been pushed too far. The goal of any asana is to be completely comfortable and relaxed; to move and hold with deep, effortless breaths. Only then can one derive the benefits from an asana. If the body is under strain and tension, and the breath is adversely affected, the purpose of the asana is defeated—and it’s no longer yoga. Always use the breath as a guide.
Flexion-Based Stretching Exercises for Spinal Stenosis
These exercises help improve lumbar stability and maintain a correct spinal posture during everyday activities, such as walking or bending.
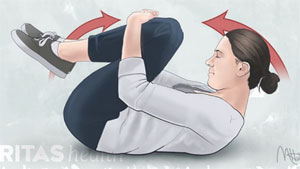
Back flexion while lying down
Stretching the back can help bring space between the vertebrae to offer pain relief.
- Lie on your back with knees bent and feet on the floor.
- Inhale deeply, then on an exhale, gently pull the knees to the chest with both hands until a comfortable stretch is felt.
- Hold for 2 to 3 seconds and slowly return to the starting position. Release and repeat four to six times trying to stretch futher each time. Gradually increase the hold for up to 1 minute.
- For a more advanced stretch, gently raise the upper back so that the forehead touches the knees.
- Aim to complete 4 to 6 repetitions of this stretch.
Back flexion while sitting
- Start by sitting in a chair with the feet flat on the floor.
- Inhale deeply, then on an exhale, lean forward, bending at the waist and keeping the back straight.
- Reach both hands towards the floor between the knees until a comfortable stretch is felt. Alternatively, you can slide your hands down the front of your thighs.
- To add overpressure and increase the amount of stretch on your back, grab your ankles and gently pull yourself into more forward flexion.
- Breathe deeply and hold for 2 to 3 seconds and slowly return to the starting position. Aim to complete 4 to 6 repetitions of this stretch.
Back flexion while standing
- Start by standing with both feet about shoulder-width apart.
- Inhale deeply, then on an exhale, gently bend forward at the waist, without arching the back.
- Reach both hands down towards the floor until a comfortable stretch is felt.
- Breathe deeply and hold for 2 to 3 seconds and slowly return to the starting position. Aim to complete 4 to 6 repetitions of this stretch.
Child’s pose or four-point back flexion
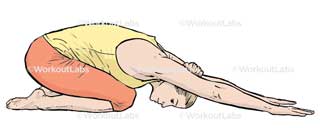
- Start by getting down on the hands and knees, hands directly beneath your shoulders and knees below your hips. Aim your tailbone towards the wall behind you and the crown of your head to the wall in front of you. You should feel your low belly and abdomen engage when you complete these two actions.
- Inhale deeply, and on a long, slow exhale, gently sit back on the heels.
- Spread the knees comfortably apart and bend forward so your neck is lengthened and your forehead is resting on the floor, reach your arms forward until the they are outstretched in front.
- Breathe into this stretch for five deep breaths, then slowly return to the starting position. Aim to complete 4 to 6 repetitions of this stretch.
- Build up so your are resting in this pose for up to 5 minutes.
Cat Cow Pose
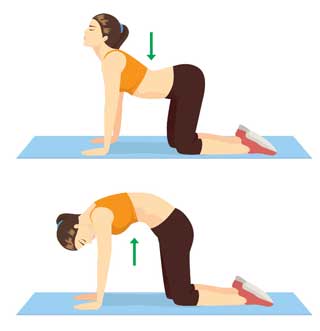
This spinal stenosis exercise can be completed on all fours, seated, or standing. Whichever position you choose, make the movement as fluid and slow as you can, following your breath. Aim for five complete rounds of cat/cow twice daily.
All fours: Start on hands and knees with hands directly beneath shoulders and knees below hips. Inhale and let your belly drop towards the ground as you open your chest forward and lift your face to the sky. Exhale, curving your tailbone down and forward as you push the floor beneath you away and arch your back.
Seated: Sit comfortably on a chair with feet flat on the ground, tailbone reaching down to the floor beneath the chair and crown of the head reaching to the sky. Place your hands on your knees, and on an inhale, stretch your sitting bones up and back as your chest reaches through your arms, curving your lumbar spine. Exhale and push away from your knees as you curl your tailbone under, arching your upper back.
Standing: Stand with feet slightly wider than hip’s width distance. Bend your knees slightly and place your hands just above your knees. On an inhale, push your sitting bones out behind you like you are trying to close a drawer as your chest comes forward between your arms and your raise your face to the sky. Exhale and drop your tailbone down, as you push out of your hands and arch your upper back like a Halloween cat.
Tiger pose
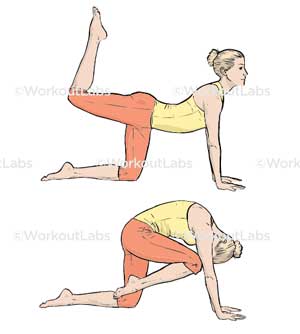
When rehabilitating an injury, it’s important to both stretch and strengthen. While muscle weakness may have contributed to the original trauma, weakness undoubtedly develops while the body rests as it heals. Yoga is particularly good for developing this balance of strength and flexibility. This deceptively simple posture gently stretches and strengthens the back while firing up the core. It’s a foundational posture in yoga, used in many beginner classes and is an excellent way to warm up the body for more rigorous postures at any level.
- Come to all fours, with the knees underneath the hips and wrists underneath the shoulders. Line the wrists up to the front edge of the mat, spread the fingers wide, and press firmly down into the base of your index finger.
- Inhale and reach the right leg straight behind you (the picture shows variation with the knee bent) so your body forms a long line. If it feels good, extend the left arm, as well.
Check for correct posture: Engage through the abdomen and core, hugging the body in so it doesn’t sag. It’s common for people to dip the hips or lift them up too high to make the posture easier. Aim for a solid, straight line. You may want to practice in front of a mirror or with a friend to ensure proper form. - Exhale, round the back and bring the knee toward the forehead. If using the arms, connect the elbow to the knee. Inhale and return to starting position.
- Repeat this exercise five to seven times before switching to the other side.
Keep in mind that some yoga postures may stress the back or other areas of pain in your body. Practice with care and only do those exercises that feel good.
Knee to Chest
Purpose: To reduce pressure on the nerves in your low back and relieve back pain.
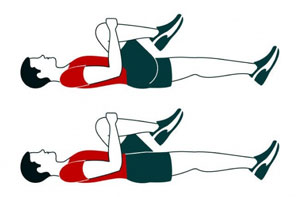
How to perform a knee to chest stretch:
- Lie on your back.
- Bring your knee toward your chest.
- Using your hands, gently pull your leg in until you feel a comfortable stretch.
- Hold for 10 seconds, then place your leg to the floor.
- Repeat with the other leg and hold for 10 seconds.
- Repeat on each leg 3 to 5 times.
- Hold both legs together in the stretched positions for 10 seconds.
- Repeat with both legs 3 to 5 times.
Flexion-Based Strengthening Exercises and Hip Mobilization
Strengthening back exercises in a forward-bent position are usually done with a pelvic tilt. A pelvic tilt exercise strengthens the abdominal muscles and stretches the muscles of the lower back. This exercise is performed by tightening the lower stomach muscles and pulling the navel in and toward the sternum.
Pelvic Tilt
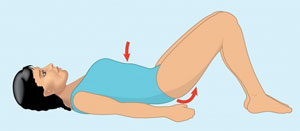
Purpose: To strengthen your lower abdominal muscles and stretch your low back.
The pelvic tilt may be done in a lying down, seated, standing, or hands-and-knees (4-point) position.
- Lie on your back with your feet flat on the floor.
- As you exhale, contract your abdominal muscles while you push your belly button toward the floor and flatten your low back.
- Hold the position for 5 seconds.
- Repeat 10 times, holding the position for 5 seconds each time.
How can I tell if I’m doing the pelvic tilt right?
With the same hand, place your pinky finger on your hip bone and thumb on your lowest rib. As you squeeze your abdominal muscles, the space between your pinky finger and thumb should get smaller.
Curl-ups
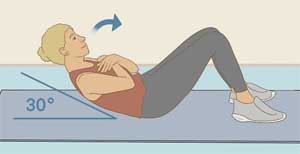
Start by lying on the back with knees bent.
- Gently fold both arms across the chest and hold a pelvic tilt (abdominal muscles contracted, lower part of pelvis tilted up).
- Slowly lift the head and shoulders from the floor. It is important to maintain a strong, supported back in this exercise, so think of letting your heart lead the movement instead of pushing with your lower back.
- Hold for 2 to 4 seconds and slowly lower to the starting position.
- As strength builds, aim to complete 2 sets of 10 curls. Do not attempt to lift the head up too high. If neck pain occurs, place the hands behind the head to support the neck.
Hook-lying march
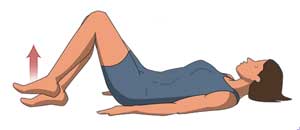
Start by lying on the back.
- Tuck both arms along the side and hold a pelvic tilt (abdominal muscles contracted, lower part of pelvis tilted up).
- Slowly raise alternate legs 3 to 4 inches from the floor (similar to a marching motion).
Aim to march for 30 seconds. Repeat for 1 or 2 more sets, with 30-second breaks in between repetitions.
Hip mobilization
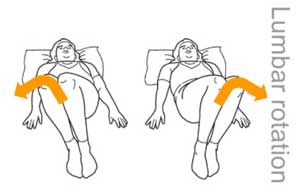
Lower Trunk Rotation
Purpose: To increase your spine’s mobility and flexibility.
Practice core engagement by tightening your abdominals (think about pressing your navel toward your spine) without moving your legs to opposite sides. This will help with body awareness and muscle control during trunk rotation. Once you have the hang of tightening your core, then progress to moving your legs during the exercise.
- Lie on your back in the hook lying position (with your knees bent and feet flat on the floor).
- Maintain your shoulders and upper body firmly against the floor. Outstretch your arms and press them into the floor to help with balance during the movement.
- While contracting your abdominal muscles (engage the core), rotate your knees to one side, working within your range of motion.
- Hold for 3 to 5 seconds. (You will feel a gentle stretching in your lower back and hips.)
- Contracting your abdominal muscles, rotate your knees to the other side.
- Hold for 3 to 5 seconds.
- Repeat up to 10 times on both sides.
