Yoga Sequence for Lumbar Spinal Stenosis
from https://yogainternational.com/
The following yoga practice for lumbar spinal stenosis (LSS), a narrowing of the space along the spinal canal, was designed to maximize benefits and to minimize risk for those with this condition. A beneficial yoga approach for those with stenosis could involve core work, forward folding, and psoas (a long muscle placed on the sides of the lumbar region of the vertebral column and brim of the lesser pelvis) stretching, while gently moving in the direction of a neutral spine. Extreme spinal movements are often best avoided.
Practice slowly enough that you feel the connection between the poses and the sensations you’re experiencing. Stop immediately if you experience pain, tingling, or numbness.
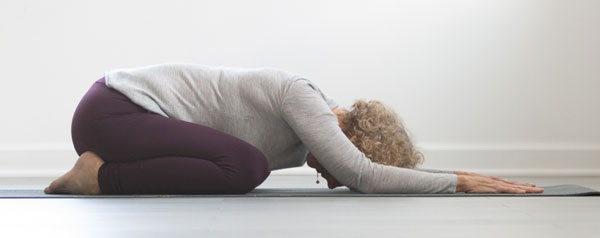
1. The Child’s Pose
In child’s pose, the lumbar spine is gently flexed, a position that offers relief to many with stenosis. It’s a controlled, partial flexion making it safer than deep or abrupt forward folds.
- From hands and knees, open your knees wide and bring your big toes to touch.
- Sink your hips back as far as they can comfortably go, and walk your hands out in front of you. Remain here for a few deep breaths.
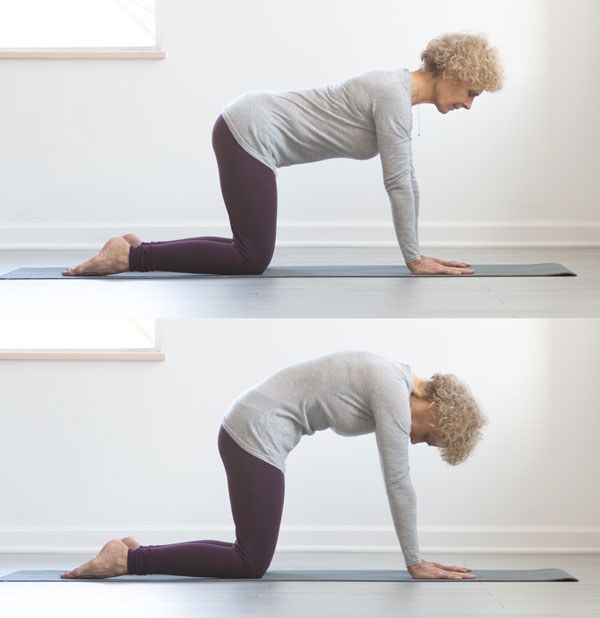
2. Cat-Cow Variation
Cat-cow encourages flexibility in the spine and strengthens the muscles that move the pelvis. In this variation, Go into a modest cat arch if it feels good, emphasizing rounding the lumbar spine, but stick to neutral instead of backbending into cow because spinal extension so often aggravates symptoms of LSS.
- Come into a hands and knees position. On your inhale, instead of the typical “cow,” find a neutral spine, creating a gentle lumbar curve and lengthening the top of your head away from the tip of your tailbone.
- On your exhale, round your spine, gazing toward your thighs.
- Repeat for several breath cycles, each time coming to a neutral spine on your inhale rather than into a backbend.
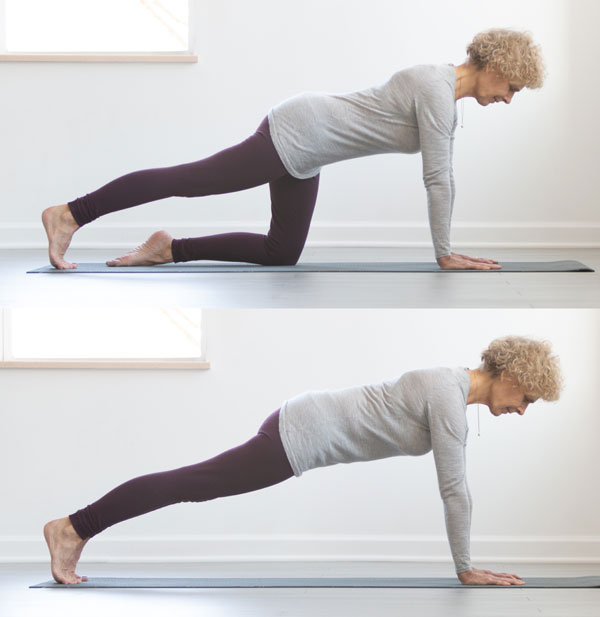
3. Plank Pose
Plank builds core strength, which can help support the lumbar spine.
- From all fours, maintain a neutral spine, and with your shoulders over wrists and the crown of your head reaching forward, step your right foot all the way back.
- Tuck your toes under you and reach back through your right heel.
- Stay here for a few breaths, if this is enough intensity, then change sides, lowering your right knee and stepping your left foot back; or, for more intensity…
- Step your left foot back alongside your right, feet hip-distance apart, heels reaching back as the crown of your head reaches forward.
- Stay in plank for several breaths, drawing your belly in and up on your exhale, before lowering your knees down to the mat.
4. Downward Dog Variation
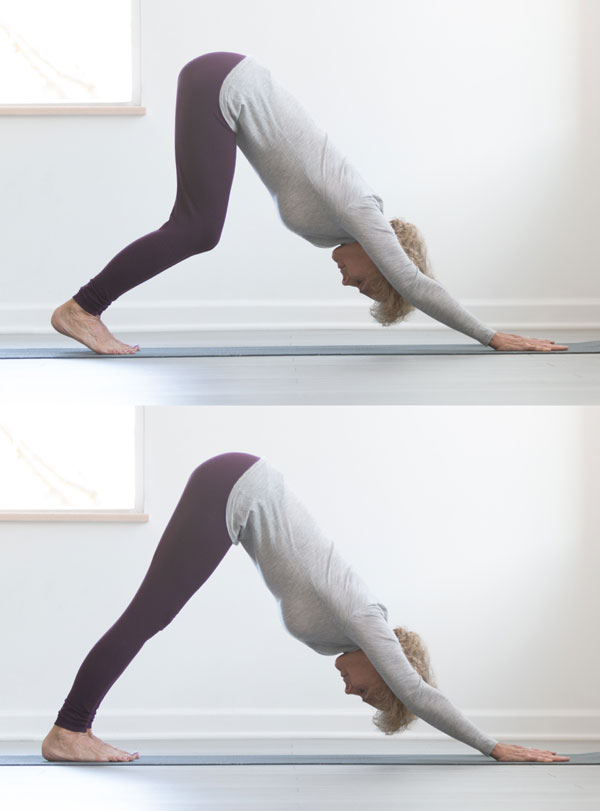
In downward facing dog, the limbs collaborate in spinal lengthening. Because some mild flexion often decreases LSS symptoms, instead of working to tip the tailbone toward the ceiling enough that the lower back curves in, those with LSS may prefer to allow the lower back to flatten in this pose.
- From tabletop position (1. Come to the floor on your hands and knees. Bring the knees hip width apart, with the feet directly behind the knees. Bring the palms directly under the shoulders with the fingers facing forward. 2. Look down between the palms and allow the back to be flat. Press into the palms to drop the shoulders slightly away from the ears. Press the tail bone towards the back wall and the crown of the head towards the front wall to lengthen the spine.)
- Lift your hips up and back, first with bent knees, then reaching your heels toward the mat to straighten your legs as much as is comfortable. (Note that if a shorter-than-usual downward dog—one in which the lower back is flat or gently rounded—feels best for you, feel free to practice the pose that way.)
- Stay here for a few breaths.
5. Forward Fold to Mountain Pose
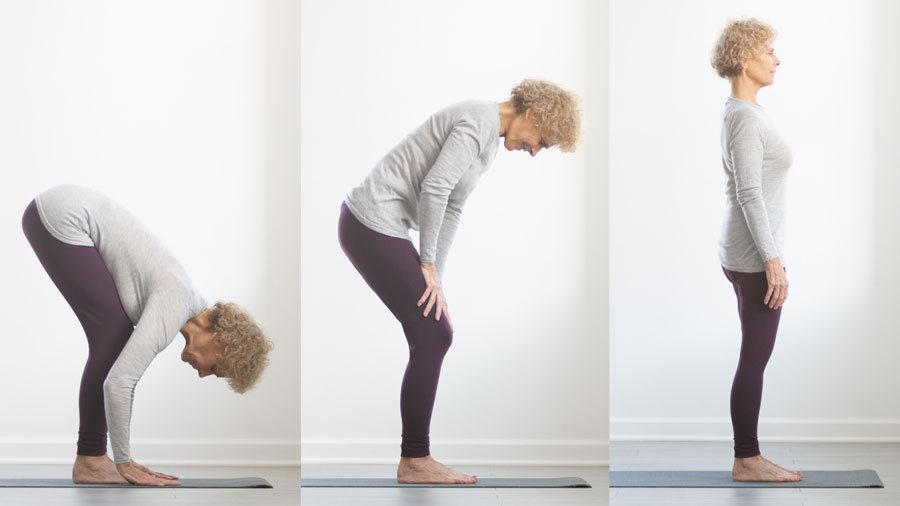
Controlled forward folding often helps to relieve LSS symptoms, and walking the hands up the thighs to come up is a transition that does not place stress on the lumbar spine.
- Walk your feet forward from downward facing dog and bring your hands to blocks, to your shins, or thighs (and feel free to bend your knees as well) until you have found the perfect place for you: a forward fold that yields a sense of relief.
- Press down with your feet and bend your knees however much is comfortable for you as you walk your hands up your thighs to come up, with a long spine, to standing.
6. Mountain Pose at the Wall
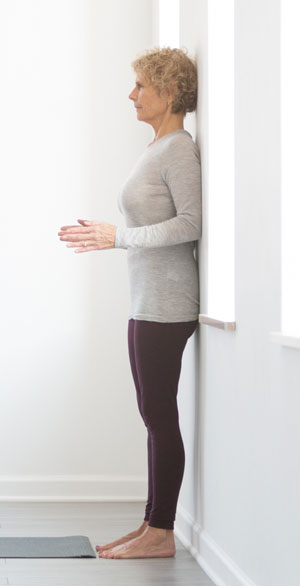
Using props can enhance your self-perception, allowing you to clearly perceive the components of a neutral spine.
- Stand with your back against a wall, feet a few inches away from it, hip-distance apart and parallel. Ideally, although your lower back and the back of your neck will curve gently away from the wall, your buttocks, your mid and upper back, your shoulder blades, and the back of your head will all touch the wall.
- To bring your shoulder blades toward the wall, make robot arms, pressing the backs of your upper arms to the wall as you bend your elbows at right angles alongside your rib cage.
- Shrug your shoulders up, move them back, then move them down your back and toward each other.
- If this neutral alignment creates discomfort in your lower back, bend your knees and walk your feet forward enough that your lower back flattens against the wall.
- Keep robot arms or relax your arms alongside you as you remain here for a few breaths, rooting down through your feet, lifting up through the crown of your head, and noting the interrelationships that compose a neutral spine so you can recreate it later and often.
7. Warrior I Variation
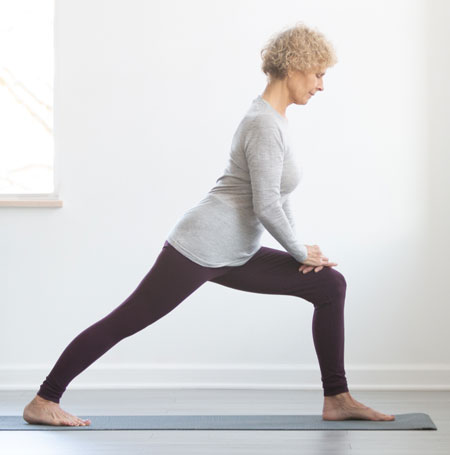
Flexing the lumbar spine by leaning forward in poses like warrior I may afford relief of stenosis symptoms, while the more upright position will stretch the psoas. Lengthening the psoas can help to prevent or reduce the lumbar lordosis (inward curvature of the lower back) that often causes symptoms for those with LSS.
- Return to the top of your mat. Root down with your left foot and step your right foot a big step back behind you. Position your feet about hip-distance apart and aim your right big toe toward the front left corner of your mat.
- Bend your left knee and lean over your left leg until your lower back flattens, placing your hands on your left thigh near the knee (or bring your forearms to your thigh if a deeper fold is necessary for comfort).
- Stay here for several breaths, reaching your heart forward, or experiment with walking your hands closer to your left hip and bringing your spine to a more upright position.
- (If a vertical spine feels good, feel free to take a more traditional warrior I: Reach your arms forward and up as high as you comfortably can.) Spend several breaths here, then step your right foot forward and change sides.
8. The Great Seal Pose (Maha Mudra) Variation
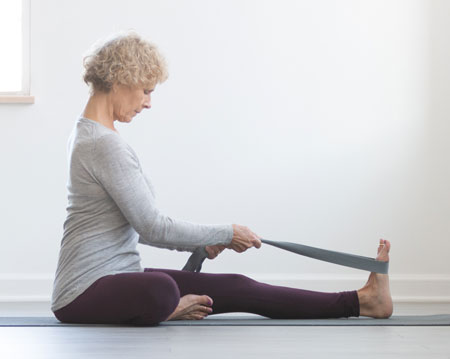
Practice all three bandhas, or body locks, to gently facilitate core strength while mobilizing the hips. Since those with LSS may find twisting with a rounded back compressive, this version of the pose, which enlists a strap, encourages a long spine.
- Come down to the floor and straighten your legs out in front of you. Bend your right knee to the right, placing the sole of your right foot against your inner left thigh. Support your right thigh with a block or blanket if you experience any knee discomfort.
- Place a strap around your left foot (or bring your hands to the floor on either side of your left thigh, whichever position helps you to lengthen your spine), and keeping an upright spine, turn your chest gently toward the left as you focus on lifting up through the crown of your head. (Naturally, don’t twist so far you feel any discomfort: Aim your chest toward your right shin if you need to decrease the twist.)
- On an exhale, lift your pelvic floor and draw your belly in and up to engage mula bandha and uddiyana bandha. Lift your chest and lower your chin toward your breastbone (only as far as is comfortable) for jalandhara bandha. Release the effort on your inhale, and re-engage with your next exhale. Do this for several breaths, then extend your right leg out and switch sides.
ROOT LOCK: MULA-BANDHA
The pelvic floor is a diamond-shaped area containing the anus, the genitals, and the perineum (the small area between the anus and genitals). The root lock is accomplished by pulling inward at the perineum.
- Sit erect in a meditative pose.
- Inhaling, contract the entire pelvic floor, pulling inward and upward. Exhaling, slowly release it. Repeat ten times.
- Practice the same contractions but reverse the breathing, contracting on the exhalation and relaxing on the inhalation.
- Now focus on the perineum, between the anus and genitals. Inhaling, contract and pull that area inward and upward. Exhaling, release it.
- Again, reverse the breathing, performing the contraction with the exhalation and relaxing it with the inhalation.
- Continue over a number of practice sessions until you can isolate the perineum while it contracts, and maintain the contraction while you continue to breathe for ten or more breaths.
STOMACH LOCK: UDDIYANA-BANDHA
The term uddiyana means “flying up.” In this practice the breath is held out while the abdominal wall is pressed inward and the contents of the abdomen are drawn up. This produces a hollowing at the base of the rib cage. Only after the abdominal contraction is released does inhalation follow. It is important to follow the steps of this practice very carefully. Breath retention should not be prolonged without the guidance of an experienced teacher.
- Stand with the feet about two feet apart, knees bent, and hands on the thighs just above the knees. Keep the elbows straight. Shift the weight of the upper body onto the arms.
- Slowly exhale.
- Hold the breath out (without applying the throat lock).
- Now draw the abdomen in and up. Do not strain, but be firm.
- Hold for a few seconds.
- Release the abdomen slowly and with control.
- Once the abdomen is fully released, inhale smoothly, without a gasp or sudden inward rush of breath.
- Breathe naturally and smoothly until the breath returns to normal.
- Repeat a maximum of two more times.
THROAT LOCK: JALANDHARA-BANDHA
The throat lock (or chin lock) restricts the upward flow of energy. It is most often used during periods of breath retention, but it can also be practiced without holding the breath.
- Sit in a meditative pose with your head, neck, and trunk erect.
- Slightly elevate the sternum and upper rib cage, bringing them toward the chin.
- Lower the chin and jaw, placing them onto (or near) the area of the upper chest at the notch between the two collarbones. If you cannot touch the upper chest, you can place a rolled washcloth under the chin.
- Do not tense any part of the neck, tilt it to the side, or strain to force the chin to the chest.
- Breathe evenly for five breaths, then raise the head back to the starting position.
9. Wind Relieving Pose to Half Wind Relieving Pose (Apanasana to Ardha Apanasana)
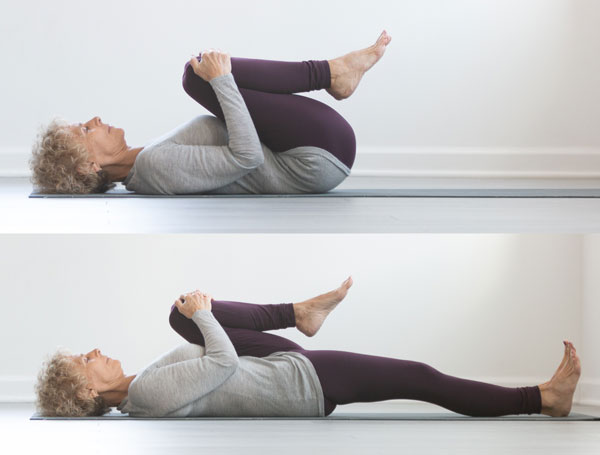
The following knees to chest pose encourages mild lumbar flexion. Stretching one leg out gently stretches the psoas, which is important for those with LSS since a tight psoas could increase the inward curvature of the lower back, exacerbating symptoms.
- Lie on your back and draw both knees in toward your chest, resting your hands on your knees or shins and allowing your lower back to flatten. Spend several breaths here.
- Keep hugging your left knee in, then, in slow motion, skim the mat with your right heel as you lengthen your right leg out in front of you, bringing it to straight or as near to straight as it can come without causing the lower back to arch inward. Spend several breaths here, encouraging the right thigh to drop toward the ground, then draw your right leg in, and change sides.
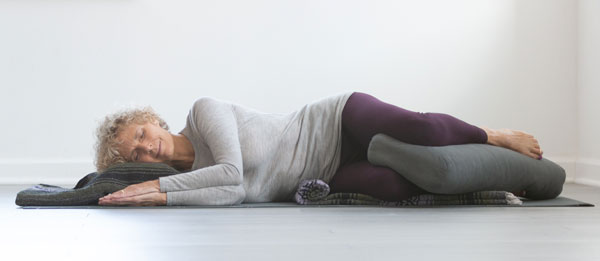
10. Side-Lying Savasana with a Bolster and Blankets
If you have LSS, you may find that lying on your side is more comfortable than lying on your back. Also see regular Savasana (or the Corpse Pose).
- Roll up one blanket partway, and place it in the middle of the mat so that the unfurled part will be under your hips and the rolled part under your waist when you lie on your side.
- Arrange yourself in a fetal position on whichever side is most comfortable for you so that the blanket roll supports your waist (preventing your lumbar spine from dropping toward the floor). Place another blanket (or a block) under your bottom ear and a bolster between your shins. Relax your bent arms out in front of you, allowing your top arm to rest on your bottom arm.
- Remain here for several minutes, increasing your mind-body connection by tuning in to the sense of relaxation you feel enveloping your lower back, and then your entire body.
- When you are ready to return to your daily life, gradually rouse yourself, moving the bolster out of your way, and pressing yourself up to a comfortable seated position. Notice the benefits of your practice—any increase in spaciousness or calmness—and aim to stay present to these sensations for as long as possible.