How to Disassemble a Cyclone Fan to Clean It
You will need a Phillips and Flat head screwdriver available to disassemble the product.
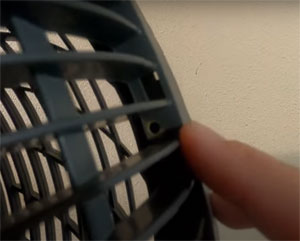
Hole where screw was removed
1. Be sure the product is unplugged then lay the fan face down on a flat stable surface. The rear grill should be facing you.
2. There are 2 screws hidden between the slats on the back side of the fan that are not obvious. Remove the 2 screws along the outer edge of the back grill.
3. Turn the fan over so the front of the fan is facing you. Place a Flat head screwdriver into the gap between the front and rear grills (near the rear grill tabs). Push down slightly on the screwdriver to create a gap between the two grilles. You will also need to pry the fan apart as it snaps together. Pull the front grille up until the fan blade is evident. Do not remove the side knobs on the product.
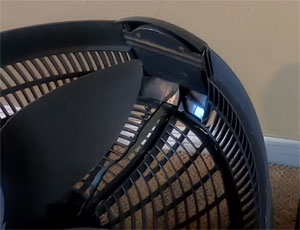
The cord, just to the right of the fan blade.
removed from the ridge on the case
4. Some websites say the blade should just pull off, but I could not get mine off. I believe Brian did in the past. If it doesn't just pull off (which it never seems to do for me), use a screwdriver or a small pry bar to carefully apply leverage between the blade and the fan housing, while gently rocking the blade.
If you do get the blade off, you will want to lubricate the fan blade shaft (the metal it attaches to) to help extend the life of the fan. In the video I linked to below, the author removes the fan along with the motor housing so at least you can clean a little better. There are 4 screws that you can remove using the hole on the top of the fan blade. You cannot get to the screws without using the hole. (The photos are from this video.)
5. Then you can take the cord out of the ridge that holds it so you can flip the fan upside down to vacuum out the motor and clean the back of the blades.
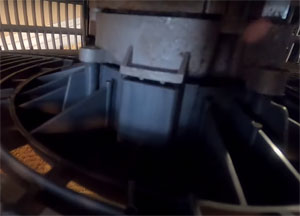
Square bracket on fan housing
6. Wipe the blade and the back of the case with a soft damp cloth. Use a mild detergent if necessary. Be very careful that no water comes into contact with the motor. This will damage the motor and the fan will become inoperable.
7. After cleaning, reassemble the fan working backwards. When screwing the motor back on, be sure to place the square bracket into its matching hole. Put the cord back into the ridge.
8. Let the fan dry. It will now be ready for operation.
For a Youtube video: https://www.youtube.com/watch?v=wzNtnsvcbkE
