How to Replace Stem Cartridge Assembly on Dripping Delta Faucet
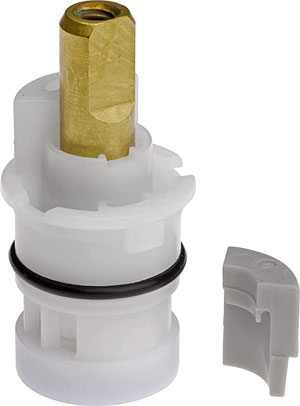
Delta RP47422 stem cartridge
On faucets with two handles, to determine which handle has the problematic cartridge, first turn off the cold water to the faucet. If the faucet still leaks, then it is the hot water cartridge you need to change. Turn the cold water line back on, then test the hot water line.
The Delta RP47422 stems can be replaced with a 1/8" or 3/32" allen wrench to remove the handles and an adjustable wrench or strap wrench to remove the bonnet nut. All other parts should unthread easily or pull out of place.
The gray 1/4 turn stop is put in the back for the cold stem and front for the hot stem. The parts for each handle are interchangeable. The flat side of the brass stem should be facing away from the spout and the white crescent-shaped part of the stem should be on the right on both sides. Be mindful of how this is put together. In the event you drop this mid-installation, it's important to remember that everything goes in just so.
Please let us know if you have any questions! Phone: 1-800-345-3358 | Email: customerservice@deltafaucet.com
Steps
1. Turn off the water to the faucet. Place a cloth or something in the sink to catch any parts you may accidently drop
2. Remove faucet handle screw with hex key (allen wrench). Reserve the tiny screw to put the handle back on
3. Pull handle off, straight up
4. Remove nut holding the cartridge in
5. Before pulling the cartridge out, note the position. The new one needs to go in exactly the same position. Maybe take a picture
6. Pull the cartridge out, again straight up
7. Insert the new cartridge in exactly the same position as the old one was. You may need to insert the gray 1/4 turn stop
8. Replace nut that holds the cartridge in
9. Replace handle. May need to push it down
10. Insert the tiny screw with hex key
11. Turn water back on and test
Please note that we do not recommend disassembling the stem unit. If it has come apart, first insert the D-shaped end of the brass stem into the barrel-shaped piece from the bottom and turn the complete assembly upside-down. Place the small white piece with the + shaped indentation onto the flat protrusion on the brass stem. Note that it must go on so that the larger protrusions on the other side of the white piece are over the ends of the flat brass protrusion on the stem. Next, there are two ceramic pieces that may be stuck together. One of these pieces will match together with the white plastic piece that is already on the stem. Place the plastic and ceramic pieces together, then pull the brass stem (from the D-shaped side) all the way into the unit. The other ceramic piece will need to be aligned with the grooves and inserted so that the smooth, flat side meets against the other ceramic piece. Finally, insert the blue gasket so that the side with the three rings is facing out.
