Feta Cheese
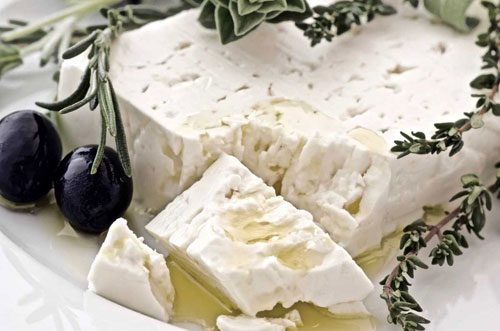
Feta cheese dates back to the eighth century B.C. when cheese made with sheep's milk was stored in brine. Feta is a soft cheese made from whole sheep's milk or a combination of sheep's milk and goat's milk. In Greece, feta is cured in a salty brine. Known as a pickled cheese, its flavor becomes sharper and saltier with age and the cheese becomes more firm. Feta is creamy white in color with small holes and a crumbly texture. It normally comes in square cakes with no rind.
In Greece, traditional production methods start with the addition of rennet and casein to pasteurized or raw sheep's milk, goat's milk, or a blend of the two. Once the milk thickens, the curd is separated, pressed into molds, and drained of excess whey. Cheesemakers cut the feta into smaller blocks (feta means "sliced" in Greek), then salt and dry them for two days before submerging them in brine, where they age for one week to several months.
In Kitchen Cheesemaking, Lue Dean Frank, Jr. says that Feta Cheese is a pickled cheese and only requires rennet. He specifically says it requires no starter (he uses buttermilk culture for many of his recipes). He says to use enough rennet to coagulate the milk in 20 - 30 minutes. You cut the curd into 1/2 inch cubes. After squeezing the curds in the drip bag and letting it hang for 4 or 5 hours, the cheese is sliced into 1 inch slices. The slices are well salted and let to set overnight. It is then packed in a crock and left for about 5 days. It is then ready for use. He is usually very detailed in his descriptions of making many cheeses, but here he gives us only this overview of making feta. From what he says, it sounds like this is the recipe used for generations and goes back to ancient times. He adds that even today in certain areas, it is the main soft cheese used.
Feta crumbles easily, making it a good choice to include in salads and as an alternative to shredded mozzarella on pizzas and flatbreads. It also tastes great sprinkled on roasted vegetables of all kinds. When using feta in uncooked dishes, such as appetizers, allow it to come to room temperature to get the best flavor. You can serve it on an appetizer plate along with slices of crusty baguette, olives, and sliced meats. Or blend it into a dip with a little lemon juice and oil.
Feta softens in hot dishes but never fully melts, a good quality for adding texture in addition to flavor in baked casseroles, savory pastries, and stews such as the traditional stifado. You could also use it in a quiche or other style of savory pie. Feta makes a good option for stuffed burgers and pairs especially well with lamb.
Feta dries out and sours quickly in improper storage conditions. It remains fresh for several months if you keep it continually submerged in the brine. Packaged feta often includes some brine, but if you inadvertently drain it, you can simply mix some up to store any leftovers. Generally, stick to a ratio of 1 teaspoon kosher salt per cup of water, making more or less as needed. You can freeze unopened packages of the dry crumbled feta—the kind that's available at most grocery stores—for a few months without too much loss of quality.
Homemade Feta Cheese
Unlike many other kinds of cheese, feta is ready to eat just a couple of days after making it. Feta is a great cheese for new cheesemakers to try because you'll know how it turned out in just a few days (instead of months, as with many other kinds of cheese).
BEFORE BEGINNING: Be sure that all equipment is sterilized.
Yield: 1 - 1 1/2 pounds
1 gallon whole cow or goat milk, not ultra-pasturized
1/8 teaspoon mesophilic starter culture [some recipes use 1/2 cup buttermilk with live cultures for 1 1/2 gal. milk]
1 1/4 teaspoons calcium chloride, divided (for pasteurized milk to re-balance the calcium content of milk)
1/2 tablet rennet (plus 1/4 cup water; or 1/2 teaspoon liquid rennet)
2 quarts cool water
1 to 1 1/4 pounds kosher salt, or other non-iodized salt
2 1/2 teaspoons vinegar (white or cider vinegar) [not all recipes use the vinegar in the brine, used to lower the pH of the brine]
Heat Milk & Acidify
Pour the milk into a large pot. Place the pot in a sink, filling the sink with hot water 3/4 up the sides of the pot. Alternatively, you can put the pot full of milk into an even larger pot of hot water. What you're after is a double-boiler effect of very gradually heating the milk—you don't want to put the pot of milk over direct heat.
Heat the milk slowly to 86 F. If you do this in a pot on the stove make sure you heat the milk slowly and stir it well as it heats so it does not scorch.
Gently stir in the mesophilic starter culture. Keep the mixture at 86 F for 1 hour without mixing. It's typically best to take the pot out of the surrounding hot water during this hour. It maintains the heat fairly well but tends to overheat if left in the hot water. The culturing process will start slowly and become more rapid over time.
Coagulate with Rennet
Stir in 1/4 teaspoon of calcium chloride.
If using the rennet tablet, crush it and then dissolve it in 1/4 cup of cool water. Add to the milk. If using liquid rennet, add it directly to the milk. Gently stir for 1 minute.
Leave the mixture alone for 30 - 45 minutes, maintaining the 86 F temperature as closely as possible. This may mean putting it back into the sink of hot water for a couple of minutes if it starts to cool off too much. See The Flocculation Test or Method
The milk mixture will set up and look something like yogurt. Poke a clean finger about an inch deep into the curd (the semi-solid milk mixture) and gently pull your finger toward you. The curd is set when it forms a "clean break," separating around your finger. It will feel like firm yogurt. If the curd hasn't reached the clean break stage yet, wait another 30 minutes.
Cut & Stir Curd
With a long-bladed knife, cut the curd from one side to the other, making slices about 1/2-inch apart that go all the way through the curd. Turn the pot a quarter turn around and cut 1/2-inch slices; the second round of slices should cross the first like a tic-tac-toe pattern.
Cut the curd one last time, coming in with the knife diagonally across the squares made by your previous slices, and at a 45-degree angle to the surface of the curd. This doesn't have to be exact. You want to end up with approximately 1/2-inch chunks of curd. Let the curds set 5 minutes.
Stir the chunks of curd very gently. The first cut curd is very soft and delicate. Put the pot back into the sink or larger pot of hot water and gradually raise the temperature to 95 F. You want it to take about an hour. The curds will start to separate from the whey, which is the yellowish liquid. Note that the temperature should not exceed 106 F.
Slowly stir the curds for 15-30 minutes, depending on final moisture desired (longer time makes drier curds). This stir will help develop the final moisture so the curd is not too moist or too dry. There is quite a range here, depending on how dry you want your final cheese. Too moist though and the cheese will become quite acid but too dry and it may be hard to age fully.
The final curd moisture should look even throughout when a curd is broken open. It should have a moderate resistance when pressed between the fingers. When this point is reached the curds can be allowed to settle under the whey
Note: Once drained, you can make a batch of Ricotta from the sweet whey. It is recommended to make Ricotta within an hour or so of draining.
Drain the Curd in Cheesecloth (or Tranfer to Molds)
Line a colander with butter muslin or several layers of cheesecloth [dip in boiling water to sterilize]. Pour the curds and whey into the colander. Bring the 4 corners of the muslin up and tie it into a tight knot. Let drain for 4 hours at room temperature. Move the cheese curds so that you flip those at the top to the bottom. The curds will congeal together while they drain. Because the final cheese can have some open space throughout, the curds don’t need to have additional weight applied.
Let your cheese hang and continue draining for about 24 hours, at this point it will start to develop a distinctive odor. The hanging of the curd is developing the acidity of the cheese. This acidity is what helps the curd "stand up" to the brine and not get soft. The next morning the cheese should have formed well and most of the lactose converted to lactic acid. The cheese will feel firmer and taste much tangier than the night before.
Some recipes move the curd to a mold to drain instead of cheesecloth. Because the curd is moist, and the final cheese can have some open space throughout, the curds don’t need to have additional weight applied. Turn the cheese frequently.
[Dry Salting]
Cut the mass that has formed into rough blocks about 3 inches wide and let drain in the muslin for another 30 minutes. [Another recipe says 1 pound slices]
[Before puting the feta into brine, the traditional method of dry salting for 2 days makes for a firmer rind and an overall more stable cheese for storage. For dry salting the room should be about 60-65F. Either following method can be used: Lay the cut pieces of cheese out on a drain cloth for salting and cover with cloth. Place the curds in layers in the 1 gallon pail and add the salt as each layer is placed. Use parchment paper between layers of cheese to keep the pieces from sticking together. Lightly rub the cheese with salt. The next day after turning the cheese, salt again.
After the second day the pieces can be rinsed clean of any slime (yeast etc) and the salty whey poured off and they will be ready for aging in brine.]
Aging in Brine
Make a saturated brine by dissolving 1 to 1 1/4 pounds of kosher or another non-iodized salt in 2 quarts of water: Add the salt a little at a time, and stop adding salt when it won't dissolve any further. Add 1 teaspoon of calcium chloride and 2 1/2 teaspoons of vinegar.
If you dry salted as above, age in only an 8% brine: For 1 gallon of brine, mix:
10.6 oz salt
1 tsp white vinegar
2 Tbs calcium chloride solution
Add non chlorinated water to make 1 gallon of solutionTraditionally, neither acid nor calcium were added because the clear whey left over after making Ricotta was used. Calcium is left in the whey because the acid development leaches it from the curd as it develops along with the natural acid that forms. You could do the same but its an extra step in a long day.
Seal the lid and place this in a cool room 50-60F for at least 3-4 weeks. This cheese will improve for many months and get better as the cheese changes during ripening.
Remove the blocks of feta from the muslin and submerge them in the saturated brine for 10 to 12 hours. This brine treatment will stabilize the feta. Cut Parchment pieces to go between the layers to keep from sticking. Parchment will hold up in the brine and can even be used again. Don’t use paper or plastic. Place a plate on top so the feta stays submerged, a small Zip Lock bag filled with enough brine to sink the cheese works well too. Note: Do not leave them in longer than this. This will result in cheese that is too salty.
Drain the feta. Leave it out on a cheese mat uncovered at room temperature for one to two days.
Transfer the feta to covered containers. Store in the refrigerator or a cool cellar or garage. Eat within one to two weeks and enjoy.
For long-term storage, make a lighter brine of 2 tablespoons non-iodized salt in 2 cups of water with 1/4 teaspoon vinegar and 1/4 teaspoon calcium chloride mixed in. Feta cheese will keep in this brine for several months. Feta stored in brine may soften and start to fall apart. If you are planning to store the cheese in brine for a long time, leave it out to dry for the full two days after its saturated brine bath.
Can I reuse the brine to make more feta? The cheese brine can be stored in the refrigerator and used to make more feta; just discard it when it becomes too cloudy. You do need to add another tablespoon of salt before brining to make up for the salt that was absorbed.
