Making Homemade Vinegar
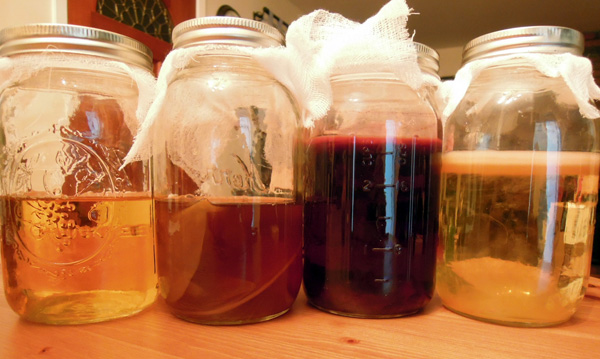
Champagne Vinegar, Sherry Vinegar, Red Wine Vinegar, White Wine Vinegar
Before you decide to empty the remaining contents of that bottle of wine that you opened a week ago and forgot about down the drain, consider making it into vinegar. Quite frankly, if you had forgotten about that bottle of wine long enough it'd eventually turn itself into vinegar. I was reading Sandor Katz's Wild Fermentation that I borrowed from my school's culinary library last week. He writes that the word 'vinegar' comes from the French word vinaigre, vin for wine and aigre for sour. Naturally occurring yeasts and bacteria called acetobacter consume the alcohol in wines and other fermented beverages and turns it into acetic acid, which we then recognize as vinegar.
The majority of vinegar-making is waiting. Vinegar is made by the bacteria Acetobacter, which eats alcohol and turns it into acetic acid, or vinegar. The process can take 2-6 months.
Live vinegar is full of probiotics that are attributed to aiding digestion, among many other health benefits. Plus, cooking with homemade vinegar contributes unique flavors and the satisfaction of making an ingredient from scratch.
Making vinegar is pretty simple. You need…
- An alcoholic beverage (such as red or white wine, champagne, hard apple cider, or beer for malt vinegar). If alcohol content is too high, it will kill a mother. Add soft, nonchlorinated water to dilute the alcohol to the ideal alcohol levels of 5½ to 12 percent. Note: Vinegar can be made from any fruit, or from any material containing sugar.
- A large glass or ceramic container (such as a pickling crock or quart mason jar), that can be covered with a breathable barrier (such as cheesecloth). Don't use metal rings on jars, they can corrode from the vinegar. Use a rubber band.
- A "vinegar mother"
Getting vinegar mother
Although these will all eventually turn into vinegar on its own, it doesn't hurt to add a mother-of-vinegar, or mother for short, to get the process going. A "vinegar mother" is the term commonly used to describe a mass of Acetobacter. Mother is a a jelly like substance that forms in vinegar that contains the bacteria and cellulose that converts the alcohol into acetic acid. You can see the mothers as the discs floating in jars of vinegar in the photo. It's quite harmless – it can easily be strained out or consumed. In fact, some people even say that it's very nutritious.
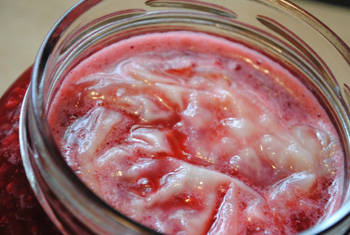
Raspberry Wine Mother
Here's how to get vinegar mother:
- Buy a bottle of Bragg Apple Cider Vinegar. Available at many health/natural food stores and supermarkets, such as Whole Foods, Bragg ACV is raw, unfiltered and unpasteurized, so it contains the mother (typical store-bought vinegars are pasteurized, so the Acetobacter has all been killed).
- Buy vinegar mother online. Leeners and The Cellar Homebrew are 2 online sources for purchasing vinegar mother and other supplies.
Ask a vinegar-maker. If you know someone or know someone who knows someone who makes vinegar, ask them if you can have some of their vinegar mother.
Steps to make vinegar
1. Put the booze in the container, and add the mother. Or use 3 Tbsp. Bragg's vinegar for each 1 cup of wine.
2. Cover the container so there's airflow, but insects or dust won't get in. The alcohol to vinegar process is aerobic, meaning that the bacteria needs oxygen to do their thing. Having a larger surface area exposed to oxygen will transform the alcohol into vinegar faster. Store your vinegar-in-process away from sunlight and away from other brewing projects. The optimum temperature for vinegar making is around 85 degrees F.
3. Wait. Check on the vinegar every few weeks and taste it and swish it around the jar to aerate it. You'll know its ready when it tastes like vinegar. Don't be alarmed by the scum that begins to form on top of your vinegar. This is the beginnings of your mother, which will take about 2 weeks. Once the mother starts to form, if you leave the jar undisturbed, this will gradually thicken and form a curious looking disc on the surface of your vinegar. The mother will sink to the bottom if it gets wet on top, and another will begin to form on the surface. This process can continue until all the available sugars or alcohol have been used up. Allow the reaction to proceed for at least 4 to 8 weeks, tasting all the while.
What's growing in my vinegar?
- Learn to distinguish the difference between the good guys and the bad guys in your vinegar zoo. Mother of vinegar resembles a jellyfish floating on the top of your liquid. Yeast can look like brown, cloudy strings floating around, or sediment collecting on the bottom of the container. These are the good guys, and can be used to speed up the vinegar making process in a new batch.
- Then there are some neutral characters that sometimes appear: vinegar mites that live in the cracks in vinegar barrels, vinegar eels or nematodes that shake their little flagella when disturbed, and fruit fly larvae, which look like tiny worms crawling up the side of your container. These things, while disturbing, do not harm your vinegar. Strain them out, wash your container and continue.
- Bad signs include brightly-colored or black mold (fuzzy coating on the surface) or a bad smell (like cleaning fluid). This indicates contamination, probably caused by not cleaning your vessels properly, not storing your container properly (don't let it experience extreme or prolonged periods of cold, for example), or simply being unable to propogate a strong, healthy colony of yeast and acetobacter in the face of competition. You should probably throw this vinegar away.
4. Once you like how it tastes, finish the vinegar-making process by straining out the mother and any cellulose layers. The mother can be reused, reducing the aging time on subsequent batches or leave the rest behind for more wine feedings. Put the strained vinegar into a sanitized bottle and seal. Continued exposure to air once you have your vinegar is a good way to ruin it, so be sure to seal the bottle. You can take the additional step and pasteurize it too. To pasteurize, bring the vinegar to a boil. If you prefer, you can boil off about 1/3 of the volume of the vinegar for a more concentrated flavor. This will also eliminate any excess alcohol that has yet to be converted to vinegar. It will last forever so no serious concerns about shelf life here.
5. Aging: All vinegar benefits from aging after bottling. During this time, the flavor mellows and matures. Allow at least two weeks and up to six months for aging before using homemade vinegar. Raw vinegar might naturally form innocuous sediment during this time, which can be removed by straining the vinegar with cheesecloth. You can also simply shake the vinegar and consume it naturally.
Here is one safety issue to keep in mind about using homemade vinegar for canning and pickling. Commercial vinegar has controlled percentages of acetic acid and therefore suitable for canning and preserving pickles. As this is a homemade product, it's not safe to use for canning since the percentage of acetic acid is variable and unknown. In order to can with homemade vinegar it is important to get a hydrometer (anywhere with homebrew supplies should carry one) in order to insure the vinegar is acidic enough. The acidity of the vinegar should be at least 4%. Fresh or quick pickles should be fine though since those won't be canned for long term storage.
Starting additional Batches from your Mother
The guys at Northampton Beer and Wine said that once the mother has dropped from the top of the batch they are not as potent but also do no harm. If you were to want to start another batch you can cut part of your active mother (the uppermost one in the jar) along with some of the vinegar liquid and start it in another jar or give it to a friend. The mother you use part of will regenerate or another will form in your batch. They also shared that in many cultures the inactive mothers are cut up in salads or other dishes for their believed medicinal properties.
