How to Trim a Beef Tenderloin
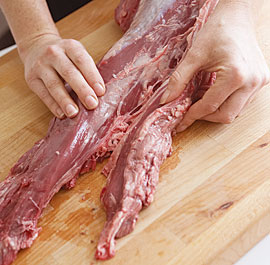
If you plan on roasting a beef tenderloin, you can save money by purchasing an untrimmed tenderloin and performing the trimming at home. A tenderloin that is not trimmed may weigh as much as 9 pounds. It may weigh as much as 5 pounds when it is trimmed.
Clean Off Loose Fat & Membrane
Remove the meat from the Cryovac packaging and pat dry with paper towels. Using your fingers, pull off as much loose fat and membrane as possible from both sides of the roast.
Remove the Chain
Locate the chain, the long piece of muscle that runs the length of the tenderloin (see picture to the right). The fatter, shorter, smooth muscle on the other side is part of the loin—leave that on. (Note: some people remove this other side piece and use it to make Chateaubriand.) Using your fingers, gently separate the chain from the tenderloin as much as possible.
With a boning knife, start at the narrow end of the chain and cut along the seam, making several long, shallow cuts rather than one or two deep ones. This way, you have more control over the path your knife takes and less chance of cutting too far in. You don't have to trim every bit of the chain from the wider end; it's fine to leave a narrow strip attached to the loin.
Save the chain for another use, such as Fajitas, stir-fries, or steak sandwiches.
Trim Off the Silverskin
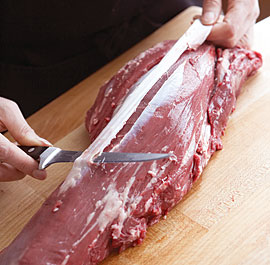
Starting about 1 inch from one end of the silverskin, push the tip of your knife under a strip of silverskin about 1/2 inch wide. Using your free hand to hold the silverskin taut, angle the knife slightly up toward the silverskin as you slide the knife down the tenderloin, freeing the silverskin. Turn the knife around and cut off the end of the silverskin that's still attached. Repeat until all the silverskin is gone.
Give both sides of the meat a final visual inspection and clean up any remaining areas of fat, membrane, or silver skin.
Tie the Roast
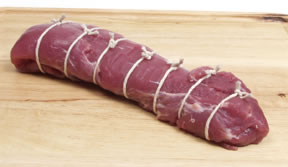
You are now ready to tie the roast. Tying is done to create even thickness for even cooking and to secure any floppy bits of meat. Fold the last 4 to 5 inches of the slender end of the tenderloin under so that the tenderloin will be closer to the same thickness throughout.
Tie the entire roast with kitchen cotton string at 2 - 3 inch intervals. The entire tenderloin does not have to be tied, only the folded under end must be, but it will be more appealing when cooked if tied all along the cut.
The important aspect of tying is that the string is tight enough to hold the shape of the cut but not too tight so that it will squeeze the juices from the meat while it is cooking. Use a kitchen twine that is made from an all-natural cotton or linen to ensure that it will not burn or affect the flavor of the meat. Keep in mind that there are many styles of tying and knots that can be used.
To Cut the Tenderloin Into Smaller Cuts
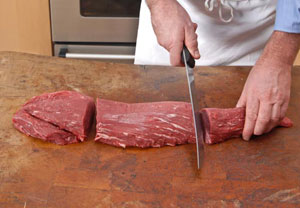
Divide the filet into the three main sections, the head (fatter end), the center and the tail (smaller end). As a first step, separate the head from the tenderloin with a single cut. Next, separate the tail. Now the tenderloin has been divided into its principle pieces.
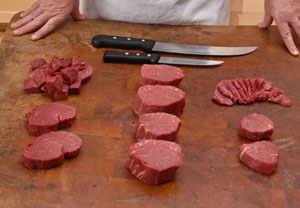
Left whole, as a roast, the center portion is called Chateaubriand. Cut into steaks, they are filet mignon and are generally the most tender cut. Filet mignon may be cut to your preferred thickness. The steaks in the center of the picture were cut from the center cut.
The tenderloin head can be roasted whole or cut into steaks. The tenderloin head can also be cut into cubes for kabobs or stew. The tenderloin head is pictured on the left, cut into 2 steaks and cubes.
From the tail, the first couple of cuts are tournedos – or small tail steaks. The remainder can be cut into strips or cubes. The 2 steaks on the right and the strips in the picture are from the tail.
Think of the wide array of meals you can get out of a single whole tenderloin.
