Extra-Tangy Sourdough Bread
from https://www.kingarthurbaking.com/
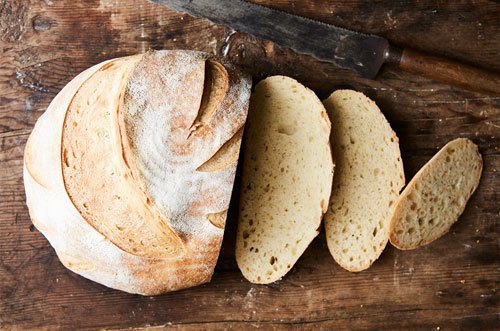
This bread actually comes out much darker. I am not sure why
the bread is shown so light in color on their website.
This bread, with its mellow tang, is perfect for those who like their sourdough bread noticeably sour, but not mouth-puckeringly so. The signature sourdough flavor comes from a combination of lactic and acetic acids, created as the dough rises and ferments. Refrigerating the dough encourages the production of more acetic acid, which is the tangier of the two. Thus, this bread with its refrigerated starter has the ideal balance of sour flavor.
[Why are some sourdoughs more sour? The flavor of your bread is more dependent on your bread recipe than the flavor of your starter. Simply put, the longer your bread rises (up to a point), the richer its flavor will be. And, the temperature at which your loaf rises makes a difference. The wild yeast in sourdough produces both acetic and lactic acids as it consumes the starch and sugars in bread dough. When the dough is refrigerated, the yeast tends to produce more acetic acid than lactic acid. Since acetic acid is quite sour (think vinegar), bread dough that rises in the refrigerator overnight will tend to produce a more sour loaf than dough that rises for several hours at room temperature.]
FMM: The first two times I tried to make this, I took the levain out of the refrigerator and added more flour and the salt to make the dough, but the dough never stiffened up. Instead it remains slack and sticky. I think this was due to my starter not being strong enough. I have since learned how to determine the stage at which my starter is ripe and ready for making bread. See link below. The last time I made this, I had a very strong starter and the loaf came out great. A nice crackly crust and wonderful holes inside. I could tell it was going to be good because, at the levain stage, the dough had already strengthen and was forming a nice ball. After refrigerating, the dough raised for a while and I could barely add any more flour, but did get the salt in. After kneading in the salt and flour, I did a few stretch and folds to strengthen it further, but it was still holding its shape. Next time I will try to get a bit more sour flavor.
Step 1: Feed your starter until it is doubling or tripling in volume in 6 to 8 hours! The starter must be ripe for best results. (See Section 3 on the page on Waking Up and Maintaining Sourdough Starter.) Take some time to strengthen your sourdough starter (particularly if it's been in the fridge for a while).
To make the starter for this recipe, you can start with 40g of starter, add 40g each water and flour. Once ripe, again add 40g each water and flour, and again wait until starter is ripe. You should have around 220g starter once finished.
Plan for 6 - 8 hours to let a refrigerated starter ripen (when doubled or tripled in volume), then 4 - 6 hours for the second ripening, then plan your time so that you mix the levain with enough time to let it rest on the counter for 4 hours before refrigerating overnight. The next day the dough will be mixed, go through a bulk ferment while being stretched and folded, then shaped, raised again and baked. This will be a busy day.
King Arhur Flour’s recipe [63% hydration]
The recipe says this makes two loaves, but these are quite small. Some of the online commenters said they made just one large boule from the recipe, and this is what I do. If you make just one large boule, it weighs about 2.25 pounds, so the smaller loaves would be a little over a pound.
In this recipe, the levain is proofed overnight in the frig and the next day the dough is mixed, bulk fermented, shaped into loaves, proofed and baked.
Entire Ingredient List
1 cup (227g) ripe (fed) sourdough starter
1 1/2 cups (340g) lukewarm water [leave for 24 hours in an open bottle so the chlorine dissipates]
5 cups (602g) King Arthur Unbleached All-Purpose Flour, divided [I use bread flour] (add 3 cups Day 1)
2 1/2 teaspoons salt (added Day 2)
Day 1: Make the Levain:
Combine the ripe starter, water, and 3 cups (12 3/4 ounces, 362g) of the flour. Beat vigorously for 1 minute.
[Wait 15 to 20 minutes for the flour to soak up the water and beat again.]
Cover, and let rest at room temperature for 4 hours. Refrigerate overnight, for about 12 hours.
Day 2: Mix & Knead the Dough:
Add the remaining 2 cups (8 1/2 ounces, 241g) flour, and the salt. Knead to form a smooth dough.
[FMM: I kneaded the extra flour in using my hands and did not add all the flour. I had a hard time getting the flour in that I did add in. The second time I tried this recipe, I had a nice ripe starter (equal amount of flour and water) and my levain rose very nicely in the frig and once I took it out, I added the salt and tried to get the flour added but I could only add 25 of the 180g. I did this all by hand. KAF has a posting that discusses making sourdough using this same technique and they used an electric stand mixer. According to KAF, the recipe is left open to any type of kneading the flour in. If kneading by hand just knead in as much of the flour as you can to make a sturdy dough.]
Bulk Ferment: Stretch and Fold to Strengthen the dough:
Allow the dough to rise in a covered bowl until it's light and airy, with visible gas bubbles. The dough will expand and become puffy. Depending on the vigor of your starter, this may take up to 5 hours (or even longer). For best results, gently deflate [don't deflate, just stretch and fold] the dough once an hour by turning it out onto a lightly floured work surface, stretching and folding the edges into the center, and turning it over before returning it to the bowl. Adding these folds will give you a better sense of how the dough is progressing, as well as strengthen it.
[One of the biggest problems, beginning bakers have is over-proofing during the bulk ferment. [Another website says beginner bakers tend to under-proof the dough.] Unlike yeast-leavened doughs, which often call for letting the dough rise till it doubles (or more) in volume, with sourdoughs, this is not a good guide. Opinions vary on what percentage increase is optimal. Some bakers suggest a 30-50% increase. Others suggest a 50-75% increase. The length of time it takes for your dough to increase in volume and complete its bulk ferment depends on a number of variables, including the strength of your starter, how much starter you use, the hydration of your dough, the type of flour you are using, the humidity, and the temperature of your kitchen.
At the end of bulk ferment, your dough should look very gassy, with some bubbles here and there, and the edges where the dough meets the bowl should be slightly domed. When you gently shake the bowl, the entire mass jiggles from side to side—very alive. The poke test is not a good guide here either, although it may leave a slight indent when done.
You know the dough has over fermented if, when you turn it out to shape it, it is very slack — if it’s like a wet puddle — and very sticky and lacking any strength and elasticity. It might smell a bit like alcohol as well.
When the dough has finished its bulk ferment, it’s ready to be shaped.]
Shape and Bench Rest
Gently divide the dough in half. [if making 2 loaves]
Gently shape the dough into two rounds or oval loaves, and place them on a lightly greased or parchment-lined baking sheet. Cover with lightly greased plastic wrap and let rise until very puffy, about 2 to 4 hours (or longer; give them sufficient time to become noticeably puffy). Don't worry if the loaves spread more than they rise; they'll pick up once they hit the oven's heat.
[You can place the loaves in a banneton, or I use a bowl, lined with parchment and sprinkled with some cornmeal/semolina to prevent the bread from sticking. I make just one loaf from the recipe, not two.
The poke test works here and will tell you when the loaves are ready to be baked.
I may want to refrigerate the shaped loaf after shaping and letting it rise for an hour or two given how late in the day it may be. I do not want to under-proof the dough at this point. I think this may be one of my big problems - under-proofing.]
Preheat Oven [and Dutch Oven]
Towards the end of the rising time, preheat the oven to 425°F.
[Place a Dutch oven with a lid, but lid off, in the oven and preheat the oven for about 30 minutes before putting the bread inside. Do not grease the Dutch oven.
The reason for using a Dutch oven is that during the initial stages of baking, steam is released from the dough itself into the sealed container, which keeps the dough moist; this allows the bread to develop a crispy, shiny crust and attain maximal volume. Sprinkle water on the bread just before putting it in the oven.]
6. Bake the Loaves
Spray the loaves with lukewarm water.
Slash the loaves. If you've made round loaves, try one slash across the center, and a curved slash on each side of it; or slash in the pattern of your choice. For oval loaves, two diagonal slashes are fine. Make the slashes fairly deep; a serrated bread knife, wielded firmly, works well here.
[When the dough is ready to go in the oven, lift the parchment and dough out of the bowl it is raising in and place it on the counter. Then brush it with water and sprinkle with sesame seeds. Slash the dough and place it in the Dutch oven with the parchment paper, sprinkle some more water on it, close the lid and return it to the oven quickly to avoid a drastic drop in temperature. The parchment paper and cornmeal/semolina flour protect the bottom of the loaf from sticking to the pot and having a burnt bottom.
To ready the bread if using a banneton, cut a piece of parchment paper and sprinkle it with cornmeal or semolina flour. Then turn the bread out of the banneton onto the parchment paper. Brush with water, sprinkle with seeds if using and slash the dough. Carefully place in the Dutch oven as above.]
Bake the bread for 25 to 30 minutes, until it's a very deep golden brown. Remove it from the oven, and cool on a rack.
[If using a Dutch oven, bake for 20 minutes; remove the lid and bake for another 10 to 15 minutes, until the loaf browns fully and the interior temperature registers around 205°F.]
Store bread, loosely wrapped in plastic, for several days at room temperature; freeze for longer storage.
YIELD 2 loaves [or 1 larger loaf]
