Waking Up and Maintaining Sourdough Starter
Once you've successfully created your starter, you'll need to feed it regularly.
If you bake a lot of sourdough treats, you may want to keep it on your counter, at room temperature. While this means feeding it twice a day, it also means your starter will be ready to bake with at the drop of a hat.
However, many of us don't want the commitment of twice-a-day feedings. If you're a more casual sourdough baker, it's possible to store your starter in the refrigerator, feeding it just once a week.
1. Maintaining your sourdough starter at room temperature
Room temperature is the best environment for the yeast and lactobacilli that inhabit your starter, and you can learn a lot about your starter by observing a twice-a-day feeding regimen with the starter at room temperature.
If you're willing to maintain your starter at room temperature by feeding it twice a day, here's how.
- Stir the starter well and discard all but 75g. (can cut back to 60g if want)
- Add 75g (60g) room-temperature and 75g (60g) Unbleached All-Purpose Flour
- Mix until smooth, and cover. Your starter will bubble and grow until it's doubled (or more) in size...
- ...then will gradually sink as it awaits its next feeding. Repeat this feeding process every 12 hours if kept at room temperature.
This whole process will take anywhere from a couple of hours to all day, depending on the health of your starter and the temperature of your house: the colder the environment, the more slowly your starter will grow. If the normal temperature in your home is below 68°F, we suggest finding a smaller, warmer spot to develop your starter.
2. Maintaining your sourdough starter in the refrigerator
For most home bakers, daily feeding is impractical; so you'll need to store your starter in the refrigerator and feed it once a week.
- Take the starter out of the fridge. If you're feeding it weekly, it will probably appear a bit frothy. There may be a bit of light amber or clear liquid on top. Either drain this off or stir it in, your choice; it's alcohol from the fermenting yeast.
- Remove all 75g (60g) starter. Use this “discard” to make pancakes, waffles, cake, pizza, flatbread, or another treat. Or, simply give to a friend so they can create their own starter.
- Add 75g (60g) room-temperature water and 75g (60g) flour to the remaining starter. Mix until smooth, and cover.
Maria, Bob’s wife, says she keeps only a small amount of her starter (60 grams) when she goes to feed it and only replenshes it with 60 grams of flour (she uses white whole wheat) and 60 grams of water. The amounts noted in some recipes seem extreme and waste a lot of ingredients unless you are baking a lot. I have been keeping 75 grams of starter and adding 75 grams each of bread flour and water, but am going to cut back to 60g.
- Allow the starter to rest at room temperature (preferably about 70°F) for 2 to 4 hours, until it shows signs of life; this gives the yeast a chance to warm up and get feeding. Once it's started to bubble, refrigerate it.
Note on Discard:
The big reason to discard it is to dilute the waste products. The yeast and bacteria in a starter produce all kinds of wastes — alcohols, acids, and other stuff. When the concentration gets too high, those waste products can actually kill the living cells. Even if they don’t, they significantly slow the growth and reproduction of the remaining cells. Plus the fact that you have to use larger amounts of water and flour with each feeding (because you have more starter to feed) and will end up with a lot of starter, wasting a lot of flour.
Can you overfeed sourdough starter? Yes, you can overfeed your sourdough starter. Every time you add more flour and water, you are depleting the existing population of natural bacteria and yeast (because some is discarded). If you keep adding more and more, eventually you’ll dilute the starter so much that you’ll just have flour and water.
3. Waking Up the Starter When Ready to Bake
Make sure that your starter is active before using for baking! Storing your sourdough starter in the refrigerator essentially slows down the fermentation process, and that means when you're getting ready to bake with a refrigerated starter, you shouldn't just take it out of the fridge and use it immediately.
If your starter has been refrigerated, you’ll want to raise its activity to a more energetic level. You can do this by giving it a series of feedings at room temperature, anywhere from a couple over the course of a day to two feedings a day for several days, depending on how strong your starter is.
- Take the starter out of the fridge, discard all but 75g (60g), and feed it as usual with 75g (60g) water and 75g (60g) flour (1:1:1 ratio). Let it rest at room temperature for about 8 to 12 hours, until bubbly. [I use 75g each which works well if we are making pancakes or waffles out of the discard.]
Maria, Bob’s wife, says she keeps only a small amount of her starter (60 grams) when she goes to feed it and only replenshes it with 60 grams of flour (she uses white whole wheat) and 60 grams of water.
- Try to keep the starter at the optimum temperature for yeast growth which is 76 - 82 degrees F.
- Repeat the feeding as necessary, until you notice the starter doubling or tripling in volume in 6 to 8 hours. That means it’s strong enough to leaven bread.
- First rule of starter feeding: never discard and refeed a starter until it peaks. When the starter peaks and begins to fall, that is when the yeast population is at its peak and the food source is being fully consumed. The best time to feed is just past peak if you are trying to grow and optimize the yeast population.
- For the final feeding, make sure you add enough flour and water to use in your recipe, with a little left over to feed and maintain the starter for the next time you bake. For instance, if your recipe calls for 1 cup (about 8 ounces, 227g) starter, add 4 ounces (113g) each water and flour. If your recipe calls for 2 cups (about 16 ounces, 454g) starter, add 8 ounces (227g) each water and flour.
- From Ted at The Sourdough Journey: “At Peak: Many recipes call for using your fed starter/leaven as soon as it peaks. You can tell when your starter is peaking because it will be domed on top. As soon as the dome begins to fall, the starter is just passing “peak.” It is not necessary to catch it at the moment it peaks. If your starter has domed and is beginning to fall, it is still super strong. The starter/leaven will start to flatten on top, but if it is not visibly falling, it is still strong and ready for baking. Some studies show that the yeast population is actually at its apex slightly after the starter reaches peak height. There is probably a 2-hour window post-peak, where the starter may be at its strongest.”
- Also see Sourdough Starter Timeline When Activating for Baking (next section below) from The Perfect Loaf, which shows you how a starter changes after it is fed until it is ripe until ready for baking.
- If your starter is past peak (a few hours) and visibly falling, you can give it a “refresh” feeding to reactivate it. Give it a top-off feeding of 30-50g of flour and 30-50g of water and let it rise again. This is known as a “refresh” and is a perfectly acceptable way to manage your starter peak to synchronize with your baking schedule. If you do multiple “refreshes” your starter can start to become more acidic, which can accelerate over-proofing due to gluten deterioration. But one refresh buys you a few hours and usually is sufficient for most schedule modifications.
- A test that is not always reliable that often gets mentioned in these discussions is the Float Test. To use the Float Test: drop a small teaspoon of the starter into a glass of water. It should rise to the surface. This indicates that the levain is active and strong enough to produce enough carbon dioxide for it to be light enough to float.
- Be sure to save starter to keep for future sourdough baking. Feed this leftover starter with 75g (60g) flour and 75g (60g) water (1:1:1 ratio). Mix until smooth, and allow the starter to work for about 2 to 4 hours at room temperature, until it shows signs of life, before putting it back in the refrigerator.
Sourdough Starter Timeline When Activating for Baking
from https://www.theperfectloaf.com/sourdough-starter-maintenance-routine/
The key to coaxing out maximal fermentation with your starter is to be observant. Watch how it evolves throughout the day and take note of how long it takes to reach full ripeness: a strong sour aroma, a breakdown of the mixture, significant bubbles on top and at the sides. If it’s doing this too fast (for example, you refresh at 8 a.m., and it ripens at 2 p.m. when you’re at work), you can reduce the water temperature, change the ambient temperature, or reduce the amount of mature starter you carry over at each refreshment (this is what I do). You want to try to refresh your starter [or mix your levain or bread dough] right when it’s at its at peak ripeness, or shortly thereafter.
Your starter will go through the following phases each day, but the times will most likely be different. If fermentation is slow (due to temperatures or percentage of starter carryover for example) then the signs I point out below might be at greater intervals, and conversely, if fermentation is fast, then the ranges will be tighter.
10:00 a.m. – Sourdough starter maintenance beginning. The first step is to take your mature sourdough starter, discard some part of it, refresh it with fresh flour and water, and cover
12:00 p.m. After only a couple of hours, you can see only slight activity visible in my starter. The smell at this point would be very, very sweet, and practically the aroma of flour and water.
2:00 p.m. Four hours after refreshment and we have a significant expansion, a tad over 100%. The top of the starter is domed with a few bubbles peaking through, the mass of dough is trapping quite a bit of the gas produced through fermentation. After this initial explosive growth things will slow down, but upward growth will continue for many hours.
3:00 p.m. At this point, there's only slightly more expansion than the last check-in. But, you can see many more bubbles on top and at the sides, showing signs of the momentous fermentation taking place. All of these are good signs. Bubbles and holes on top are a good sign, but my starter is not ready to be fed or used at this time. Another key indicator here is the aroma: how does it smell? Is it still sweet, sourer, or very acidic and vinegar-like? At this point mine still has a sweet aroma to it with a very subtle backdrop of sourness starting to creep in.
5:00 p.m. By this time we have significantly more bubbles at the sides and the top; overall fermentation activity is much higher. If I were to describe the aroma of the starter at this point, it would still smell quite sweet at it was at 3:00 p.m., but now the sourness is starting to escalate and build. Given the look and aroma, I can expect my starter to rapidly come to ripeness very soon.
7:00 p.m. You'll notice here at 7:00 p.m. any dome that was once at the top of the starter is now gone, replaced by a reasonably flat surface. The flattening of the top usually indicates upward growth has significantly slowed and upward movement won't be as prominent. More holes on top and more fermentation visible at the sides. We'll continue to let it ferment.
8:00 p.m. – Ripe, time to make a levain or mix your dough. As seen below, we still see some rise since 7:00 p.m., but not much. The top is showing signs of more holes and bubbles and the aroma is what I would describe as “ripe” and ready for use. If I were to pull back a little bit of the top, I would smell a slightly sour, vinegary smell with hints of sweetness still present. At this point, I'd use some of the sourdough starter to make a fresh levain or use this starter directly in making bread.
While I find the “float test” to be a misleading test because it can sometimes give you false positives for when a starter or levain is ready to use, the float test would surely pass at this point.
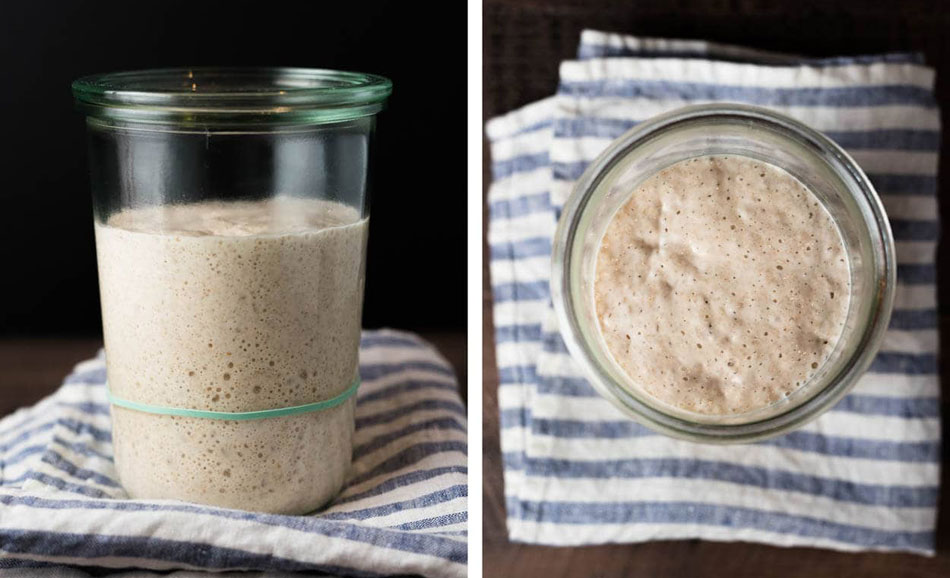
Ripe Starter
10:00 p.m. – Just past ripe The culture is beginning to show signs of ripeness. There are streaks at the top that indicate where the top of the starter once was, and you can see the center is starting to collapse. This time (10:00 pm) is when you would want to refresh (feed) your starter. If you are using the correct mixture of inputs—water at a specific temperature, percentage of mature starter, and flour mixture—this time will coincide with when you want to feed it.
The fact that it's starting to collapse is not the single most important factor in judging starter and levain readiness, it's the cumulative signs that matter: a general breakdown of the mixture, a stronger sour aroma, and significant gas production.
!!! If your starter has arrived at this point before you want it to use it, you can use a smaller percentage of ripe starter carryover or use colder water. If your starter is a bit sluggish and isn't quite at this level, use a bit more ripe starter at the next feeding or use 2° to 8° warmer water. Being observant helps us help our starter to maximize fermentation activity. As you continue to care for your starter, take a moment before you rush through refreshments to observe the look and aroma of your starter—plan to adjust things either at the current refreshment or the next based on this observation.
Picture of Sourdough Starter Ripening from King Arthur Flour
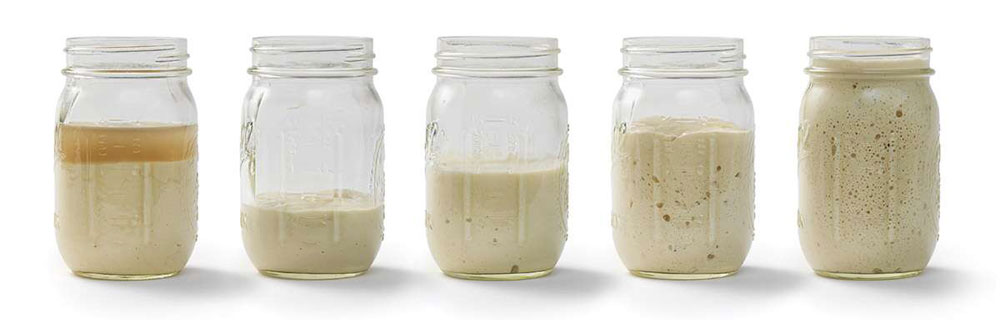
Starter taken from the frig -> Just fed starter -> 2 hours later -> 5 hours later -> 8 hours later
How to Take a Long Break from Your Starter:
If you're taking a break from baking, but want to keep your starter, you can do two things:
- Make a Thick Starter: Feed your starter double the amount of flour to make a thicker dough-like starter. This thicker batter will maintain the yeast better over long periods of inactivity in the fridge.
- Dry the Starter: Smear your starter as thin as you can on a Silpat or 2 layers of parchment paper and let it dry at room temperature. Once completely dry, break it into flakes and store it in an airtight container. Dried sourdough can be stored for months. To re-start it, dissolve 1/4 cup of the flakes in 4 ounces of water, and stir in 4 ounces of flour. Continue feeding the starter until it is active again. It should be vigorously bubbling before using in a recipe.
Also see Drying & Storing Your Starter
