Signs Your Sourdough has Finished Bulk Ferment
from https://truesourdough.com/
A word of caution here. Knowing when the dough is finished bulk ferment, takes some experience. And the more you bake sourdough, the more you’ll develop a ‘bakers instinct’ when it comes to knowing when to move to the next stage. But there are signs to look for that you can use to help you make the decision to go ahead and shape…
As a very basic time frame, the very minimum that sourdough should ferment/proof for is 4 hours. Less than 4 hours simply won’t be enough time to develop enough of a gluten structure or flavor. Also, do not do any stretch and folds for at least the last 2 hours. But depending on other variables, such as: How much sourdough starter or leaven has been used in the dough. The temperature of the dough and its environment.
Signs of Change During Bulk Fermentation of Sourdough
The dough will change considerably during the bulk fermentation period (by bulk fermentation, we mean the first rise or proofing time), and knowing what to look for will help you determine if it is ready for shaping or not. Here are 4 signals to look for that will tell you if your dough is ready:
Sign #1: The Dough will Look Different after Fermentation
Once the dough has proven for enough time, it will look different. Look out for the following signs:
- Grown in size – don’t wait for it to double in size though, depends on flours used. Some sourdough bakers suggest a 50% increase in volume.
- Bubbles in the dough – These can be seen just beneath the surface or along the sides of the bowl.
- Smooth surface – there should be no shagginess in the texture of the dough, it should smooth and almost shiny at its surface.
- A domed surface – the top of the dough should looked domed, indicating it is still growing and has strength left in it. If it becomes flat or collapses, this is a sign it has over fermented.
- Wobble test - Shake the bowl. The dough should move like it is jell-o.
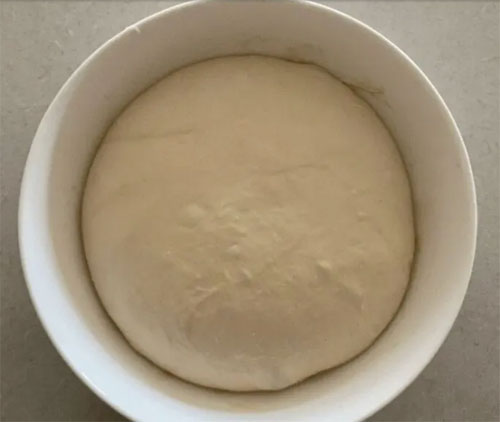
- The dough is ready to be shaped. It's forming a dome with the dough moving away from the sides of the bowl. There are bubbles forming underneath the surface.
Sign #2: The Dough’s Density will Change
When the dough is at the initial stages, it will be dense. During the bulk fermentation, the gluten structure will begin to develop, which helps to trap air into the dough. As air bubbles start to develop, the dough will not only grow in size, but also become lighter and fluffier. It will lose its density and become more airy.
QUICK TIP: Sourdough needs to be handled very gently at this stage in order to maintain all of those bubbles it has spent hours developing!
Has the dough become aerated? If it is still dense then it needs more time to ferment.
Sign #3: The Dough will ‘Feel’ Different
When you handle the dough after its bulk fermentation, it will feel quite different to when you first handled it. The dough will now be very light and have a ‘bouncy’ kind of a feel to it. In fact, if you give the bowl/container some gentle movement backwards and forwards, the dough will ‘jiggle’ and be wobbly. This is the point at which it is done and ready to shape.
There is also a test that you can perform to help you understand if the dough has developed enough strength and ‘bounce’ in it to hold itself up…
The ‘Poke’ Test
This test can be done once the dough has had some time to ferment. Poke your finger into the dough about a half inch deep. Does the dough ‘recover’ by popping back out? or does it stay where it is? If:
- The dough pops back out quickly – This means its under-proofed.
- The dough stays where it is – This means its over-proofed.
- The dough pops back out slowly and leaves a slight indentation – Perfect, your dough is ready!
Sign #4: The Dough will Behave Differently
A dough that has been proofed properly will still have ‘strength’ to it when handled. It will feel alive by being a little stubborn in the shape it wants to be. You will find that it has developed stretchiness and elasticity.
Whereas before the proofing, the dough would have been quite flat and easy to manipulate (rather like play dough), once the dough has proofed enough, the dough will be more elastic and resist being overly stretched.
What Happens if I Proof my Dough for Too Long?
There is of course a limit to how long you can proof your sourdough for. And if you do leave it too long, it eventually runs out of its food source (the starches and sugars in the dough), and over ferments. Over fermentation means the dough has no food left, and so it has no strength left to continue to ferment or grow in size. The gluten strands eventually break down, and the dough cannot hold itself up and basically collapses in on itself.
Signs that your Dough has Over Proofed, and What to Do:
Having an over proofed dough is a little tricky to salvage. And it really depends how over proofed it is. Here are a couple of signs that you have an over proofed dough, and what to do in each case:
Tip: When scoring, the lame or knife will pull against an over proofed dough instead of cutting cleanly.
First sign: The dough has become flatter rather than domed, or has started to collapse at the sides of the bowl.
What to do: Give the dough some stretch and folds and simply moving the dough around. This will give the sourdough a chance to find new pockets of sugars and starches to consume. Shaping it and baking very shortly afterwards is recommended.
Second sign: The dough has become loose and slack, and doesn’t seem to hold any kind of shape. If your dough becomes slack and sticky, it may have become too sour and the lactic acids started breaking down your gluten structure. This could be due to too long a bulk ferment or having a too sour starter. FMM: I have also found my dough gets like this if I have not ripened my starter long enough. See Waking Up & Maintaining Sourdough Starter
What to do: The only thing to do with a heavily over proofed dough is pour it into a greased loaf tin and bake it. The loaf tin will hold its shape up in absence of strength in the dough. Baking heavily over proofed dough at this point will probably result in a denser, flatter bread that tastes overly sour. It’s not ideal, but still a positive learning experience!
Look at the Crumb once baked: (Also see How to Read Sourdough Crumb (.pdf))
Signs of an under-proofed loaf:
- Vertical shaped holes in the crumb
- Scoring lines that have spread very far apart or blown out
- Areas of dough that have blown out through the crust
- After baking, if your sourdough has large cracks on the top or sides, it could be a sign it’s underproofed. You might also notice that the top of your loaf is quite raised, almost pyramid-like. This can also be a telltale sign that your sourdough is under proofed. As it bakes, the dough will have a rapid expansion due to the trapped gas. This causes cracks on the loaf to form beyond your scoring and a huge ovenspring or rise during the bake . This usually means it didn’t get enough time to develop the right crumb structure.
- A rounded bottom crust or A loaf shaped like a ball
- Dense crumb - Areas of dense crumb mixed with some large holes
- When the dough doesn’t get enough rise time, it can’t develop the gas and structure needed for that nice, light, airy crumb. Instead, you’re left with a heavy, chewy loaf that’s hard to tear apart. The crumb might even feel sticky or way too dense, and that’s definitely not what you want. The crumb will resemble that of a sponge – very tight with many tiny holes with some larger holes or tunnels, especially near the top.
- Pale crust
- Hard crust
- When the dough fails to rise right during fermentation, it messes with how the outer layer bakes. Instead of getting that light, crispy crust, you might end up with something thick and hard. This happens because the dough didn’t get enough time to form air bubbles, which help the bread bake more evenly and give it that delicate crust.
- Flavor Doesn’t Develop Fully
- If your sourdough tastes flat or lacks that rich, tangy flavor, it might be underproofed. When the dough doesn’t rise long enough, the wild yeast and bacteria don’t have enough time to develop the flavor fully. You’ll end up with bread that just doesn’t have that depth or complexity you’re used to. Letting the dough proof properly is the secret to getting that perfect sourdough tang we all love. Take a look at your loaf. Does it have big tunnels, especially near the top crust? That’s a clear sign it didn’t proof long enough and has uneven gas distribution. Next time, just make sure you give your dough enough time to rise.
Signs of an over-proofed loaf:
- Spongey crumb with small round holes
- Flat loaf
- Scoring lines that have hardly spread
- Oval or flat shaped loaf
- Collapsing during scoring
- Dense uneven crumb
