Sourdough Starter Recipe
Recipe is from http://www.thekitchn.com/
Makes 4 cups
[These instructions do not have you discard any starter, as most do, and makes 4 cups. According to Rose Levy Beranbaum, author of The Bread Bible, the primary reason home recipes for starter call for some of it to be discarded is “because as the starter is fed (refreshed) with flour and water to keep it alive and active, it continues to grow and expand to a far greater quantity than is practical, especially for home baking,” Instead of throwing the starter out, there a lot of recipes that use this "discard."]
What You Need
Ingredients
All-purpose flour (or a mix of all-purpose and whole grain flour)
Water, preferably filtered
Equipment
2-quart glass or plastic container (not metal)
Scale (highly recommended) or measuring cups
Mixing spoon
Plastic wrap or container lid
Instructions
Making sourdough starter takes about 5 days. Each day you "feed" the starter with equal amounts of fresh flour and water. As the wild yeast grows stronger, the starter will become more frothy and sour-smelling. On average, this process takes about 5 days, but it can take longer depending on the conditions in your kitchen. As long as you see bubbles and sings of yeast activity, continue feeding it regularly. If you see zero signs of bubbles after three days, take a look at the Troubleshooting section below.
Comment on a web site, modified: "Conditions vary so widely that 5 days can be far too little. I've learned the key is to watch for a dramatic and consistent rise in the jar — at least doubling between 1 and 4 hours after feeding. This could be 5 days or less after you begin, or it could be three weeks (for me it was 12 to 14 days). I would encourage you watch for this phenomenon, rather than watch the calendar."
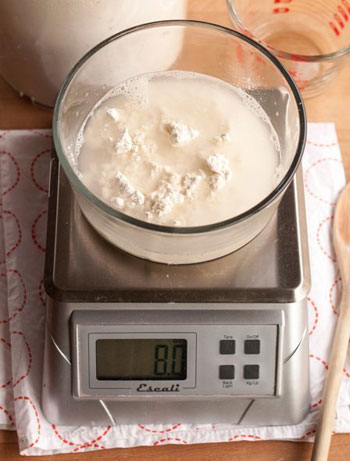
Day 1: Make the Initial Starter
4 ounces (3/4 cup + 2 tablespoons) all-purpose flour
4 ounces (1/2 cup) water
Weigh the flour and water, and combine them in the container. Stir vigorously until combined into a smooth batter. It will look like a sticky, thick dough. Scrape down the sides and loosely cover the container with plastic wrap or the lid (left ajar).
Put the container somewhere with a consistent room temperature of 70°F to 75°F (like the top of the refrigerator) and let sit for 24 hours.
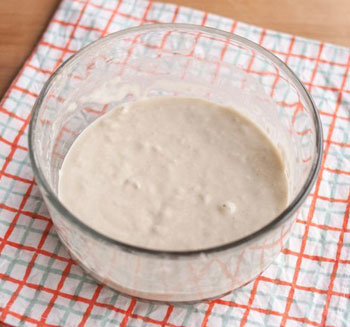
Day 2: Feed the Starter
4 ounces (3/4 cup + 2 tablespoons) all-purpose flour
4 ounces (1/2 cup) water
Take down your starter and give it a look. You may see a few small bubbles here and there. This is good! The bubbles mean that wild yeast have started making themselves at home in your starter. They will eat the sugars in the the flour and release carbon dioxide (the bubbles) and alcohol. They will also increase the acidity of the mixture, which helps fend off any bad bacterias. At this point, the starter should smell fresh, mildly sweet, and yeasty.
If you don't see any bubbles yet, don't panic — depending on the conditions in your kitchen, the average room temperature, and other factors, your starter might just be slow to get going.
Weigh the flour and water for today, and combine them in the container. [Some recipes say to discard all but 1/2 cup of the starter first, if you prefer not to end up with a lot of starter.] Stir vigorously until combined into a smooth batter. It will look like a sticky, thick dough. Scrape down the sides and loosely cover the container with plastic wrap or the lid (left ajar). Put the container somewhere with a consistent room temperature of 70°F to 75°F (like the top of the refrigerator) and let sit for 24 hours.
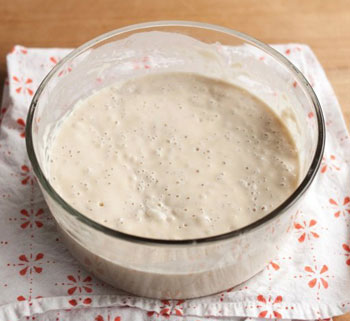
Day 3: Feed the Starter
4 ounces (3/4 cup + 2 tablespoons) all-purpose flour
4 ounces (1/2 cup) water
Check your starter. By now, the surface of your starter should look dotted with bubbles and your starter should look visibly larger in volume. If you stir the starter, it will still feel thick and batter-like, but you'll hear bubbles popping. It should also start smelling a little sour and musty.
Again, if your starter doesn't look quite like mine in the photo, don't worry. Give it a few more days. My starter happened to be particularly vigorous!
[Again discard all but 1/2 cup, if you prefer.] Weigh the flour and water for today, and combine them in the container. Stir vigorously until combined into a smooth batter. It will look like a sticky, thick dough. Scrape down the sides and loosely cover the container with plastic wrap or the lid (left ajar). Put the container somewhere with a consistent room temperature of 70°F to 75°F (like the top of the refrigerator) and let sit for 24 hours.
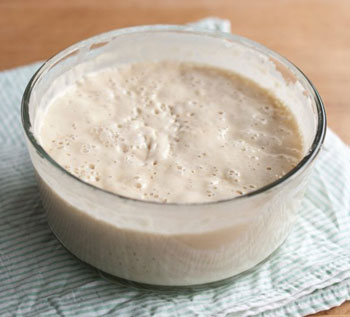
Day 4: Feed the Starter
4 ounces (3/4 cup + 2 tablespoons) all-purpose flour
4 ounces (1/2 cup) water
Check your starter. By now, the starter should be looking very bubbly with large and small bubbles, and it will have doubled in volume. If you stir the starter, it will feel looser than yesterday and honeycombed with bubbles. It should also be smelling quite sour and pungent. You can taste a little too! It should taste sour and somewhat vinegary.
When I made my starter here, I didn't notice much visual change from Day 3 to Day 4, but could tell things had progress by the looseness of the starter and the sourness of the aroma.
Weigh the flour and water for today, and combine them in the container [again discarding all but 1/2 cup first, if you prefer.] Stir vigorously until combined into a smooth batter. It will look like a sticky, thick dough. Scrape down the sides and loosely cover the container with plastic wrap or the lid (left ajar). Put the container somewhere with a consistent room temperature of 70°F to 75°F (like the top of the refrigerator) and let sit for 24 hours.
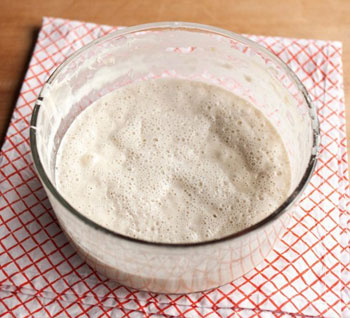
Day 5: Starter is Ready to Use
Check your starter. It should have doubled in bulk since yesterday. By now, the starter should also be looking very bubbly — even frothy. If you stir the starter, it will feel looser than yesterday and be completely webbed with bubbles. It should also be smelling quite sour and pungent. You can taste a little too! It should taste even more sour and vinegary.
If everything is looking, smelling, and tasting good, you can consider your starter ripe and ready to use! If your starter is lagging behind a bit, continue on with the Day 5 and Beyond instructions.
Note: Watch for a dramatic and consistent rise in the jar — at least doubling between 1 and 4 hours after feeding. This indicate that the starter is ready.
From https://www.feastingathome.com/sourdough-starter/:
"DAY 6: Give it one last feeding. Discard all but a 1/2 cup [this person uses the technique of discarding part of the starter, then feeding, as noted by one commenter at the beginning of this page]. Add 1 heaping cup flour (120 grams) and 1/2 cup water, and place it in a clean jar so you can see the action clearly. You can use a sharpie or place a rubber band around the jar to mark the beginning level. The starter should hopefully double in volume within 4-6 hours of feeding. Let the starter rest at room temperature for 8 hours; it should be active, with bubbles throughout or breaking the surface.
Then DO THE FLOAT TEST: To test the starter, place a teaspoon of starter (just from the top, don’t stir it down) in a glass full of water, it should hopefully float. If it does, you can make bread. Tonight!
At this point, if your starter does not double in size or pass the float test, don’t give up! Sometimes it just takes longer. Continue feeding one-two times a day, for a few more days, until you see a consistent, predictable, rise and fall, and it floats. Read the troubleshooting section. If you need to take a break, put it in the fridge and try it again up to a week later. Don’t toss it!"
Day 5 and Beyond: Maintaining Your Starter
Also see Waking Up & Maintaining Sourdough Starter
4 ounces (3/4 cup + 2 tablespoons) all-purpose flour
4 ounces (1/2 cup) water
Once your starter is ripe (or even if it's not quite ripe yet), you no longer need to bulk it up. To maintain the starter, discard (or use) about half of the starter and then "feed" it with new flour and water: weigh the flour and water, and combine them in the container with the starter. Stir vigorously until combined into a smooth batter.
If you're using the starter within the next few days, leave it out on the counter and continue discarding half and "feeding" it daily. If it will be longer before you use your starter, cover it tightly and place it in the fridge. Remember to take it out and feed it at least once a week — I also usually let the starter sit out overnight to give the yeast time to recuperate before putting it back in the fridge.
Makes 4 cups
From https://www.feastingathome.com/sourdough-starter/:
TROUBLESHOOTING:
SMELL: Starter should smell sweet and tangy, and not “bad”. If it really smells unpleasant, you may have used an unclean jar, or somehow introduced other bad bacteria. I would start over.
NO ACTION: If your starter was doing great, then fizzled out, try using a little whole grain flour mixed with the bread flour into the feedings and really monitor amounts, making sure you are feeding the 1/2 cup starter a full heaping cup of flour (120 grams). Check the temp (using a thermometer) and give it a little extra time to “digest” the flour. ***Sometimes it takes longer than 12 hours for starter to need more flour. It is OK to skip a feeding at night if it looks like it is still peaking or rising.
DO NOT overfeed. For example, maybe, feeding 2 x day at 12-hour intervals is too often. You want to feed after the starter has peaked, then deflated (you’ll see some slide marks on the jar) and this tells you that it is hungry. If you feed the starter before it has had a chance to metabolize (or eat) all the flour (before peaking) and then you discard part, and feed it again, you are actually diluting all that amazing bacteria. Get it? So it’s all about watching your starter in your home. There are lots of variables here. Just be patient, pay attention and watch. This is a living thing - it doesn’t care about time schedules and recipes or what it “should” do. It will “eat” when it is “hungry” and sometimes it likes to eat slowly!
TIME: It may take longer than 6 days in colder environments to create a starter. Use a kitchen thermometer and take its temp. Is it over 65F? Find a place where it can be warm. Not in direct sun. Sometimes it takes 10-12 days. Be patient, keep going. If it is doing absolutely nothing, leave it out on the counter for 24-48 hours and see what happens. If you run out of flour or need a break, don’t just toss it, put it in the fridge and see if you can get it going a few days later.
ACIDITY: If you still can’t get that starter going, some people recommend subbing pineapple juice for the water for one feeding- raising the acidity level. My good friend just tried this and it got hers going!
LIQUID: If you see any liquid at the top of your starter, it means your starter is hungry! So, yes it’s still alive which is a good thing! You can stir the liquid in, or pour the liquid out, either way, but feed it! This may be a sign that you may need to feed it more often than every 12 hours.
MOLD: if you see any discoloring or mold on the surface, starter was probably contaminated. If it is only on the surface, it is probably worth saving. Scrape it off, save 1/2 cup of the underneath starter, and keep going. Feed, smell, use your best judgment.
