Rustic Italian Bread
Recipe from Baking Illustrated, by Cook’s Illustrated Magazine Editors
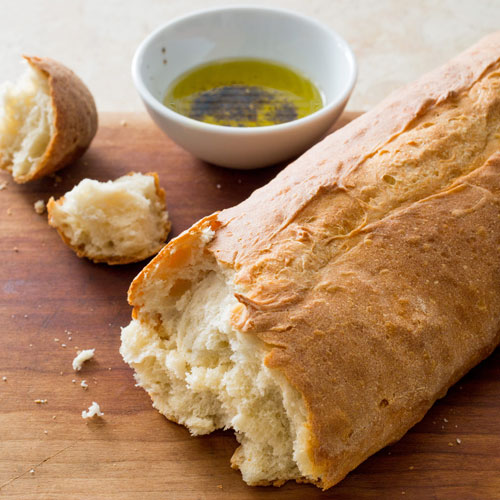
Be forewarned that this recipe does take some planning, as you’ll need to start the day before you want to bake it, and on the day of baking, you’ll need to start things about 7 hours before it’ll be ready to eat.
This recipe makes one large loaf of Italian bread that has that characteristic shatteringly crisp crust, along with a chewy interior… The perfect bread for soaking up leftover sauce on your plate, or the last remnants of a hearty soup in your bowl.
FMM: At 72% hydration, this dough was somewhat sticky and very fragile; there is no way it could be kneaded without adding a lot more flour. I forgot to tuck the bottom edges under the dough after placing on the sheet pan to form a tight skin, as well as flouring the dough for the final raise after shaping and brushing the loaf with water before placing in the oven. I did add a pan to the bottom of the oven and poured boiling water into it just before putting the bread in (which is not mentioned in the recipe). I had trouble with making the slash. My knife kept dragging on the dough (the serrated knife was useless). I added notes about this in the recipe that will hopefully help next time.
It smelled really good while baking and the bread has decent flavor, although not as good as the sourdough I had just made. This makes a huge loaf, weighing 2 pounds 12 ounces before baking, and 2 pounds 6 ounces after. The bread seemed very bubbly when proofing it, but it did not have good oven spring and came out a little flat. Perhaps in part because I did not create a tight skin when shaping; I think the dough after first being mixed should be kneaded lightly to form a firmer structure in the dough - the Extra-Tangy Sourdough bread recipe has you knead initially and the structure is much better. Also, the bread was fairly moist, not light and airy. It seemed more like ciabatta bread than Italian bread (although it was not a flat as ciabatta), although this is a "rustic" bread. I think the bread overproofed. I adjusted the recipe to start checking the rise on the bread after shaping.
Make 1/2 recipe, the bread is huge. Or form into two loaves.
About 72% hydration.
For the Sponge:
2 cups (312 grams) bread flour
1/4 teaspoon instant yeast
1 cup (240 ml) water, at room temperature
For the Dough:
3 cups (468 grams) bread flour
1 teaspoon instant yeast
1 1/3 cups (320 ml) water, at room temperature
2 teaspoons salt
Make the Sponge: Combine the flour, yeast and water in the bowl of a stand mixer fitted with the dough hook. Knead at the lowest speed until a shaggy dough is formed, 2 to 3 minutes. Transfer to a medium bowl, cover tightly with plastic wrap, and let stand at room temperature until it begins to bubble and rise, about 3 hours [in winter, mine took about 4 hours]. Refrigerate for at least 8 hours or up to 24 hours.
Note: The small amount of yeast in the Sponge allows the dough to ferment more slowly than if more were addd. This allows the enzymes to break down more of the starch in the flour into sugars, which will help brown the crust and further develop the flavor of the bread.
Make the Dough: Remove the sponge from the refrigerator and let stand at room temperature while making the dough. Combine the flour, yeast and water in the bowl of a stand mixer fitted with the dough hook; knead at the lowest speed until a rough dough is formed, about 3 minutes.
Cover the bowl loosely with plastic wrap and allow to rest for 20 minutes.
Remove the plastic wrap, add the sponge and the salt, and knead at the lowest speed until the ingredients are incorporated and the dough is formed (the dough should clear the sides of the bowl but stick to the bottom), about 4 minutes. Increase the mixer speed to medium-low and continue to knead until the dough forms a more cohesive ball, about 1 minute.
Transfer the dough to a large, greased bowl and cover tightly with plastic wrap. Let the dough rise in a cool, draft-free place until slightly risen and puffy, about 1 hour.
[Mix and Rise for 1 hour]
Remove the plastic wrap, slide a plastic bench scraper under one side of the dough, gently lift and fold a third of the dough toward the center. Repeat with the opposite side of the dough. Lastly, fold the dough in half, perpendicular to the first folds. The dough should be a rough square. Replace the plastic wrap and let the dough rise for 1 hour.
[1st Fold and Rise for 1 hour]
Turn the dough, repeating the folds. Replace the plastic wrap and let dough rise for 1 hour.
[2nd Fold and Rise for 1 hour]
Shape the Dough: Liberally flour a work surface and gently scrape the dough from the bowl onto the work surface. Dust the dough and your hands liberally with flour and, using gently pressure, push the dough into a rough 8- to 10-inch square. [If you want two smaller loaves, split the dough into two equal halves. Use a knife or bench scraper. If you are making two loaves, shape each piece into a smaller rectangle.]
Fold the top right corner diagonally to the middle. Fold the top left corner diagonally to the middle. Begin to gently roll the dough from top to bottom, continuing to roll until the dough forms a rough log. Roll the dough onto its seam and, sliding your hands under each end, transfer the dough to a sheet of parchment paper.
Gently shape the dough into a 16-inch football shape by tucking the bottom edges underneath [to get a tight skin on top]. Dust the loaf liberally with flour and cover loosely with plastic wrap; let rise until doubled in size, about 1 hour.
[Shape and Rise for 1 hour - check the bread after 30 minutes then continually until the bread is ready to bake]
Meanwhile, adjust an oven rack to the lower-middle position, place a baking stone on the rack [my stone is only 13 inches in diameter, not big enough if making 1 loaf, use a sheet pan], and preheat the oven to 500 degrees F.
Bake the Bread: Using a single-edge razor or sharp knife, cut a slit ½-inch deep lengthwise along the top of the loaf, starting and stopping 1½ inches from the ends. Spray the loaf lightly with water. [See Baking Bread with Steam] Slide the parchment sheet with the loaf onto a peel (or inverted rimmed baking sheet), then slide the parchment with the loaf onto the hot baking stone in the oven.
[Scoring the Dough: Making the cuts rapidly will help to prevent the lame from sticking to the bread. It’s also advised to prove your bread in a banneton beforehand to allow the skin of the dough to dry out just enough. Cutting cold proofed dough is also easier.
If your dough is sticky, dip your lame/blade in flour before making each slash. If your dough is dry, try running the lame under hot water. This helps lubricate the blade as it cuts, and keeps the cut bread from sticking
It's the thickness of the blade that's holding you up. The shape of the tip doesn't help, but that's easy enough to work around. But behind that tip is the spine of the blade, and it's close to where you're cutting. This creates extra drag. So just use the tip of the blade to make the slash.
A slashed lengthwise will expand width-wise as it rises. Alternatively, you can make diagonal slashes every 2.5 inches, approximately five slashes for a 12-inch roll, to maintain a narrower shape to the roll.]
Bake 10 minutes, then reduce the oven temperature to 400 degrees F and rotate the loaf from front to back; continue to bake until deep golden brown and an instant-read thermometer inserted into the center of the loaf reads 210 degrees, 35 to 45 minutes longer. Transfer to a wire rack, discard the parchment, and cool the loaf to room temperature, about 2 hours.
Yield: 1 loaf
