Peter Reinhart’s Tuscan Bread
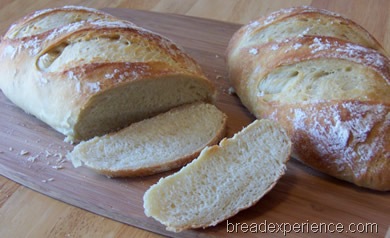 from The Bread Baker’s Apprentice by Peter Reinhart
"A technique unique to Tuscan Bread is the use of a cooked flour paste, made the day before. This is different from a pre-ferment since there is no yeast added and the pasted does not ferment, but the gelatinized starches release flavors and sweetness that gives this bread a distinct quality unlike any other bread. It is yet another way to control flavor by manipulating time, temperature, and ingredients."
[This is very similar to the Tangzhong Technique, used in many breads made in Asia.]
Recipe and comment from https://www.breadexperience.com/
Several of the other bakers in the BBA (The Bread Baker’s Apprentice) Challenge mentioned they didn’t like this bread because it is salt less. To me, it was neither dull nor flat tasting. It had a wonderful, slightly sweet flavor. I really liked it and so did my taste tester! I tasted a piece spread with peanut butter, one with jam, and then another one with plain butter (not at the same time). Each slice tasted great. For one meal, I toasted some slices and served them with homemade Tuscan Bean Soup and some olive oil and herbs for dipping. Yummy! I also made Bruschetta with some of the bread. I think that was my favorite.
Flour Paste:
1 3/4 cups boiling water
2 cups unbleached bread flour
Dough:
2 2/3 cups unbleached bread flour
2 1/2 teaspoons instant yeast
2 tablespoons olive oil
About 1/2 cup water, at room temperature
Semolina flour or cornmeal for dusting
Make the Flour Paste
Pour the boiling water over the flour in a mixing bowl and stir vigorously until the flour is hydrated and roux-like thick smooth paste forms. Let cool, cover, and leave out overnight at room temperature. If not using the next day, refrigerate it instead of leaving it out.
Mixing the Dough
The next day, make the dough by mixing together the flour and yeast in a mixing bowl, then add the paste and olive oil.
Stir or mix, adding as much water as necessary to make a soft, supple ball.
Transfer the dough to a counter sprinkled with flour and hand knead for about 10 minutes or if you’re using a mixer, mix for 6 to 8 minutes. Add more flour as needed to make a dough that is tacky but not sticky.
Transfer the dough to a lightly oiled bowl and roll it around to coat it in oil. Let the dough ferment on the counter for 2 hours.
Gently divide the dough into two pieces being careful not to degas it too much. Shape the balls into boules. Cover and let them rest on the counter for 15 minutes.
Then shape the boules into batards. To make the batard shape, gently pat the dough into a rough rectangle.
Then without degassing the piece of dough, fold the bottom third of dough, letter style, up to the center and press to seal, creating surface tension on the outer edge.
Fold the remaining dough over the top and use the edge of your hand to seal the seam closed and to increase the surface tension all over.
Form the other ball of dough the same way, then transfer the loaves to a parchment-lined baking sheet for proofing. Mist the loaves with spray oil and cover loosely with plastic wrap. Proof the loaves at room temperature for 60 to 90 minutes, or until they nearly double in size.
Baking the Loaves
Prepare the oven for hearth baking by placing a steam pan in place. Preheat the oven to 500 degrees F. and pour 2 cups of water in the steam pan.
Just before baking, spray the loaves with a little bit of water and lightly dust with bread flour by tapping some through a sieve.
Score the loaves by making 3 slashes using a lame or serrated knife. I used a serrated knife.
Slide the breads directly onto the baking stone. After 30 seconds, open the door, spray the walls with water, and close the door. Repeat twice more at 30-second intervals, then lower the oven setting to 450 and bake for 10 minutes. Remove the steam pan 10 minutes after loading the oven being careful not to splash yourself if there’s any water left. Check the breads and rotate them 180 degrees for even baking. Continue baking for 10 to 20 minutes longer, or until the loaves turn a rich golden color.
Transfer the loaves to a wire rack and cool for at least an hour before slicing or serving. Once the bread is cooled, it’s time to enjoy a slice and see what you think about salt-free bread. My taste tester thinks it would taste good with almost anything.
Makes: 2 Loaves
