Speculaas (Dutch Windmill Cookies)
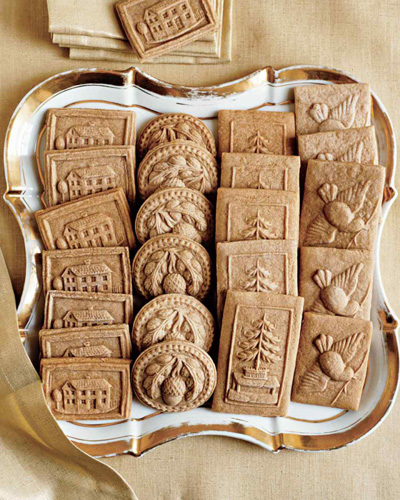
Speculaas (Dutch: Speculaas Dutch pronunciation: [speːkyˈlaːs], French: spéculoos, German: Spekulatius) is a type of spiced shortcrust biscuit, traditionally baked for consumption on or just before St Nicholas' feast in the Netherlands (December 5), Belgium (December 6), and around Christmas in the western and southern parts of Germany. Speculoos are thin, very crunchy, slightly browned and, most significantly, have some image or figure (often from the traditional stories about St. Nicholas) stamped on the front side before baking; the back is flat.
Speculoos dough does not rise much. Dutch and Belgian versions are baked with light brown (beet) sugar and baking powder. German Spekulatius uses baker's ammonia as leavening agent. Spices used in speculoos are cinnamon, nutmeg, cloves, ginger, cardamom and white pepper. Traditionally, speculaas were made from rye and the name speculoos was coined for Belgian wheat flour cookies with hardly any spices. Nowadays most Speculoos versions are made from white (wheat) flour, brown sugar, butter and spices. Some varieties use some almond flour and have slivered almonds embedded in the bottom. Some Belgian varieties use less or no spice.
To make the dough, butter, sugar and spices are combined. The flour and leavening agent are mixed separately and then added. Bakers carefully ensure the dough doesn't heat too quickly. The dough is stored in a cool place overnight to give the spices time to permeate the dough and add extra flavor.
Historical Notes
As the Dutch Republic entered its Golden Age in the 17th century, special dishes consisting of a rich variety of fruits, cheeses, meat, wine, and nuts became available to the wealthy middle class as well. The Dutch Empire enabled spices, sugar, and exotic fruits to be imported to the country. The availability of relatively cheaper spices resulted in a tradition of spiced cookies called speculaas, the exact recipes of which were kept secret by bakers. Of course, even in the Golden Age, not everyone could afford such luxuries and the everyday meal of the ordinary Dutchman was still a humble affair of grain or legume pottage served with rye.
Historically, the cookies were served on December 5 and 6 to celebrate St. Nicholas’ Day; thus speculaas were traditionally created in the shape of St. Nicholas in order to honor the life of St. Nicholas. St. Nicholas (or known as Santa Claus or Sinterklaas) was born in the late 3rd century in Patara (an ancient city in Turkey). Although he had a wealthy background he actually spent his life giving his money and gifts to the poor. He died on December 6 in the 4th century, and many still wanted to honor his spirits of generosity and kindness so they began to celebrate on December 6 as St. Nicholas’ Day.
As a tradition on St. Nicholas Eve in the Netherlands and Belgium, children will put shoes by the chimney before going to bed, and well-behaved children are rewarded by speculaas cookies in their shoes. Today Speculaas are still essential to serve on the Feast of St. Nicholas but are also popular during the Christmas season.
The cookie itself dates back to at least the Middle Ages, when cinnamon, nutmeg, and cloves were commonly used and foods such as gingerbread were popular. They were certainly being baked by the 15th century, when couples in love would express their desires through the gift giving of speculaas, shaped as humans or even in a representation of St. Nicholas himself. While originally based in religious iconography, nowadays speculaas come in a variety of shapes, including elephants, horses, ships, farmhouses, windmills, chickens, trees, birds, etc. Prior to around 1850, speculaas were made from rye flour and honey, resulting in a very hard cookie which could only be eaten when softened by dipping in a drink or crumbled into a sweet (and tasty) porridge.
FMM: I searched the web for the earliest recipes for Speculaas and couldn't find any. But I did find this excerpt:
According to http://www.bakkerijwiki.nl/, "Secret recipe: Every baker developed his own bakers secrets over the centuries. Naturally, this also applied to the composition of the gingerbread dough. Often the recipe was recorded in a booklet with a lock or in a simple script. Woe to the baker's servant who dared to drop his eyes in this secret book! Gingerbread dough was a clear example of so-called patron dough, no one other than the bakers' pattern itself could prepare this special dough. This dough was sometimes prepared in September and then ripened for three months. The secrets include not only the composition of the dough, the way of baking and the construction of the oven. In particular, the ratio of the spices and the types that were used gave an uniqueness to the spicy gingerbread. Also the way the speculaas, after it was baked, was preserved affected the taste. For the thick speculaas they had crates that were covered with tin inside. A proper construction ensured that the hard, sandy pastry eventually became deliciously brittle." (translation by Google Translate)
Tips from https://www.heritagecookies.net/
- Speculaas are thin, light, and crispy. Speculaas molds are shallower than Springerle molds, tend to be less detailed, and are also relatively large.
- The dough cannot be overly sweet, and must have some caramel notes. recipe originates with Mssr. Luc Longin of Belgium
- One easy and common path avoids the molds in favor of a large, thin, roll-and-cut cookie. Try decorating the top with some almond slices held on by egg wash just to fancy them up.
- A recipe from Mssr. Luc Longin of Belgium, that heritagecookies.net is partial to, lists some ingredients that are not common in a U.S. supermarket.
- “Type 00” flour: “Type 00” refers to a super-fine grind, not to a protein content. We tested a few different products and found that “Type 00 pizza flour” worked better than “pasta flour”. Pizza flour is more successful in speculaas than pasta flour due to the use of soft wheat in most commercially available pizza flour blends. All purpose flour will also work until you get to that last 5%. The difference only becomes apparent when you employ a traditional cookie mold. The finer “Type 00” yields slightly sharper features.
- Belgian Dark Brown Candi Sugar: Belgian brown sugar is not the same thing as U.S. brown sugar. The American version is made by adding molasses back into white cane sugar (pure sucrose) at a ratio of 1 tbsp. per cup for light brown sugar, and 2 tbsp. per cup for dark. Belgian brown sugar is a byproduct of the candy making industry and is made from “invert sugar,” meaning sucrose that has been treated with an acid to break a portion of it down into glucose and fructose. Those two component sugars, added together, end up being a little less sweet than pure sucrose. The invert sugar (sucrose, glucose, and fructose) is then caramelized to a medium or dark brown color as desired. The darker the caramel, the deeper the flavor and the lower the level of sweetness. Luc recommends the darker brown, least sweet version.
- The inestimable Stella Parks of Seriouseats.com, a self avowed Speculaas fanatic, likes to make a “toasted sugar” facsimile of Belgian Brown Sugar. Spread your desired weight out on a tray, and roast it at 300°F (150°C) for 4-5 hours, stirring occasionally, until you get the color you want. Grind the result in a food processor to break up the clumps, and proceed. Toasted sugar differs from the real thing because it is caramalized sucrose rather than caramelized invert sugar, but it is the closest alternative we know of.
- Hartshorn, (also called Baker’s Ammonia or ammonium chloride): Hrtshorn yields a finer, more even aeration than other chemical leavening agents. Combining it with baking soda yields the exact crumb you want for truly authentic Speculaas. Baking soda alone will work, but the cookies will lose some definition. Not a problem unless you use a mold and want sharp features.
- How To Make The Dough: Luc mixes together the butter, egg, and water, and then kneads in the sugar and the dry ingredients. That’s it. Period. I figured things might work better if I creamed the butter and sugar together before adding in the other ingredients. That’s standard Cookie Making 101, right? Wrong. The cookies came out almost fluffy, with next to no definition, and a distinct lack of the all-important crunch.
- Letting the dough sit in the fridge for 1-3 days is not a matter of convenience, nor of relaxing the gluten. This dough is carefully calibrated to have just enough moisture to hold together with very little more, and it has a lot of flour. That long wait allows the spice flavors to meld, while giving the flour particles a chance to hydrate evenly.
- If you are using molds, fill the mold all the way up with rice flour, dump that powder back into the bowl, and then knocks on the back of the mold to remove the excess. The result? A perfectly dusted mold every time, without any need for buttering or oiling. The figures come out more easily, and are that much sharper. I haven’t tested it, but we are convinced that corn starch, tapioca starch, and similar powders should work equally well.
- Luc fills each powdered mold with softened dough, rolls it to fill in all the nooks and crannies, and then cuts off the excess to leave the cookie backs exposed. The videos clearly use a serrated slicing knife to cut off the extra dough. Our serrated bread knife worked far better thjan our sharpest knives, especially when used in very small back-and-forth sawing motions.
Speculaas
recipe from http://www.marthastewart.com/
Also see Stella Parks "Homemade Biscoff (Belgian Speculoos Cookies)"
FMM: These do taste very much like Dutch Windmill Cookies. I got about 72 cookies. I refrigerated the dough for several days, then rolled it out to match the width of my springerle rolling pin, rolled sliced almonds onto one side (to mimic Windmill Cookies), flipped the dough over, used my springerle rolling pin to print a decoration on them, then cut them. My cookies were much smaller than Martha's, I am sure. I baked mine only for about 35 minutes, until the bottoms were lightly brown. The imprint from the springerle rolling pin was not that pronounced and the cookies did not look like Martha's. Still, the cookies were delicious and crispy when biting into them, but then they sort of break apart and dissolve in your mouth while eating them. To get this texture, you need to roll the dough very thin. Also, keeping the dough in the frig may have helped with this.
NOTE: Mix the dough and refrigerate 1 - 3 days before baking them so the spices have time to permeate.
3 1/2 cups all-purpose flour
1/2 teaspoon baking soda
1/2 teaspoon salt
1 1/2 teaspoons ground cinnamon
1 teaspoon ground ginger
1/4 teaspoon ground nutmeg
3/4 teaspoon ground cardamom
1/4 teaspoon ground mace
1/4 teaspoon freshly ground white pepper
Pinch of ground cloves
6 ounces (1 1/2 sticks) unsalted butter, softened
1 cup packed light-brown sugar (use toasted sugar, which Stella Parks thinks gives these cookies a more authentic taste and texture)
1/3 cup water
Confectioners' sugar, for surface dusting
Thinly sliced almonds (not in Martha's recipe)
Whisk together flour, baking soda, salt, cinnamon, ginger, nutmeg, cardamom, mace, white pepper, and cloves in a large bowl.
Cream butter and brown sugar until light and fluffy. [heritagecookies.net says you should not cream the butter and sugar, but just mix it together.] Beat in half the flour mixture. Beat in water, then remaining flour mixture. Shape into 3 disks. [If rolling out to imprint with Springerle rolling pin, divide into 2 disks.] Pat each to a 1-inch thickness, wrap in plastic, and refrigerate for 1 hour. [heritagecookies.net says to let the dough sit in the fridge for 1-3 days.]
Dust surface and springerle mold lightly with confectioners' sugar. Roll out dough to a 1/4- to 3/8-inch thickness (deeper molds will need thicker dough). [The thinner the better. Otherwise they are a bit tough and need coffee or something to dip them in. When rolled very thin, they dissolve in your mouth as Windmill Cookies do.]
[Note: you can use a Springerle rolling pin at this point instead of the molds. Use the rolling pin and cut the dough between the figures. If you want you can add thinly sliced almonds (before imprinting with the Springerle rolling pin) at this stage by pressing and rolling them into the dough, then flipping the dough over and continue rolling out the dough. This way the almonds will be on the underside of the cookie. A little egg white brushed on lightly helps the almonds to adhere.]
Cut a piece of dough about the size of the mold. Press mold firmly into dough, flip over, and gently roll over dough with a rolling pin. Flip over, and press onto a parchment-lined baking sheet. Using a knife, trim excess dough. Gently coax dough out of mold with fingertips and onto a baking sheet. Repeat, spacing cookies 1 inch apart, and placing same-size cookies on same sheet. Freeze until firm, about 1 hour. [Freezing them is supposed to help the image stay sharper.]
Preheat oven to 325 degrees. Place 1 sheet of cookies in oven, and immediately reduce temperature to 250. Bake, 1 sheet at a time, until cookies are set and just beginning to turn light gold around edges, 55 to 65 minutes. Let cool on sheets on wire racks. [The speculaas should be crunchy all the way through, from the edges to the center of the cookie. You will only know this for sure when they are completely cooled.]
Yield: Makes about 32 cookies [I got about 72 cookies rolling them out and imprinting with a Springerle rolling pin]
