Red Velvet Cake
Red velvet cake is traditionally a red, red-brown, crimson, or scarlet-colored chocolate layer cake, layered with ermine icing. Traditional recipes do not use food coloring, with the red color due to non-Dutched, anthocyanin-rich cocoa. Common ingredients include buttermilk, butter, cocoa, vinegar, and flour. Beetroot or red food coloring may be used for the color. The reaction of acidic vinegar and buttermilk tends to better reveal the red anthocyanin in cocoa and keeps the cake moist, light, and fluffy. This natural tinting may have been the source for the name "red velvet."
In the 19th century, "velvet" cake, a soft and velvety crumb cake, came to be served as a fancy dessert, in contrast to what had been the more common, coarser-crumbed cake. Around the turn of the 20th century, devil's food cake was introduced, which is how some believe that red velvet cake came about.
In recent years, red velvet cake and red velvet cupcakes have become increasingly popular in the US and many European countries, especially around Christmas and more recently Valentine's Day.
Also see Red Devil’s Cake vs Red Velvet Cake
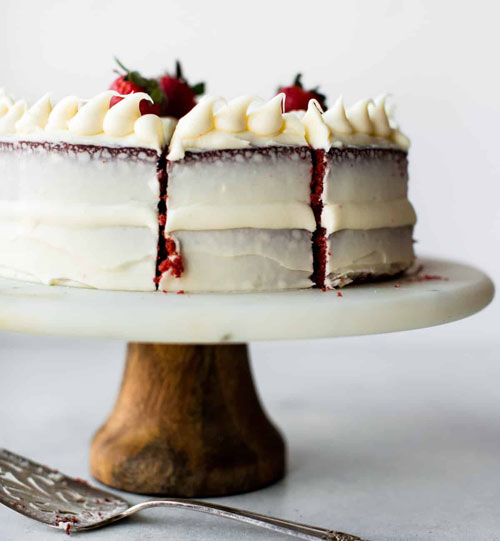
Red Velvet Cake
from https://sallysbakingaddiction.com/
Red velvet cake is much more than vanilla cake tinted red. This recipe produces the best red velvet cake with superior buttery, vanilla, and cocoa flavors, as well as a delicious tang from buttermilk. In my opinion, cream cheese frosting pairs best with red velvet’s flavor and this frosting recipe is really simple.
Red velvet cake is the queen of all layer cakes. The “I can’t quite put my finger on the flavor” cake. It’s the sweet marriage of buttermilk and vanilla with a little cocoa for good measure. I highly recommend cake flour. Cake flour is much lighter than all-purpose and the perfect base for a light, soft-crumbed cake texture. Unsweetened Cocoa Powder: 2 Tablespoons is plenty for a little cocoa flavor without overpowering the vanilla and butter flavors. Buttermilk is tangy, creamy, and makes baked goods extremely moist. You can’t make delicious red velvet cake without it! Additionally, buttermilk helps activate the baking soda to leaven the cake.
Red velvet cake wouldn’t be red without food coloring. I recommend gel food coloring because the color is concentrated, so you need less of it. The amount of red food coloring is up to you. Use about 2 teaspoons of gel food coloring or 1 Tablespoon of liquid. Dye the batter until you are pleased with the color. For natural coloring, use beet powder (mix it with 2 teaspoons of water before adding). If you don’t want to use food coloring, leave it out! The cake will have the same flavor and be a lovely shade of cocoa.
I add one simple step to this red velvet cake recipe and it guarantees the BEST texture. This cake recipe requires 4 large eggs. Separate the eggs before starting. Beat the egg yolks with the wet ingredients, then beat the egg whites into fluffy peaks and fold them in last. Beating the egg whites incorporates air and promises a velvet-rich texture.
3 cups (360g) cake flour (spoon & leveled)
1 teaspoon baking soda
2 Tablespoons (10g) unsweetened natural cocoa powder
1/2 teaspoon salt
1/2 cup (115g) unsalted butter, softened to room temperature
2 cups (400g) granulated sugar
1 cup (240ml) canola or vegetable oil
4 large eggs, room temperature and separated
1 Tablespoon pure vanilla extract
1 teaspoon distilled white vinegar
liquid or gel red food coloring
1 cup (240ml) buttermilk, at room temperature
Cream Cheese Frosting
16 ounces (450g) full-fat block cream cheese, softened to room temperature
3/4 cup (170g) unsalted butter, softened to room temperature
5 and 1/2 cups (660g) confectioners’ sugar
1 and 1/2 teaspoons pure vanilla extract
pinch of salt, to taste
Preheat oven to 350°F (177°C). Grease two 9-inch cake pans, line with parchment paper, then grease the parchment paper. Parchment paper helps the cakes seamlessly release from the pans.
Make the cake: Whisk the flour, baking soda, cocoa powder, and salt together in a large bowl. Set aside.
Using a handheld or stand mixer fitted with a paddle attachment, beat the butter and sugar together on medium-high speed until combined, about 1 minute. Scrape down the sides and up the bottom of the bowl with a rubber spatula as needed. Add the oil, egg yolks, vanilla extract, and vinegar and beat on high for 2 minutes. (Set the egg whites aside.) Scrape down the sides and up the bottom of the bowl with a rubber spatula as needed.
With the mixer on low speed, add the dry ingredients in 2-3 additions alternating with the buttermilk. Beat in your desired amount of food coloring just until combined. I use 1-2 teaspoons gel food coloring. Vigorously whisk or beat the 4 egg whites on high speed until fluffy peaks form as pictured above, about 3 minutes. Gently fold into cake batter. The batter will be silky and slightly thick.
Divide batter between cake pans. Bake for 30-32 minutes or until the tops of the cakes spring back when gently touched and a toothpick inserted in the center comes out clean. If the cakes need a little longer as determined by wet crumbs on the toothpick, bake for longer. However, careful not to overbake as the cakes may dry out. Remove cakes from the oven and cool completely in the pans set on a wire rack. The cakes must be completely cool before frosting and assembling.
Make the frosting: In a large bowl using a handheld or stand mixer fitted with a whisk or paddle attachment, beat the cream cheese and butter together on medium-high speed until smooth, about 2 minutes. Add the confectioners’ sugar, vanilla extract, and a pinch of salt. Beat on low speed for 30 seconds, then increase to high speed and beat for 3 minutes until completely combined and creamy. Add more confectioners’ sugar if frosting is too thin or an extra pinch of salt if frosting is too sweet. Frosting should be soft, but not runny.
Assemble and frost: Using a large serrated knife, slice a thin layer off the tops of the cakes to create a flat surface. Discard or crumble over finished cake. Place 1 cake layer on your cake stand or serving plate. Evenly cover the top with frosting. Top with 2nd layer and spread remaining frosting all over the top and sides. I always use an icing spatula and bench scraper for the frosting. I used Wilton piping tip #12 for decoration around the top.
Refrigerate cake for at least 30-60 minutes before slicing. This helps the cake hold its shape when cutting.
Cover leftover cake tightly and store in the refrigerator for 5 days. Frosted cake or unfrosted cake layers can be frozen up to 2-3 months. Thaw overnight in the refrigerator and bring to room temperature before decorating/serving.
Yield: 12 servings
Notes
Sheet Cake: This batter fits nicely into a 9×13 inch cake pan or 12×17 inch sheet pan. Same oven temperature. Bake for about 40-45 minutes or 20-25 minutes, respectively. Keep your eye on the cake and use a toothpick to test for doneness.
3 Layer Cake: Divide the batter between 3 9-inch cake pans. Bake for about 22-25 minutes.
Bundt Cake: This cake batter fits into a 10-cup or larger bundt pan. I’m unsure of the exact bake time (likely around an hour), but use a toothpick to test for doneness. Same oven temperature.
Cupcakes: You can use this cake batter for 2-3 dozen cupcakes. Fill cupcake liners 1/2 – 2/3 of the way full. Bake for 20-21 minutes or until the tops of the cupcakes spring back when gently touched and a toothpick inserted in the center comes out clean.
