My Sourdough Bread Recipe
by Faith McCarty
I think I will go back to the Extra-Tangy Sourdough Bread I used before. I had better results when adding all the water in the Levain, which is something different than in this recipe, then gradually adding more flour to get the right consistency. In this recipe it is too easy to get too much water in. That recipe may take 3 days to make: mix the levain and refrig overnight. Next day finish the dough and go through bulk ferment. The dough can then be shaped and refrigerated again if not ready to be baked. This recipe also uses more starter. This recipe uses less and took forever to get through bulk ferment.
I am still working on getting a good recipe, but after making several sourdough bread recipes and running into different issues, I decided to take tips from a few recipes I made and start writing up my own recipe, one that:
- fits my schedule (I am not getting up at 7:00am to get my starter going)
- the fact that my sourdough starter has been sitting in the frig for quite some time with just simply being fed. I do not make sourdough bread often so it is rare that my starter doubles and gets ripe quickly, so it takes several feedings to get it going and I often have to feed it in the morning and wait for it to ripen again. I think I have now figured out how to tell if it is ripe and as long as the starter has been very active, I am going to use it the next morning even if it fell overnight.
- Never knowing if my dough is raising properly and if the dough is sturdy enough. I think I need to knead it some when first mixing it as in the Extra-Tangy Sourdough Bread recipe to start to build the structure. It should build up plenty of holes during bulk ferment. Might not be a good idea (see Levain section below). As long as I do not use too much water, it will hopefully be fine.
- Never knowing when bulk ferment is complete. Maurizio Leo has a good description and a good picture for this, which I have included.
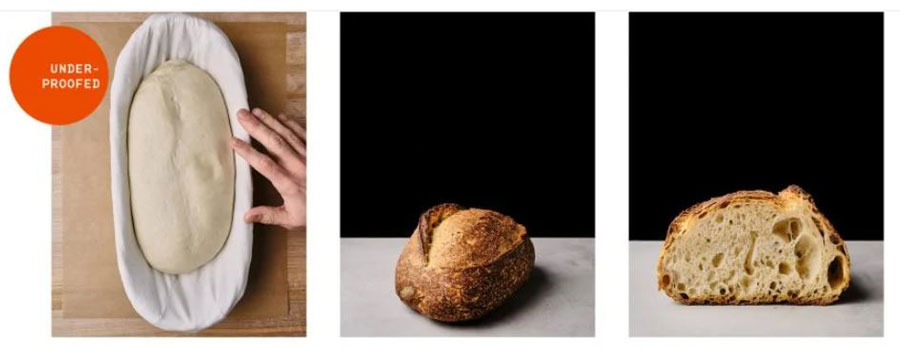
- afraid to let the final proof occur overnight in the frig (afraid of overproofing). The last time I proofed it overnight in the frig and it was fine. Since making the bread again, I really don't think this is an issue. I may have under-proofed my bread (see tunneling below). One other time my scoring lines spread very far apart, and I have read that happens when the bread is under-proofed.
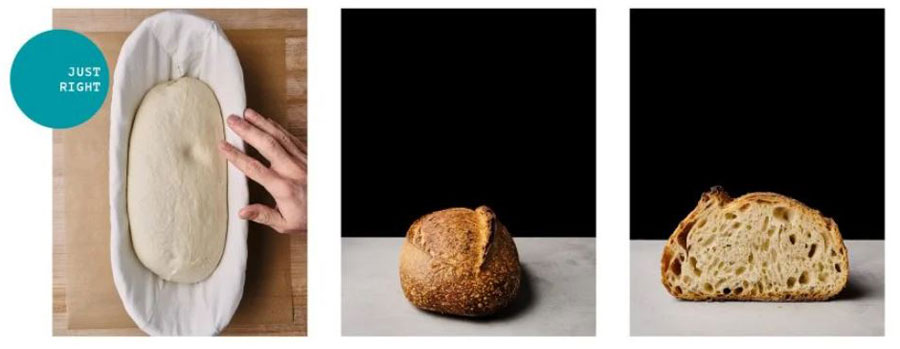
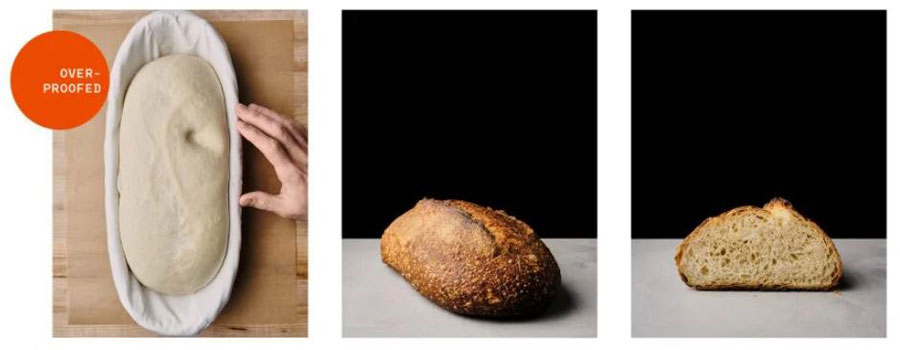
- knowing when my shaped loaves are properly proofed, not under or over-proofed. Again Maurizio Leo has good descriptions and good pictures for this, which I have included. He uses the poke test, as do most other recipes I have looked at. I need to check this more frequently and not just set a timer even if not setting it for as long as the recipe calls for. If a shaped loaf is at the perfect proof stage, but the oven is not ready, put it in the frig to retard it a bit.
My Lst Loaf:
- My last loaf had big holes and tunneling, especially near the top. The crumb was actually nice, not dense and gummy. I have read this is due to under-proofing. This could be due to a number of causes:
- Large holes or tunnels in sourdough bread often indicate underproofing, meaning the dough hasn't fermented long enough before baking. This is because underproofed dough doesn't develop a strong enough gluten network to hold the gas produced by fermentation, leading to uneven expansion and large, irregular holes. Consequently, the gas produced by fermentation can escape in large pockets, leaving behind big holes or tunnels in the bread. A well-developed gluten network, achieved through proper kneading and fermentation, traps these gas bubbles evenly, resulting in a consistent crumb structure.
- While underproofing is a primary cause, other factors like using too much flour during shaping (which can prevent the dough from sealing properly) or a weak starter can also contribute to tunneling. I need to make sure I am not folding flour into the dough during shaping. I did add my test piece of dough to the bottom of my loaf before shaping. It was not dusted with flour, but maybe it was not sealed properly with the rest of the dough.
- The crust on my bread is too hard. It is not as bad on the top, but the bottom crust is hard to cut through. I noticed the bread was very flat on the bottom, I think meaning the bottom crust set too quickly, not allowing the bread to get a head-start for oven spring.
I will base this on Maurizio Leo’s recipe at https://www.theperfectloaf.com/ called My Best Sourdough Recipe. Pictures are also from his website.
Step 1: Get sourdough starter going so it is riping for a day or two
You need to start with a good, strong starter. See next step "Better Solution for me". - Skipping Levain, starter refresh is basically a Levain.
Dough Temperature:
Note: The target final dough temperature (FDT) is 78°F (25°C) throughout the entire process. You can add cooler or warmer water depending on the room temperature. This dough loves a warm ambient environment. Try to keep the dough at the listed temperatures if possible. If your room temperature is lower that this, you can put your sourdough in the oven with the light on. In my oven the dough gets into the 80s when the light is on. I should leave the door open next time and check the temperature.
***The last bread I made took forever to ferment, 11 hours bulk and I thought it could use a little more time. But I was tired, so shaped it and put it in the frig. The next day I let it proof awhile, used the poke test, was afraid it would over-proof, so baked it. The crumb told me it was under-proofed. The temperature in my house was 72 degrees (winter and I kept it on the table). Next time try to keep the starter through final proofing warmer so it doesn't take so long. In summer, may need to figure out how to keep it cooler.
Step 2 The Next Day: Make Levain - ferment for about 5 hours (SKIP)
I have problems getting my starter at the proper level of ripeness for making the Levain when I want to. I would like to make the Levain in the morning, given that mixing the dough and the bulk ferment take about 10 hours, but inevitably my starter has fallen overnight and I need to feed it and wait for it to get ripe again. This can take 4 or 5 hours.
Solution: Let the starter ferment overnight on the counter (it should have already gone through a few feedings to strengthen it) and even if it has fallen, make the Levain, just make sure the Levain is strong and bubbly once it has fermented. The Levain is basically a refreshed and ripened sourdough starter. By making the levain instead of using the sourdough starter, you are able to start the bread baking process when you want.
[This distinction between a starter and a levain is slight, but bakers refer to “building” a levain prior to mixing, a concept which underscores (1) both the scaling necessary to turn a relatively small stash of starter into a large enough quantity to leaven one or more loaves of bread, (2) as well as the scheduling required to pull it all off, so that the bread is ready to be baked at the desired time. (3) Also, using a levain allows you to customize its composition for specific bread doughs. For example, if you want to bake a whole wheat bread, you might build your levain with whole wheat flour instead of whatever flour or flour blend you typically use to feed your starter.
For instance, you may keep a relatively small total starter amount (50 grams or less) on a day-to-day basis. But 50 grams of starter won’t take you very far—doubly so if you intend on baking multiple loaves. To produce enough starter for baking, we take some portion of the original culture (say, 30 grams) and feed it at least 1:1:1 (starter to flour to water), which gives 90 grams of mature starter to work with.]
Better Solution for me:
Because a levain is basically a refreshed and ripened sourdough starter with some of the flour and water in the final dough, as long as I have a strong starter, I will skip this. I have to refresh my starter to make bread anyhow, which is the same process as a levain and I will still have plenty to keep in the frig. Maurizio even says, "It's always an option to use your starter instead of making a levain." If you look at the ingredients in the Levain, you can see it is basically a refreshed starter. Use 150g starter [75g for 1 loaf] instead and add where levain is added.
I use 75g starter, 75g water and 75g flour when keeping my starter. Total of 225g starter. Need 75g for bread. Feed sarter as usual and place in frig (actually start keeping a smaller amount of starter - 60g each is what Bob's wife keeps). Use 25g discard and add 25g water and 25g flour to start starter for 1 loaf of bread. When doubled, use 25g starter and 25g each water and flour as will probably need to refresh again. Final refresh will follow measurements in Levain below.
Build the levain using the following ingredients. The recipe makes 2 loaves. Use those in [ ] to make 1 loaf. Mix thoroughly, cover and let work for about 5 hours, assuming about 78°F. You want this very bubbly and alive. Because the levain is basically sourdough starter that has been refreshed and left to ferment, it should look like ripe sourdough starter.
This is the amount of ripe starter I will need: 75g
Weight Ingredient Baker's Percentage 30g [15g] Ripe sourdough starter (100% hydration) 50% 30g [15g] Medium-protein bread flour (~11.5% protein, Giusto's Artisan Bread Flour) 50% 30g [15g] Whole wheat flour (Giusto's Organic Stoneground Whole Wheat) 50% 60g [30g] Water 100%
Step 3: Autolyse - hydrates flour and starts the developement of gluten - 20 - 30 minutes before Levain ready
Start Autolyse 20 - 30 minutes before starter is ready. Do not go any longer.
The Perfect Loaf’s recipe mixes ALL the flour in the recipe for the Autolyse. I was making a recipe where quite a bit of the flour was mixed into the Levain (3 cups out of a total of 5), but I think the Perfect Loaf recipe strengthened the final mixed dough more, especially due to the fact it has high hydration.
Note: The crumb in my final loaf of bread from this recipe was a little gummy and reminded me of the gummy crumb in my Stollen I made for Christmas using the Tangzhong method. Maybe using this Autolyse was not such a good idea, although the Autolyse did soak longer than 2 hours suggested by the recipe while waiting for my levain. Maybe it should be shorter, like 20 or 30 minutes. I took the temperature of the bread when I took it out of the oven and it was 208°F. It should be around 205°F, so it was definitely baked long enough. Also the bottom crust was a little hard to cut through, and the top crust could have been thinner and more crackly. I did get a nice crackly crust once using the Extra-Tangy Sourdough Bread recipe. Also it may not have been completely proofed, but it was hard to tell because the dough was still somewhat cold from the frig and dough is stiffer when cold. It was very late when I shaped my loaf and I wanted to go to bed, so the bulk ferment may have been a bit short although there were some bubbles on top and the dough curved down near the edge of the bowl.
I read this about Autolyse: "The problem is that when you soak flour, it starts the enzyme activity. We like this because it releases the sugars and adds to flavor. However, if this is not controlled, then the enzymes can be break down the flour too much and lead to a gummy dough. One way to control the enzyme activity to a degree is to add salt. So if you want to go the length of time you are talking about (3 - 4 hours) without refrigeration, then you should use a soaker of flour, liquid, and salt (no yeast). I don't know how many hours you can do an autolyse with no salt at room temperature before you run into these issues. Too long and refrigeration is needed. For what it's worth, I highly recommend at least an over night soak when using whole grains." Someone else added: "The strength of the flour also has a great affect on the autolyse. AP will break down faster than Bread Flour. And large amount of spelt, don’t even consider autolyse. Flours that are naturally extensible don’t (and probably shouldn’t) be autolysed."
This from another forum: "Salt also impedes the releasing of the gelatinous starch which forms the walls of the bubbles in the crumb. Alton Brown, in his somewhat wacky "Good Eats" show explained the competition for water molecules between salt and pentosans in oats. Pentosans form the starchy gel in a dough when mixed with water. Same applies in wheat or any cereal. When adding salt to a cereal, it is always best to do so after the water has been added so the pentosans (gelatinous starches) can absorb the water without the competition of the salt molecules. That is why tangzhong yields a nice soft loaf. It adds gelatinous starch."
Other possibilities to explore include for gummy crumb:
- Insufficient gluten development. Hard, thick bottom crust would jive with this.
- Under-fermentation.
- Starter health, or lack thereof
- Underbaked.
- Insufficient cooling time. If you sliced the bread before it completely cooled, expect gummy crumb. Next time try to wait at least 3 hours or so after baking, or better yet overnight, so the bread sets up.
- Too high an oven temperature - This recipe has you set the oven to 450°F. The recipe I had been using set it to 425°F.Continuing with the recipe: Mix the flour and water in the bowl you will be mixing the final dough in until all the dry bits are incorporated, then cover. Ensure all dry flour is hydrated—store near levain (we want the dough's temperature to remain warm). Salt can interfere with the Autolyse so this is added later. This is the total amount of flour for the recipe. This mixture will be quite stiff as all the water has not been added yet.
Autolyse Ingredients
Weight Ingredient 822g [411g] Medium-protein bread flour 64g [32g] Whole wheat flour 650g [325g] Water 1 [= 65% hydration]
Step 4: Once the Levain is ready, mix the Dough
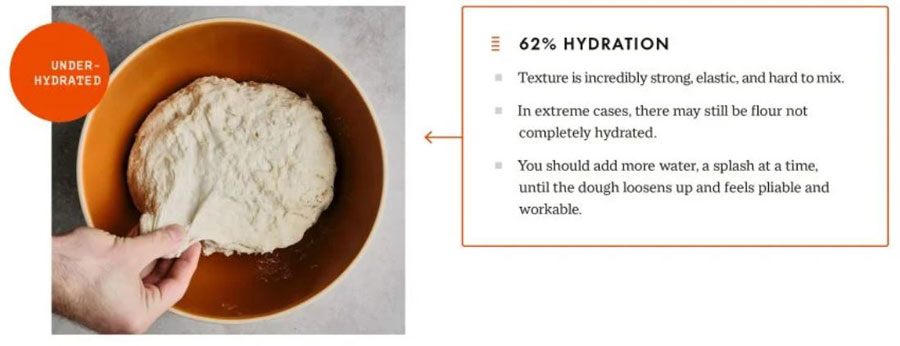
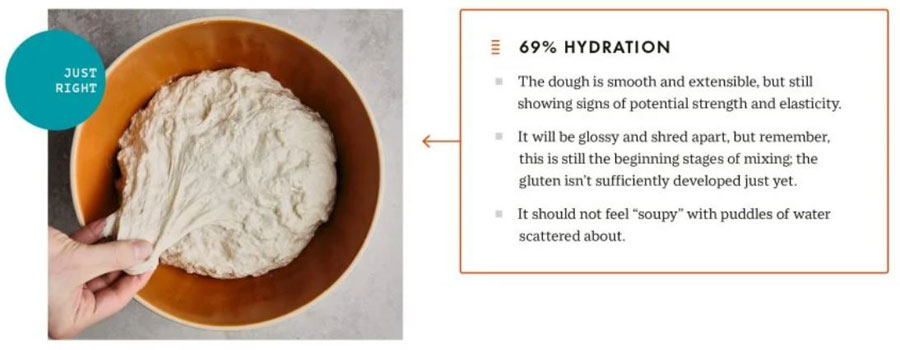
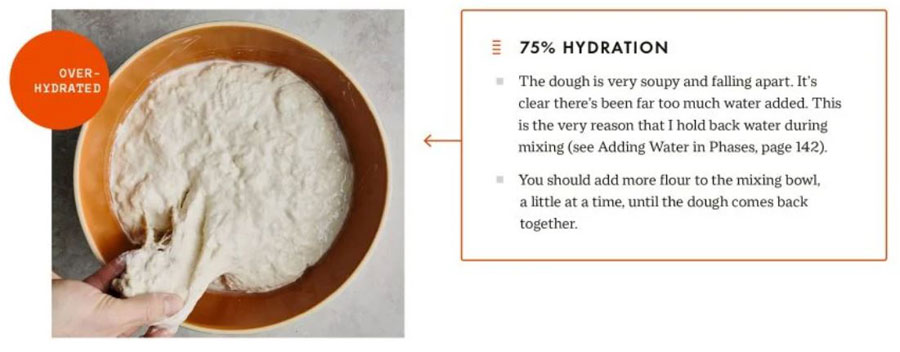
Add the following ingredients to your dough in the mixing bowl that underwent an autolyse. Add the water slowly, in stages, while you're mixing, and stop adding water if the dough feels excessively wet or soupy at any point (see pictures below). In the video he also did pinches (or squished the dough with his fingers) to make sure it was mixed.
In an article at King Arthur Flour written by Maurizio Leo, he says, "The hydration of your dough ultimately doesn't matter: you can achieve an open crumb with either high or low hydration." "If too much water is added to a dough, I find it results in a loaf that's almost too soft, and too much mixing is required to ensure an adequate rise in the oven. Again, the more water in the dough, the more strengthening you'll have to do to ensure it traps gasses and retains structure."
***My last loaf may have had too much water and I did not add 27g of Water 2, so my dough was almost 78% hydration. Aim for 75% hydration, meaning for 443g of flour, add 332g of water total. The amount of water needed actually depends on the flour.
Weight Ingredient 17g [8.5g] Fine sea salt 151g [75.5g] Ripe liquid levain (see above) [about 17% hydration] 95g [47.5g] Water 2 (do not add all at once, dough may not need all) [85% hydration] [I added all but 27g of the water. My dough was plenty wet, was sticky, and difficult to work with. It never stopped sticking to my hands, although it did stretch well and mostly pulled out of the bowl. Later, I realized that Maurizio Leo’s recipe (which this is) using some whole wheat flour and whole wheat flour can absorb more water than white flour. Plus when I made this, I used ShopRite's brand of bread flour and it is only 10% protein. Most bread flour is 12% - 14%, again which can absorb more water.]
Once mixed fairly well, perform folds for about 2-3 minutes in the bowl. Grab under one side, pull up and over to the other side, then rotate the bowl a bit and repeat. Do this probably 30 times or so (it goes fast and easy). In the end, the dough should still be shaggy, but it will be more smooth and will start to hold itself together more in the bowl.
The correct level of dough strength at this point is important. You want the dough to be smooth, elastic, and strong, but it doesn't have to be fully developed, and it will still be shaggy. We will continue to strengthen the dough through stretch and folds in bulk fermentation.
Dough is mixed. Transfer dough to a tub or thick-walled bowl for bulk fermentation or use the bowl you have been mixing in.
[***Take a small piece of dough and place in a small, strait-sided jar. When this doubles, bulk ferment should be done. I just add this back to the dough when shaping it for proofing. I placed it on the underside and made sure it was sealing to the dough of the loaf (important!). Do not knead or you will knock out all of the bubbles you just created during bulk ferment.
Step 5: Bulk Fermentation - this will take 4 or more hours depending on temperature of dough, etc.
Mine took 11 hours and it still wasn't quite fully fermented. I was tired, shaped it and put it into the frig. It had some bubbles on top, but there was not as much jiggly as I would like,
As the term suggests, bulk fermentation is the time when dough is fermenting in bulk, or one large mass. It’s an important step in the bread-making process wherein the dough is strengthened, generates acidity (flavor), and rises. Skipping or shortening this step can result in underdeveloped flavors and an undesirably tight crumb structure. It begins when the sourdough starter is added to the dough.
At 78°F (25°C) ambient temperature, bulk fermentation should go for about 4 hours. Cover the bowl and place in a proofer or your oven with light on, again with the door open perhaps. Check the temperature.
Perform six sets of stretch and folds (or coil folds) during the bulk. The first three are at 15-minute intervals (these intervals allow the dough to relax), and the last three are at 30-minute intervals. After these folds (2 hours and 15 minutes have gone by), we will let the dough rest for the remainder of bulk fermentation.
To do a stretch and fold, pick up one side of the dough with both hands and pull it up, just before tearing, and fold it over to the other side. Rotate your container and repeat 4 or 5 times. That is one set. I find it's always beneficial to leave the dough gathered up neatly in the bulk fermentation container. This means the dough has a smooth surface on top with the sides tucked in and down. Cleanly bundled dough allows you to assess it better as it rises during bulk fermentation.
[After so many folds, the dough will start to stiffen as the gluten tightens. Once this occurs, give it a rest (15 or 30 minutes depending on the schedule above. As soon as the bread slackens, do another set.]
After about 2 hours. There is no significant rise as of yet, but the edges are beginning to dome downward, and the dough's texture is smoothing out slightly. We still have more folds to do and more strength to build.
[My dough was very sticky (I think too much water was added, so after awhile I added a little flour to help with the stretch and folds. This seemed to help strengthen the dough.]
Eventually, your dough reaches the sweet spot where it's strong enough, the ideal point at which it can rest for the remainder of bulk fermentation without intervention. What is the ideal dough strength anyway? There's no ideal; that's my imaginary point where I feel the dough is strong enough. The dough looks smoother, has defined edges, and (drastically) domes downward at the edges. You can feel that it's stronger just by looking at. A weak dough still looks shaggy and sloppy; it doesn't have sufficient structure. You will get a feel for this as you bake more bread..
Once it reaches this point, you do not need to stretch and fold any more during the rest of the bulk fermentation. If you fold properly, the dough will continue to feel light and airy as you work it. If it starts to feel heavy, that's a sign that you may be working it too much.
Folding that ceases earlier in the bulk ferment will leave more gas pockets in the dough. Folds that continue longer into the bulk ferment will produce a more uniform crumb.
One of the biggest problems, beginning bakers have is over-proofing during the bulk ferment. Unlike yeast-leavened doughs, which often call for letting the dough rise till it doubles (or more) in volume, with sourdoughs, this is not a good guide. [Don't forget, the dough does not get punched down and will be rising more during the proofing stage.
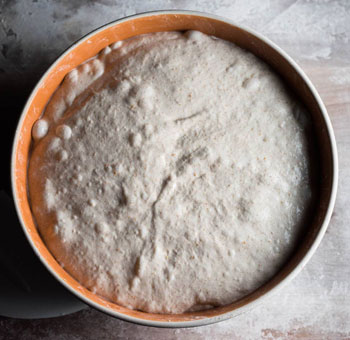
At the end of bulk, your dough should look very gassy, with some bubbles here and there, and the edges where the dough meets the bowl should be slightly domed. You can see all these signs in the image to the left.
When you gently shake the bowl, the entire mass jiggles from side to side—very alive. The dough is smoother and holds its edges, folds, and creases more readily (most of the bumps and ridges you see are due to trapped gasses from fermentation).
You know the dough has over fermented if, when you turn it out to shape it, it is very slack — if it’s like a wet puddle — and very sticky and lacking any strength and elasticity. It might smell a bit like alcohol as well.
Step 6. Divide & Preshape
Do not flour the counter. Divide the dough into two halves and gently preshape each piece of dough into a round. Using the bench scraper at a 45 degree angle, push into the dough on the right side (if right-handed) then rotate up around the dough and push into the dough at the top to tuck the dough under. Keep going around the dough to shape into a round. In the YouTube channel I got this from, he did not use any flour so there was more tension of the dough on the counter. If using just your hands to do this, push in with the side of the hand on the right side of the dough, then rotate up and push the dough under with your fingers. He actually started doing this at the 15 minute stretch and folds. He did stretch and folds, then shaped into a round. Then, let the dough rest for 30 minutes, uncovered. Act quickly when handling this dough and rely heavily on your bench knife (scraper). Try to use your hands as little as possible when dealing with the dough at this point.
Step 7: Shape
Have the banneton or the bowl that the dough is going to do the final proof in ready.
Lightly flour the top of your dough rounds and flour the work surface. Gently flip each round using a bench knife and shape into a batard or boule, whatever your preference. Handle the dough very gently and be careful not to deflate the dough.
To shape into boule: (round shape) Fold the bottom edge of the dough up to about halfway. Fold the left side over to about 3/4 to the right. Fold the right side over to cover left. Stretch top up & away from the center and fold down to about half (you’ll now have a “letter”). Hold the bottom and roll the package over. Use hands by rounding and pushing the dough around the bottom near the work surface to tuck the dough under iteself. Dough will tighten up and hold its shape and have a tight skin on top. Use bench scraper to move dough to proofing basket or bowl.
I use a mixing bowl in which I put a sheet of parchment paper, sprinkled with cornmeal, to proof the dough in.
To shape into bâtards (kind of rounded ovals, as in pictures below): Place the preshaped dough on a lightly floured surface and stretch it gently from the top and bottom, elongating it into an oval. Gently pat the dough to remove any lingering bubbles. Fold the top third of the dough down toward the center, as if folding a letter. Press with the heel of your hand to seal. Then fold the left and right top corners toward the center at 45° angles, pressing to seal. Repeat this process a second time. Then fold the dough in half, bringing the top edge to meet the bottom. Seal the seam with the heel of your hand, pressing firmly where the two edges meet. Turn the dough over so the seam is facing down. With cupped hands, gently roll the dough back and forth; your fingertips should be lightly touching its surface as you roll. Move your hands from the center out toward the edges, rounding the dough and tapering the ends very slightly by using more pressure. Place the bâtards in bannetons or on a lightly greased or parchment-lined baking sheet sprinkled with a little cornmeal.
Step 8. Proof
In an article at King Arthur Flour on getting an open crumb written by Maurizio Leo, he says, "For the final proof, I look for my dough to have risen and be puffy, light, and soft-textured. If you gently poke the dough, it shouldn't feel dense and tight; you're trying to assess how the dough's internal structure is with these pokes. If the interior still feels tight, give it another 30 minutes at room temperature and check again. Conversely, if the dough starts to feel very soft and weak, or you start seeing large bubbles beneath the surface emerge, it's time to get that dough into the oven."
Any bowl or basket will work well to hold bread dough during proofing, though some bowls and baskets work better than others. Use containers with little space to let the dough rise uninhibited. If you’re working with a highly hydrated dough or one that is slack and weak, be sure the container is more tight-fitting so the dough doesn’t spread too much. An important consideration in choosing a proofing container is to be sure it’s nonstick so the dough removes cleanly. To make it nonstick, use a flour sack towel or specially made liner, or dust it with white flour.
Cover your bannetons or bowls with plastic and place it in the refrigerator at 38°F (3°C) overnight.
[I use a bowl, lined with parchment and sprinkled with some cornmeal/semolina to prevent the bread from sticking. Then when I go to bake the bread, I just lift the dough out with the parchment paper and place in the heated dutch oven.]
When should I be putting my dough into the fridge for the cold retard? You have the option to prove the loaf at room temperature for 1-3 hours or place it directly in the refrigerator for a cold ferment, but this really depends on the dough itself and how far it has progressed during the bulk ferment. The longer the dough is left at room temperature, the longer the yeast has to consume the flour and the more likely that the dough will over-proof. The short answer is to let it rest for about an hour after shaping, and the long answer is to watch the dough – the more you bake with sourdough the more you get to know your dough’s cues and will be able to stretch the fermenting times to the limit.
Can I proof my bread dough for more than overnight in the fridge? Yes, absolutely. Know that the longer you proof your dough in the refrigerator, the less rise and more (potential) sourness you’ll get in the resulting loaf of sourdough bread.
Step 9. Bake – Next Morning:
Remove the dough from the fridge (there's no need to let the dough come to room temperature before baking) and uncover. Check your dough to make sure it is not underproofed. If so, let it proof a while at room temperature before putting in the oven. Preheat your oven to 450°F (230°C) for about 1 hour. [Change to 425°F - High heat can contribute to hard bottom crust! Also, place some aluminum foil in the bottom of the pan so more air circulation under the bread. Plus sprinkle water in the pan as I have in the past. The last time I just sprayed some water. It may not have been enough.]
***If large air bubbles form near the top of the loaf, the dough tried to expand but a crust formed too fast. The pockets converge into mega pockets. Try to not bake hotter at 230°C (446°F). Also consider upgrading your steam game. Lack of steam: This is similar to baking too hot. Your crust sealed too quickly. Your dough couldn’t expand properly. The pockets converge into mega pockets.
- If making a boule place a Dutch oven with a lid, but with lid off, in the oven. Do not grease the Dutch oven. You will move the dough from the proofing bowl using the parchment paper and place both the dough and parchment paper into the Dutch oven when ready to bake. The reason for using a Dutch oven is that during the initial stages of baking, steam is released from the dough itself into the sealed container, which keeps the dough moist; this allows the bread to develop a crispy, shiny crust and attain maximal volume.
- If you made dough shapes that only fit in bannetons or on a baking sheet, preheat baking stones if using. To add steam, place a cast-iron frying pan or other heavy pan in the bottom of the oven. Right after you place the bread in to bake, add several ice cubes or boiling water to the pan to create steam.
- Place the shaped dough in the refrigerator for one hour uncovered which will firm up the bread, and make scoring easier and help boost “oven spring”. It won’t rise in the fridge so it should be fully proofed if doing this. (You could also keep it in the fridge for 3-4 hours if you want to bake later.)
When ready to bake:
***My scoring was good last time. I made one, slightly off center, and made sure my knife was basically flat. I got a decent ear.
- If making a round loaf that has proofed in a bowl, remove it from the bowl by lifting the parchment out so you have room to slash it
- Brush water on the bread
- Sprinkle sesame seeds on top, if using
- Using a bread knife, cut one long curved slash in the top of the boule at about a 45 degree angle. The taut skin created during shaping will “peel” back as the loaf rises. For the bâtards, make one long curved slash on top at about a 45 degree angle, or two slashs on an angle across the top of the dough, each taking up half of the dough length.
Tips for scoring:
- Making the cuts rapidly will help to prevent the lame from sticking to the bread. It’s also advised to prove your bread in a banneton beforehand to allow the skin of the dough to dry out just enough. Cutting cold proofed dough is also easier.
- If your dough is sticky, dip your lame/blade in flour before making each slash. If your dough is dry, try running the lame under hot water. This helps lubricate the blade as it cuts, and keeps the cut bread from sticking
- It's the thickness of the blade that's holding you up. The shape of the tip doesn't help, but that's easy enough to work around. But behind that tip is the spine of the blade, and it's close to where you're cutting. This creates extra drag. So just use the tip of the blade to make the slash.- If using a Dutch Oven, remove from the oven and place the bread inside using the parchment to lift it. Spray or sprinkle the inside of the Dutch oven with water, replace the cover and slide into the oven. If using a baking stone, place the bread on the stone. spray the inside of the oven with water, add ice cubes to the water pan or whatever you are using to create steam.
Bake for 20 minutes with steam, then remove your steaming pans if baking on a surface or the Dutch oven/combo cooker lid. Then, bake for an additional 20 - 30 minutes until done to your liking. Maurizio Leo likes to bake his bread rather dark, so he sometimes extends this second half of baking until he gets the crust he is looking for.
Once your loaf is done, remove and let cool on a wire rack for 1-2 hours before slicing. Slicing too early can mak the crumb gummy,
Makes 2 - 900g loaves [1.98 pounds each]
