 Ciabatta
Adapted from Williams-Sonoma Collection Series, Bread, by Beth Hensperger (Simon & Schuster, 2002)
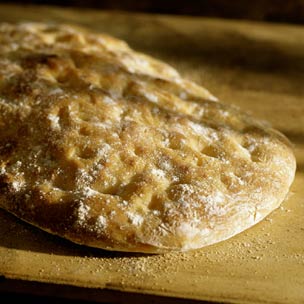
The Italian word ciabatta (pronounced chuh-BAH-tah), or "slipper," describes the shape of this loaf, which is like a flat slipper or old shoe. The dough is extremely wet, with a near equal amount of water and flour. This makes it impossible to knead in the traditional way and difficult to shape into loaves. Traditionally, the dough was kneaded by either slapping it repeatedly against the counter (like brioche) or giving it a series of folds during its long rising time.
It is made with an Italian-style starter called a biga, which is firm like a bread dough rather than soft like a sponge. The biga must rest overnight, so plan to make this bread over the course of 2 days. The chewy loaf is dimpled with big, uneven holes, known as occhi, or "eyes." It is traditionally topped with a dusting of flour.
The bread is baked on a baking stone, also called a pizza stone or a baking tile. These are available in large rounds and rectangles. Made of high-fired unglazed clay stoneware, they retain and distribute heat evenly, producing a more uniformly baked loaf and nicely browned crusts. To be effective, the stone must be preheated in the oven for at least 30 minutes before the bread is placed on it. Wipe the cooled stone clean after use; do not use soap and water.
The difference between Ciabatta and Focaccia is that a proper ciabatta starts with a biga while a focaccia doesn't use a biga. So when they are baked, a focaccia is a little denser, while a ciabatta is light and full of holes. And the denser crumb of focaccia makes for a bread that is easier to add things to like more olive oil, olives, whole fresh spices and cheese, whereas the lightness of a ciabatta is enjoyed plain.
Ciabatta Rolls (from https://www.kingarthurflour.com/)
Translated to rolls, ciabatta becomes the perfect vehicle for an overstuffed sandwich. Sturdy enough to hold any filling, these flat rolls — they fit beautifully in the toaster — are mostly crust, meaning you don't have a lot of bread competing with the cheese, meat, and veggies. Pat the dough into an 8" x 10" rectangle and cut it into 12 squares (about 2 1/2" each). Firmly dimple each one with your fingers, making fairly deep pockets. King Arthur Flour's recipe uses 4 1/2 cups flour total.
For the biga starter:
1 1/3 cups water, at room temperature
2 1/3 cups unbleached all-purpose or bread flour
3/4 tsp. active dry yeast
3 Tbs. warm water (105° to 115°F)
3/4 cup warm milk (105° to 115°F)
2 tsp. active dry yeast
2 to 2 1/3 cups bread flour, plus more as needed
1 1/2 tsp. salt
2 Tbs. olive oil, plus more for greasing
To make the starter, in a stand mixer fitted with the paddle attachment, combine the water, 1 cup of the all-purpose flour and the yeast. Mix on low speed for 1 minute. Add the remaining 1 1/3 cups all-purpose flour and mix until smooth and soft, about 1 minute. Cover the bowl with plastic wrap and let stand at room temperature until almost tripled in bulk, 4 to 6 hours. The starter will smell yeasty. Refrigerate for 8 to 12 hours or for up to 3 days. When ready to make the dough, remove the starter from the refrigerator and let stand for 1 to 2 hours, or overnight.
To make the dough, fit the mixer again with the paddle attachment. Add the warm water and milk and the yeast to the starter and mix on low speed, making a souplike mixture. Add 1 1/2 cups of the bread flour, the salt and the 2 Tbs. olive oil. Mix on low speed until smooth, about 3 minutes. Add only as much of the remaining bread flour as needed to form a very soft, moist dough, and mix on low speed for 5 minutes, occasionally scraping the dough off the bowl sides and paddle. The dough should be very soft and sticky, pulling away from the sides of the bowl but sticking to the bottom.
Cover the bowl with oiled plastic wrap and let rise at room temperature until doubled or tripled in bulk, about 2 hours. The top will be smooth, but the dough will be sticky under the surface.
Line a large, heavy baking sheet with aluminum foil and sprinkle generously with bread flour. Turn the dough out onto a lightly floured board (it will deflate), sprinkle lightly with flour, and pat with your fingers into a 14-by-5-inch rectangle. Fold the rectangle like a letter, overlapping the 2 short sides in the middle to make 3 layers. Turn the dough 90 degrees and repeat the sprinkling and folding, letting the dough rest for 10 minutes if it seems too springy to fold. Cut the dough crosswise into 2 equal rectangles and place each half on the prepared baking sheet. Cover loosely with plastic wrap and let rest for 20 minutes.
Sprinkle the tops generously with flour. Holding your fingers in an open, splayed position, press, push and stretch each dough rectangle, making an irregular rectangle about 11 inches long and the width of your hand. Your fingers will press the dough unevenly, producing the characteristic dimpled texture in the baked loaf. Cover again loosely with plastic wrap and let rest until tripled in bulk, about 1 1/2 hours. Press the dough to accentuate the dimpling 2 more times during this rise. The loaves will remain relatively flat.
Place a baking stone on the lower rack of an oven and preheat to 425°F.
Sprinkle the tops of the loaves with flour and place the baking sheet on the stone. Bake until the loaves are deep golden brown, 20 to 25 minutes. Let cool on the baking sheet. Serve warm or at room temperature.
Makes 2 large loaves.
