Pizza Dough (New York Style)
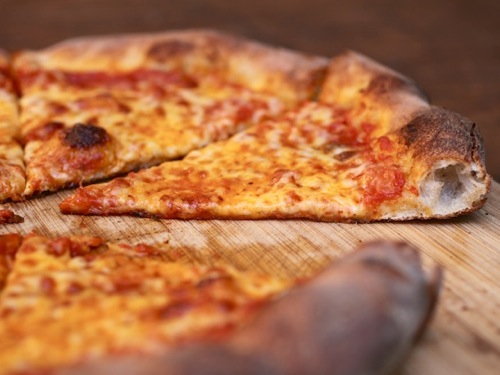
New York Style Pizza
Also see Sourdough Pizza Crust
A slice of New York-style pizza is characterized by having a puffy, bread-like, outer crust which quickly tapers down to a very thin, crisp middle. The crust is usually dark brown and somewhat charred in appearance.
No pans are used in the cooking process, rather the pizza is assembled on a pizza peel and then placed directly on the oven deck to cook. In order to simulate the deck of a commercial pizza oven, you can purchase a pizza stone (or unglazed quarry tiles) to allow you to cook the pizza without using a pan. The hot stone draws moisture out of the crust which allows it to become crisp on the outside while remaining bread-like on the inside. This pizza could also be cooked on an outside grill.
Pizza with Stuffed Crust: Roll out pizza. Pipe ricotta around the edge of the round and fold the edges over. Or, cut mozzarella into logs and place on the edges of the round and fold over the edges. Top with desired toppings and bake as above.
Also see The Pizza Lab: Three Doughs to Know, Tips for Making Good Pizza, Pizza Toppings and Using a Pizza Stone
Note: Make your pizza dough the day before you want to bake your pizza so it can "ferment" in the refrigerator for a day.
Pizza Dough (New York Style)
Recipe courtesy Alton Brown (modified instructions)
Bread flour has a higher protein content than all-purpose, which makes it ideal for pizza dough. The extra protein creates more gluten and yields a chewier crust than its all-purpose counterpart. All-purpose flour could work in a pinch, but it will yield fluffier results.
2 tablespoons sugar (2 1/4 Tbsp.) [try cutting amount
in 1/2]
1 teaspoon kosher salt (1 1/4 tsp.)
1 tablespoon pure olive oil (1 1/4 Tbsp.) - try without* or just 1/2
3/4 cup warm water (3/4 + 3/16 = almost 1 cup)
2 cups bread flour (2 1/2 cups)
1 teaspoon instant yeast (1 1/4 tsp.)
2 teaspoons olive oil, for oiling the bowl [use as little as can]
Olive oil, for the rim of the pizza crust before baking
Flour, for dusting the pizza peel
Pizza Topping
*I've read Neapolitan dough does not have any oil in it, giving you a crisper crust. It was added to pizza dough baked in ovens, which cannot achieve the high temperatures that you find in wood oven. The dough tends to dry out without the oil.
Place the sugar, salt, olive oil, water, 1 cup of flour, yeast, and remaining cup of flour into a standing mixer's work bowl. [Add the 2nd cup of flour as needed. You may not need all of it. The dough should be between tacky and sticky.] Using the paddle attachment, start the mixer on low and mix until the dough just comes together, forming a ball. Lube the hook attachment with cooking spray. Attach the hook to the mixer and knead for 15 minutes on medium speed.
Tear off a small piece of dough and flatten into a disc. Stretch the dough until thin. Hold it up to the light and look to see if the baker's windowpane, or taut membrane, has formed. If the dough tears before it forms, knead the dough for an additional 5 to 10 minutes.
Roll the pizza dough into a smooth ball on the countertop. Place into a stainless steel or glass bowl. Add 2 teaspoons of olive oil to the bowl and toss to coat. Cover with plastic wrap and refrigerate for 18 to 24 hours.
This makes two small 10" pizzas. For two larger pizzas, make 1 1/4 recipe - amounts in ( ). [I was making 1 1/2 recipe but it is too much dough.]
See next steps below.
Basic New York-Style Pizza Dough
By J. Kenji López-Alt, https://www.seriouseats.com/
New York-style pizza dough is an offshoot of Neapolitan-style dough—still a thin crust pie, but slightly thicker than its Italian cousin. The crust is sturdy, but not cracker-like, and instead features a tender chew thanks to the addition of oil in the dough.
22.5 ounces bread flour, plus more for dusting (630 g; about 4 1/2 cups)
0.5 ounces sugar (15 g; about 1 1/2 tablespoons)
0.35 ounces kosher salt (10 g; about 1 tablespoon)
0.35 ounces instant yeast, such as SAF Instant Yeast (10 g; about 2 teaspoons)
1.125 ounces extra virgin olive oil (32 g; about 3 tablespoons)
15 ounces lukewarm water (420 g; about 1 3/4 cups)
Combine flour, sugar, salt, and yeast in bowl of food processor. Pulse 3 to 4 times until incorporated. Add olive oil and water. Run food processor until mixture forms ball that rides around the bowl above the blade, about 15 seconds. Continue processing 15 seconds longer.
Transfer dough ball to lightly floured surface and knead once or twice by hand until smooth ball is formed. It should pass the windowpane test. Divide dough into three even parts and place each in a covered quart-sized deli container or in a zipper-lock freezer bag. Place in refrigerator and allow to rise at least 1 day, and up to 5. Remove from refrigerator, shape into balls, and allow to rest at room temperature for at least 2 hours before baking.
3 pizza doughs
Ferment the Dough
The best NY style doughs "ferment" or "cure" in the refrigerator for at least 24 hours and up to 72 hours. This is called a "cold rise" (vs warm rise on your kitchen counter) and it is used to retard the dough's fermentation, allowing that distinctive flavor to come through (ever wonder why some pizza crust tastes different than others, despite the fact that they are both made from just about the same exact ingredients? – this is a big reason why!) When your dough rises too quickly, the flavor will not develop optimally. Slow rise = MUCH better flavor.
Cut the piece of dough in half. Shape into rounds and place in
Preheat the Pizza Stone/Oven
Place the pizza stone or tile onto the bottom of a cold oven and turn the oven to its highest temperature, about 500 degrees F [We bake ours at 450 degrees F]. If the oven has coils on the oven floor, place the tile onto the lowest rack of the oven. You want the pizza stone/oven good and hot before you start to make your pizza.
Shape the Pizza
Split the pizza dough into 2 or equal parts, depending on the recipe, using a knife or a dough scraper. Flatten into a disk onto the countertop and then fold the dough into a ball.
Wet hands barely with water and rub them onto the countertop to dampen the surface. Roll the dough on the surface until it tightens. Cover one ball with a tea towel and rest for 30 minutes to let it come to room temperature.
Repeat the steps with the other piece of dough. If not baking the remaining pizza immediately, spray the inside of a ziptop bag with cooking spray and place the dough ball into the bag. Refrigerate for up to 6 days.
Flour the work surface and place the ball in the center. Using your fingers in a V shape, form a lip around the edges of the pizza, turning and flattening the ball of dough into a flat disc while leaving the edges to define the outside crust. Push the edges out and around getting it as flat and wide and round as far as the dough will let you. Then:
- Slide a hand under the dough, with your palm and fingertips against the counter. Stretching the dough on the backs of your hands creates a softer, sloped surface that's less likely to tear the dough than if you held your hands with your palms and fingertips (and fingernails!) facing up. With the dough resting on the back of one hand (and up your wrist if the dough needs more support) use your other hand to stretch and rotate the dough. The first hand remains stationary while the other hand moves the dough.
My left hand is stationary and my right hand is sliding under the right edge of the dough. I lift the dough up on the back of my right hand, using my knuckles to stretch the dough as I lift my hand up and cross it over my left hand. Then, I slip the dough off my right hand and repeat the process. You may find it easier to kind of bounce the dough on your stationary hand as you do this so that it doesn't stick.
You may find that holding one hand stationary doesn't work for you. With the dough on the backs of your hands, carefully stretch them away from each other, gently spreading your curved fingers to stretch the the dough. Rotate the dough on the backs of your hands and repeat. - Slap technique: With one hand, hold the edge of the dough on the counter. With the other hand, stretch gently outwards. Using the same hand, flip the dough onto your other hand. In one motion, rotate the dough 90 degree whilst flipping the dough back over. Repeat this process until you have achieved the desired thickness (quite thin). Stretching very gently and turning often ensures that the dough is stretched evenly.
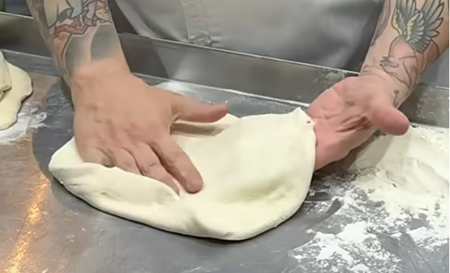
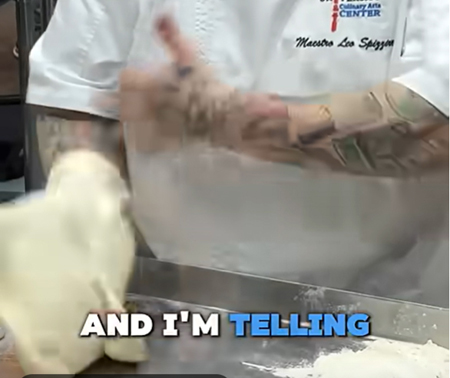
For a thin crust aim for a thickness of about 1/8". Then put it back down on your floured surface. When you get good at this, you can try tossing the dough!
Take care not to "degas" the rim of your pizza as you are spreading your dough! Do NOT use a rolling pin! There are many different methods to spread/open your dough ball without using a rolling pin.
Sprinkle the flour onto the peel and place the dough onto the peel. Shake the pizza on the peel to be sure that it will slide onto the pizza stone or tile.
Add the toppings
Dress and bake the pizza immediately for a crisp crust or rest the dough for 30 minutes if you want a chewy texture.
To dress: Brush the rim of the pizza with olive oil. Spread the pizza sauce evenly onto the pizza leaving the edges free of sauce. This exposed "margin" of dough around the circumference of the pizza will allow the crust to rise and crisp more quickly than the covered dough; creating the classic, puffed up edge of the pizza. Add cheese (reserving 1/3), sprinkle on the toppings and the remaining reserved cheese.
Go light on the toppings. Some toppings, (fresh vegetables, certain cheeses and fatty meats), are higher in moisture and fat content. Those liquids will be released quickly during the baking process. If the liquid contents are too high and do not evaporate during baking, puddling and pooling will occur in the middle, bottom of the pizza. This often results in preventing the dough bottom from fully cooking through and causing a soggy pizza center.
Bake the Pizza
Again shake the pizza on the peel to make sure it is not sticking. Slide the pizza onto the heated tile or stone and bake for 7 - 10 minutes, or until the top is golden brown and bubbly and the bottom is golden brown and crisp when you lift it with a thin spatula. Rest for 3 minutes before slicing.
Makes 2 pizzas, each about 10"
