Ways to Coagulate Cheese
from Quinn Veon, https://homesteadersofamerica.com/, modified
There are three different ways you can coagulate milk to make cheese:
Direct Acid Coagulation
These cheeses use high heat (up to 180F) and an acid to coagulate the curds and separate them from the whey. This acid can be lemon juice, apple cider vinegar, white vinegar, or citric acid (dissolved in water). Simply stir in a bit of acid into the hot milk, a little at a time, until you see the curds start to separate from the translucent, greenish-yellow whey. Beside curdling the milk, the vinegar or lemon juice inhibits the growth of undesirable microorganisms.
After a resting period in the pot, the curds are ladled into a cheesecloth-lined colander and drained until they reach the desired texture. Then, if using, salt is mixed in. The whey that drains out can be used to make ricotta cheese. (see Ricotta Cheese made from Whey)
The cheese can then be hung or pressed to make a more solid cheese.
Cheeses: Fresh unripened cheeses, such as, Ricotta, Indian Paneer, Queso Blanco, Mascarpone, Quark
Example: Steps in Making Ricotta Cheese
2 gallons milk
¼ cup apple cider vinegar, or lemon juice
1 teaspoon salt, or to taste
- Heat the milk to 180F in a large pot.
- Slowly stir in the apple cider vinegar for a couple minutes. You will see the curds separate from the whey. The whey should be translucent, not cloudy. If it’s cloudy, add in another splash of acid to increase your yield.
- Remove the pot from the heat and let it rest for about 10 minutes.
- Line a colander with butter muslin.
- Ladle the curds into the cheesecloth and let it drain for a few minutes until it reaches the desired consistency.
- Sprinkle the salt over the cheese and use your fingers to break up the curds to your preferred size and work the salt throughout.
- Store leftover cheese in the refrigerator for up to one week.
Whey Ricotta Cheese
2 gallons fresh whey
1-4 cups whole milk, optional (increases yield)
¼ teaspoon citric acid dissolved in 1/4 cup water, OR 2+ Tablespoons apple cider vinegar or lemon juice
1 teaspoon salt
- Heat the whey to 160F.
- Gently stir in the milk. Continue heating the milk to 180F.
- Quickly and thoroughly stir in the acid of choice for a few seconds. The curds will begin to form a layer on top of the whey.
- Without stirring, allow the cheese to continue to heat until the surface cracks and the whey comes through.
- Remove from the heat and allow to rest for about 10 minutes.
- Line a colander with cheese cloth and ladle the curd into it.
- Tie up the ends and hang for about 30 minutes or until you like the consistency.
- Gently stir the salt in with a spoon.
Lactic Acid Coagulation (Mesophilic & Thermophilic Cultures)
Lactic acid cheeses include Cream Cheese, Chèvre (goat cheese), Cottage Cheese, Fromage Blanc, and Quark. Other dairy made with cultures are Buttermilk, Sour Cream, Crème Fraîche, Mexican Crema, and Yogurt. For descriptions, see Cultured Dairy Products.
(Note: Fromage Blanc is prepared similar to Creme Fraiche, but is made with milk instead of cream for a lower fat. It is also more tart in flavor then Creme Fraiche but can be just as soft in texture so it's able to be used as a topping for soups and fruits or in other similar ways.)
The primary function of cultures is to raise the acidity of milk by absorbing the lactose (a natural sugar found in milk) and transforming it into lactic acid. The acid helps the milk split into particles called curds--an essential ingredient to produce cheese. This is done at much lower temperatures than Direct Acid Coagulations (although the milk may be heated to high temperatures initially to kill of any bad bacteria and denature the proteins, then cooled).
Lactic acid coagulation is basically allowing time and bacteria from your culture to work their magic by converting lactose into lactic acid which curdles the milk and inhibits the growth of undesirable microorganisms. You can make lactic acid cheese, but you should bear in mind that, like yogurt, the longer you let cheese sit during incubation, the tangier it gets. For this reason, you may want to add a few drops of rennet, expecially for milder cheeses like cream cheese, to speed the coagulation process along. Adding a couple drops of rennet cuts the culturing time in half.
Technically, all cheeses can be made without a culture, however cultures are extremely important for influencing the flavor of your cheese. When you use a culture you are telling your milk which bacteria you want working so you get the final product you expect. If you do not use a culture, you could end up with something that looks like cream cheese, but definitely doesn’t taste like it.
There are two main types of cultures used to make cheese: Mesophilic Culture & Thermophilic Culture. Mesophilic Cultures are used for lower temperature cheese (under 90 F.) Any temperature higher and the cultures will start to die. Thermophilic Cultures are used for higher temperature cheeses and start to die over 128F degrees. See Making Homemade Cultured Dairy
Like any living organism, bacteria require a certain temperature range to live and flourish. So recipes for cheeses and other dairy made with with mesophilic cultures and thermophilic cultures add the cultures to the milk when it is at certain low temperature (86 degrees and 120 degrees respectivly), unlike acid coagulated dairy recipes where the milk is heated to a much higher degree.
Note: Some recipes using these cultures heat the milk to 180 - 185 degrees to kill any bacteria that may be present in the milk, but then cool the milk to bring it to the right temperature for the culture. This is important because you want to be sure that the cultures you add to the milk are the only ones that are able to grow.
Also the proteins in the milk denature at high temperatures. Denaturing is the process in which the protein molecules lose their shape and become unfolded. For instance, this can lead to a thicker yoghurt, because the denatured proteins can form a more stable gel. Additionally, by heating the milk to this high temperature, you can also help to break down certain proteins that can make yoghurt too thin. You can skip this step but the results will be a thinner texture to the yogurt.
The reason the milk is not heated any higher is a temperature over 185 degrees will cause formation of thermolytic compounds (amino acid+milk sugar reaction), that can retard the growth rate of yogurt cultures.
The temperature of the mass is of great influence during stirring. Stirring at a higher temperature gives a cheese with a lower moisture content. The temperature should not be too high, a dry 'skin' around the curd particles can hinder coalescence.
Use Mesophilic cultures:
Use Thermophilic cultures: Yogurt
Rennet Coagulation
Acid coagulated and Rennet coagulated cheeses are different. Rennet works by modifying the protein in milk so that it can all hook up together using calcium as a glue. The gel that it makes is relatively quite strong. You get a rubbery, strong cheese.
This is how most cheese, such as cheddar, is made. Rennet set cheese can be soft (camembert, brie) or hard (cheddar, gouda) or young (mozzarella), or old (parmesan).
Rennet is an enzyme found in the stomach of young ruminant animals such as calves and goat kids. Their systems use this enzyme to help digest milk. It coagulates the milk into curds. Microbial and vegetarian sources of rennet are not as reliable as animal sources. Even worse, the other alternative, FPC Enzyme rennet, is a genetically modified organism (GMO.)
You would use rennet coagulation for any cheese where you did not want the bacteria to convert all of the lactose into lactic acid (Lactic Acid Coagulation). That method creates a distinct, tangy flavor which is delicious in many cheeses, but not always desired. Likewise, you cannot use a direct acid to coagulate hard cheeses because the high temperatures needed for the acid to coagulate the cheese would kill off the cultures we are using to steer the flavor of these cheese. One of rennet’s primary functions is to set the curd at a higher pH.
Some mild cheeses such as Gouda and Havarti are made by “washing” the curds. This is simply done by removing a portion of they whey (in the case of Butter Cheese we remove half of it) and replacing it with hot water. This reduces the acidity of the whey used to cook the curds and is what makes these cheeses sweeter.
coliform bacteria infection (do not eat)Coliform Bacteria Infection
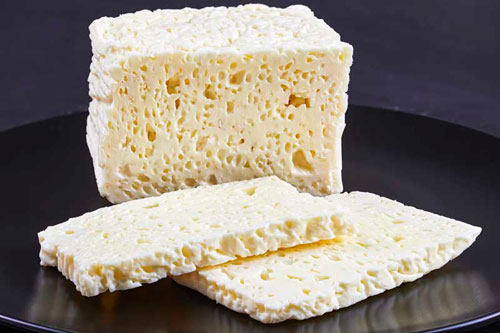
One concern to be aware of when making washed-curd cheese is that it’s more prone to coliform contamination. Do not eat any cheese you suspect has been contaminated. Signs of contamination are cheese blowing out of the hoop, audible fizzy popping sounds when you give the cheese a little squeeze, and an abundance of holes when you cut it. A few holes are perfectly fine. Sometimes a cheese will have holes because the cultures are gas-producing. Sometimes it will be what are known as “mechanical” holes. That’s what mine are from. I’m using a new hoop and suspect I need a larger follower to make better contact during pressing. Coliform contamination looks like a sponge with lots of holes throughout.
Because Gouda is a mesophilic (low temperature) washed-curd cheese it is more prone to coliform than Butter Cheese which is made at a higher temperature with thermophilic cultures.
Mesophilic Culture & Thermophilic Culture
There are two types of cultures used to make cheese: Mesophilic Culture & Thermophilic Culture. Which one you use will depend on the highest temperature used in your cheese recipe. Mesophilic Cultures are used for lower temperature cheese (under 90 F.) Any temperature higher and the cultures will start to die. Thermophilic Cultures are used for higher temperature cheeses and start to die over 128F.
Mesophilic Culture is ideal for making a variety of mellow cheeses such as Monterey, Cheddar, Colby, Jack, Edam, Gouda, etc. Mesophilic is also the most common of the two cultures as it is used to produce the majority of cheeses that cannot be heated up to a high degree. The temperature must be kept 90°F or below.
Thermophilic Culture works well with warmer temperatures between 68-125° F range as it is a heat-loving bacteria. It’s used to make a variety of cheeses soft and semi-soft like mozzarella, and sharper cheeses such as Gruyère, Parmesan, Provolone, Romano, farmstead type cheeses, Emmenthaler, Gruyere, and Swiss and more that can withstand higher temperatures.
There are lesser used cultures used in these type of cheeses.
- Propioni bacteria - Used for the aroma, nutty or buttery flavor, eye formation, and production of Swiss-style cheeses. The eyes are bubbles of carbon dioxide that are produced by bacteria in the cheese.
- Penicillium Candidum - Produce fuzzy, white mold on surface of bloomy rind cheeses including Brie, Camembert, Coulommiers, and a variety of French Goat Cheeses
- Pennicillium Roqueforti - Creates veins, surfaces and flavors in Blue, Roquefort, Gorganzola, and Stilton cheeses. See Grow your own Penicillium Roqueforti
- Brevibacterium linens - Creates an orange coat to cheeses
Using freeze-dried, commercially prepared cultures will result in cheeses with correct flavor for the cheese.
Example: Steps in Making Butterkase
Butter Cheese (Butterkase) is the perfect first hard cheese to make at home. There is no complicated cheddaring or aging process to also learn alongside renneting. It’s a fairly quick hard cheese to make as well and can easily be in the press before lunchtime.
- Sanitize Your Equipment
- Warm the milk to 102F. Do this slowly over medium-low heat. (Shut your burner off for the last few degrees to make sure you don’t go over the target temp.)
- Acidify the Milk. Add the thermophilic culture to the milk and vigorously stir it for a couple of minutes.
- Coagulate the Milk. Add the rennet and stir it slowly but thoroughly for about 30 seconds. Stop the motion of the milk and allow it to sit while the curds coagulate, undisturbed, for half an hour.
- Cut the Curds. Check for a clean break and then cut the curds into ½” cubes with a long curd knife. Create a half-inch grid across the top. Then come them from an angle to cut the long columns of curds you created into cubes. Let them rest for a few minutes to lock in some whey (moisture).
- Release the Whey. Because this is a semi-firm cheese we want to release some whey from the curds but not as much for harder cheeses like swiss or cheddar. You release whey from the curds by warming (cooking) and stirring them. Contrary to popular belief, whey is not actually released during the pressing stage, it must be done in the pot.
- Wash the Curds. While the curds are in the pot with the whey, they will continue to acidify. Because we want a sweeter cheese we remove half of the whey and replace it with an equal amount of hot water. This is called “washing” the curds. When making Butter Cheese the process of releasing the whey is completed in the watered down whey mixture.
- Press the Cheese. Pressing Butter Cheese is done in 3 steps.
- The first pressing actually happens “under the whey” to help form the shape while keeping the cultures warm and reduce the amount of “mechanical holes” in the cheese. (Those are holes left between to curds during pressing or are created by gas producing cultures.)
- The next pressing is done for 30 minutes before flipping the cheese and increasing pressure for the final pressing overnight. These steps remove the whey from between the curds so it won’t have a bitter flavor.
- Brine the Cheese. Submerge the cheese in a saturated brine for 16 hours, flipping it halfway. If your brine is properly made, your cheese should float. Sprinkle a little salt on top and place a weight on top to hold it under the brine. If you make a whey brine, instead of water, it will last longer and you won’t risk leaching calcium into the water if your sodium saturation level is off.
- Form a Rind on the Cheese. Allow the cheese to form a rind by air-drying it on a cheese mat at room temperature for about 3-4 days. Flip it twice a day so the moisture in the cheese is evenly distributed and it dries evenly. You’ll notice when you flip the cheese the bottom side of the cheese is more moist than the top. If you don’t keep it flipping, your cheese won’t have a uniform texture and flavor. You can move on to the next step when the surface is generally dry to the touch, but a clammy hand feel is ok for this cheese since we want it to be moist.
- Age the Cheese. Aging Butter Cheese is simple! Just vacuum seal it and place it in a cheese fridge at 50-55F for 4 weeks or your refrigerator for 6 weeks.
- Let the cheese warm up for at least an hour before trying your cheese. You can expect to get about one less pound of cheese than the number of gallons of milk you use. So 6 gallons of milk in the pot gives you a little over 5 pounds of cheese.
